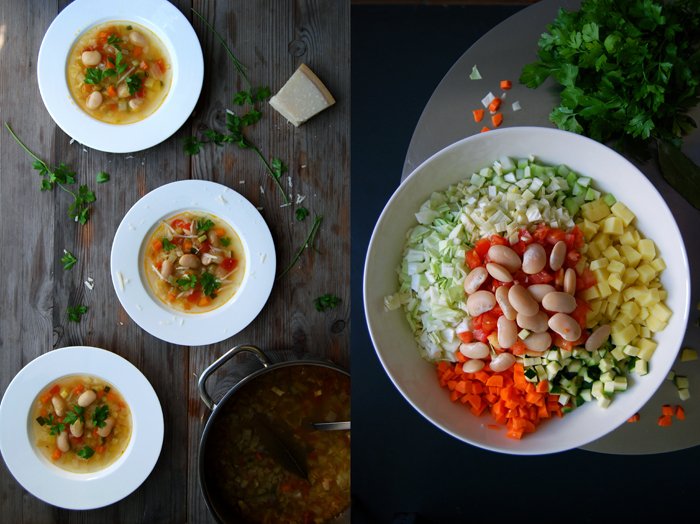
Minestrone alla Genovese with Zucchini, Beans and Parmesan
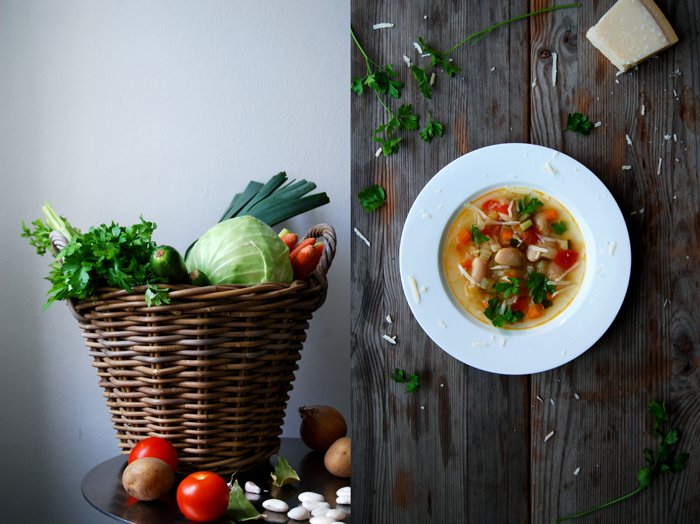
A minestrone simmering on the cooker puts me a into a comfortable mood, the smell and taste reminds me of the kitchens of all the great cooks in my family and it makes me feel at home! I'm very lucky as I'm surrounded by a few women who have mastered the art of a good minestrone.
My Maltese granny Edith cooks her vegetable soup with courgette, marrows and potatoes and I learnt from her that a little parmesan sprinkled on top makes all the difference. The cheese melts into the warming broth and adds a hearty touch to it. My mother goes with the seasons and uses whatever her vegetable garden offers. Beans, cabbage, peas, potatoes, carrots, the list is long and inspiring. She walks through her garden with a big basket in her hand and picks the fruits and vegetables that fit her mood. She taught me to chop everything into small cubes and blanch each vegetable in the broth separately. This way you avoid some vegetables becoming too soggy and soft while others stay crunchy. I don't always do this, sometimes I cook it all at once, it depends on the texture I want to achieve.
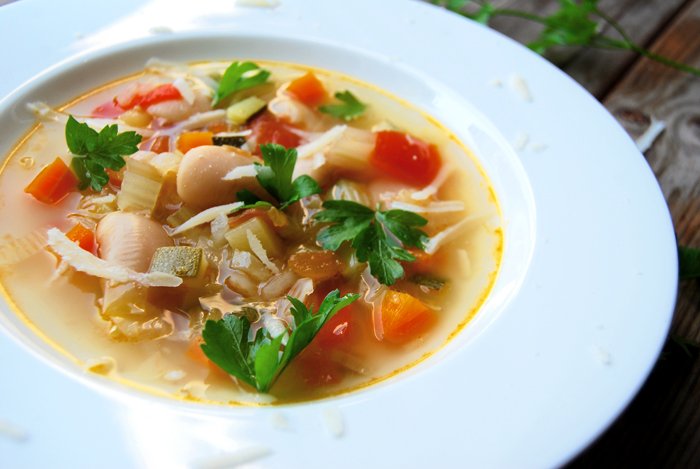
My minestrone never tastes the same, I like to try out new variations and this one was inspired by the north of Italy, the Minestrone alla Genovese! This warming soup is so rich in flavours, cooked with cabbage, dried butter beans, zucchini, carrots, potatoes, fennel, tomatoes, celery and leak, I listened to both women to be rewarded with a very satisfying result, I chopped the vegetables into little cubes which would have pleased my mother but I cooked them all at once for not more than 20 minutes. I just cooked the soaked dried butter beans separately as they needed about an hour. After I filled my flavourful soup into the plates, I scattered some parsley leaves and grated Parmesan over it, thanks to Edith!
When I cook minestrone, I cook lots of it as I like to put a few portions in the freezer for a quick lunch or dinner. Once the chopping is done, it just needs another half an hour, so you might as well prepare a bit more. You could also add some little pasta like Anellini or Risini to make the dish a bit richer.
Minestrone alla Genovese
For a large pot of around 4l / 8.5 pints of minestrone (for about 8-12 people) you need
big dried butter beans, soaked over night, 200g / 7 ounces
large onion, chopped, 1
white cabbage, cut into small cubes, 200g / 7 ounces
carrots, cut into small cubes, 150g / 5.5 ounces
zucchini, cut into small cubes, 150g / 5.5 ounces
leek, cut into small cubes, 100g / 3.5 ounces
potatoes, cut into small cubes, 200g / 7 ounces
fennel bulb, cut into small cubes, 100g / 3.5 ounces
large celery stalk, cut into small cubes, 1
large tomatoes, cut into small cubes, 2
broth, hot, 2.8l / 6 pints
garlic, crushed, 3 cloves
bay leaf 1
salt and pepper
olive oil
Parmesan, grated, for the topping
fresh parsley leaves, a handful, for the topping
In a large pot, cook the soaked beans for about an hour or until al dente, drain and set aside.
In a large pot, heat a splash of olive oil and fry the onion for a few minutes on medium heat till golden and soft. Add the garlic and cook for 1 minute. Add a little more oil and the chopped vegetables, stir and cook for 1-2 minutes. Add the hot broth, the beans and bay leaf. Season with salt and pepper and cook for 20 minutes. Season to taste and serve sprinkled with Parmesan and parsley.

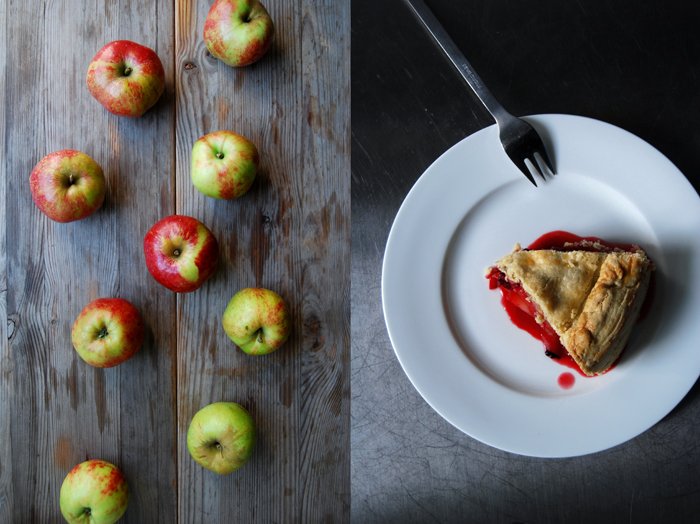
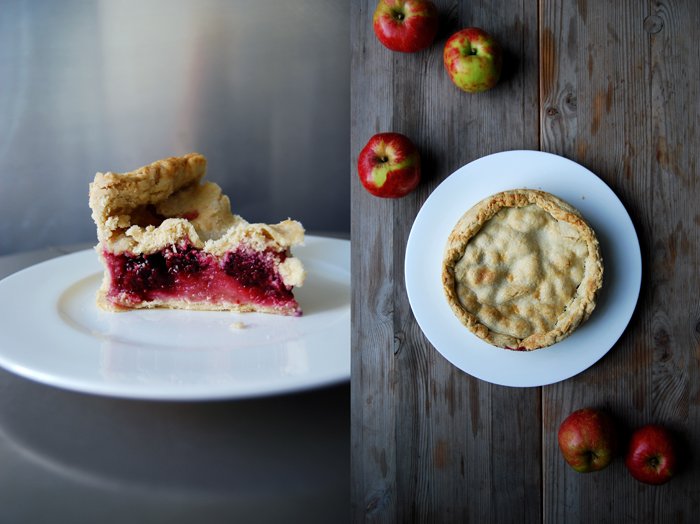
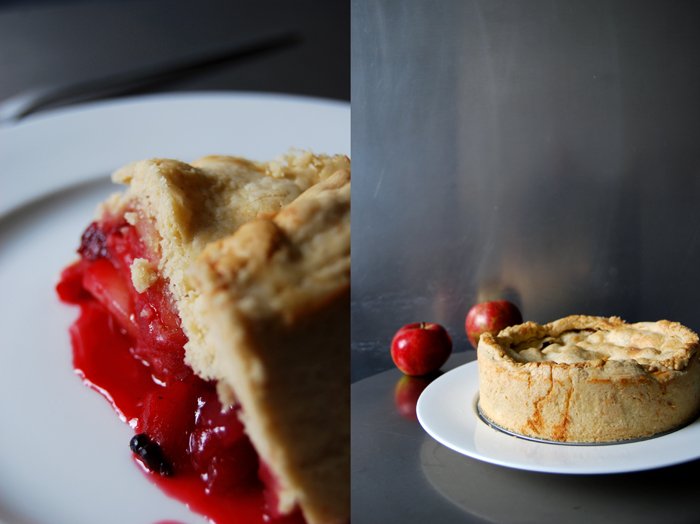
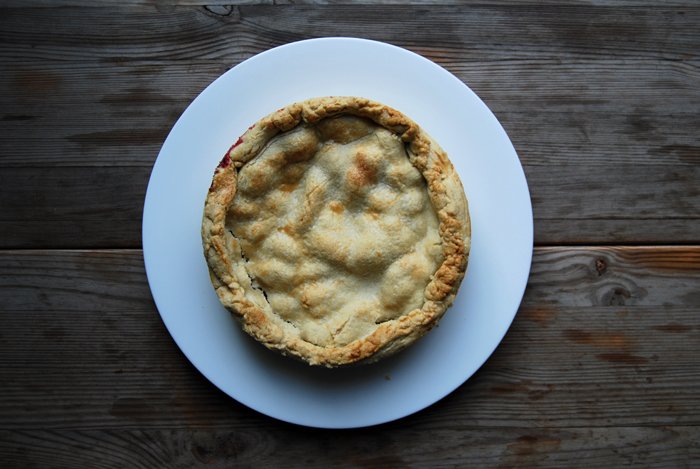
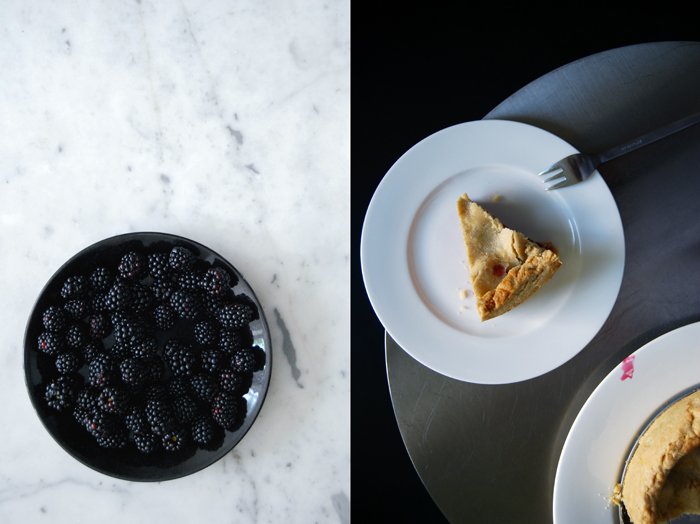
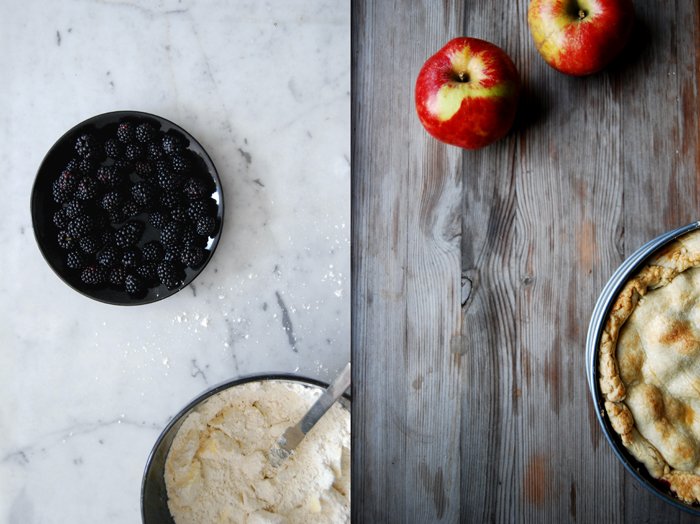
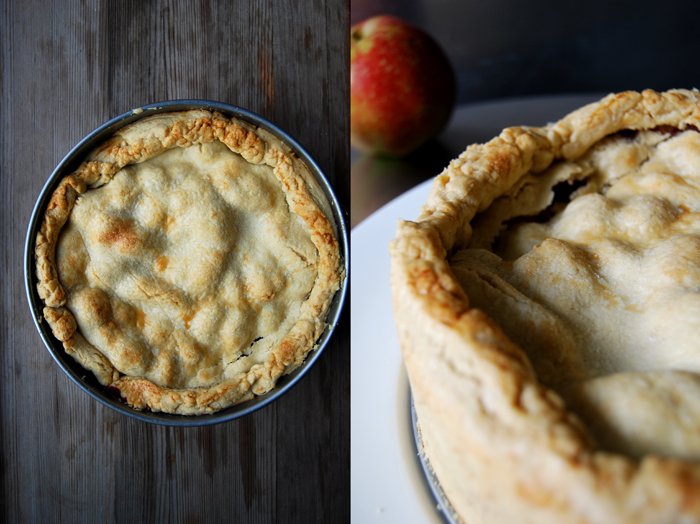
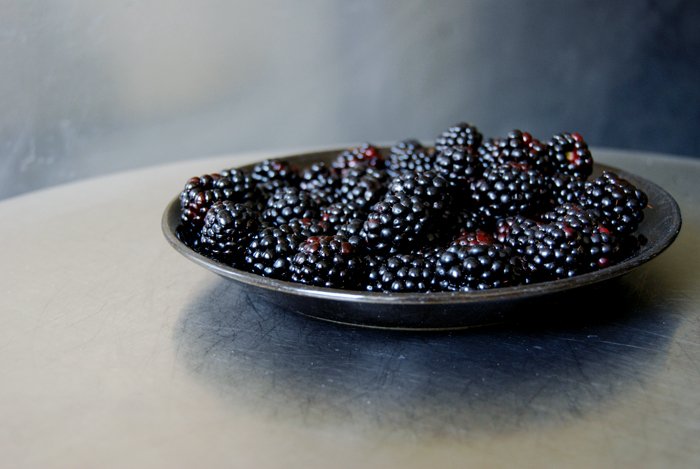
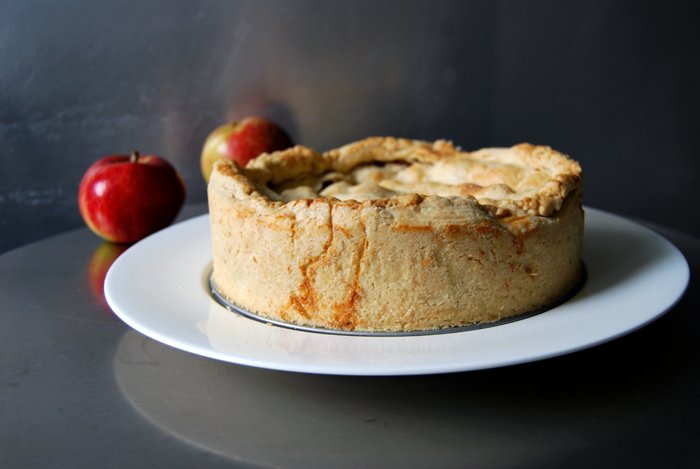
Blackberry and Apple Pie
Glorious weather, food and friends, it was a perfect weekend! Last week, an old friend of mine from my days at university came to visit us and I was so excited as we hadn't seen each other in years! She moved to LA a long time ago where I've only visited her once but a year ago she decided to head over to Costa Rica together with her family, so we're even further apart from each other now. When she finally stood at the door with her two children, I couldn't believe it! It was such a strange feeling to meet the little ones who I only knew from pictures and skype, but they felt so familiar. This is such a weird thing about the internet, you can be so far away and still feel so close!
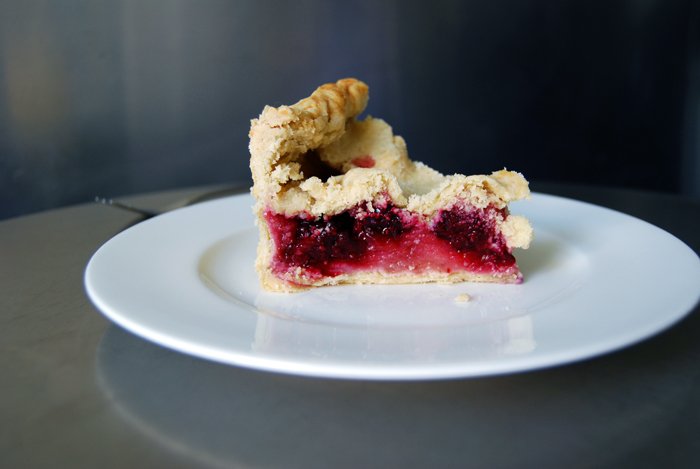
Before the young family arrived I decided to bake, not only a cake but a pie, the ultimate sweet comfort food. I needed to calm down and nothing beats a pie in a situation like that! The result was a thin layer of buttery short crust wrapped around a juicy filling of apples and blackberries. I've made many apple pies in my life but this was the first time that I tried this English classic with the dark berries. They add a sweet juiciness and melt together with the apples to a very unique composition. It reminds me a bit of plums or pears but it's still different, they create a new taste which is hard to describe.
The fruity filling was so full of red juices that I was a bit worried about the pastry. For no reason, the short crust didn't soak it all up or get too soggy, it was still crunchy. It was all good, even more so, it was delicious! Just the first piece which I cut off impatiently when the pie was still hot was a bit soft, it's best to let it sit for a while which is almost impossible as it smells too good!

Apple and Blackberry Pie
For a 20cm / 8" springform pan you need
For the filling
sour baking apples (such as Boskoop), peeled, cored, quartered and thinly sliced, 600g / 21 ounces
blackberries, 200g / 7 ounces
granulated sugar 5 tablespoons
ground cinnamon 1 teaspoon
plain flour 2 tablespoons
For the pastry
plain flour 260g / 9 ounces
granulated sugar 1 teaspoon
a pinch of salt
ground cinnamon 1/4 teaspoon
butter, cold, 70g / 2.5 ounces
vegetable shortening, cold, 70g / 2.5 ounces
cold water 1 tablespoon
For the glaze
milk 3 tablespoons
granulated sugar 1 heaping teaspoon
For the pastry, combine the dry ingredients. Cut the butter and vegetable shortening with a knife into the flour until there are just little, crumbly pieces left. Continue with your fingers and quickly work the buttery pieces into the flour until combined. Add the water, continue mixing with the hooks of your mixer until you have a crumbly mixture. Form 2 discs, dividing them roughly 2:1, wrap in cling film and put in the freezer for 10 minutes.
Set the oven to 200°C / 390°F (top / bottom heat).
Take the dough out of the freezer, put the smaller disc in the fridge and roll out the bigger one. Roll out a circle big enough to line the bottom and the sides of the springform pan, overlapping the rim about 1 cm / 1/2 ". Put the pan with the pastry in the fridge.
For the filling, combine the sugar and cinnamon and mix with the apples. Take out the pan with the pastry and fill with 1/3 of the apples, sprinkle with 1 tablespoon of flour and add half of the berries. Add another layer of apples, 1 tablespoon of flour and the remaining berries and apples on top. Roll out the remaining disc, a bit bigger than the springform pan and lay on top of the apples. Gently push the sides onto the bottom layer of pastry, sealing it by rolling it inwards. Brush the top with milk and sprinkle with sugar.
Bake the pie for 15 minutes, turn down the heat to 175°C / 350°F and bake for another 40 minutes or until the pie is golden on top. Take it out and let it sit for 10 minutes.
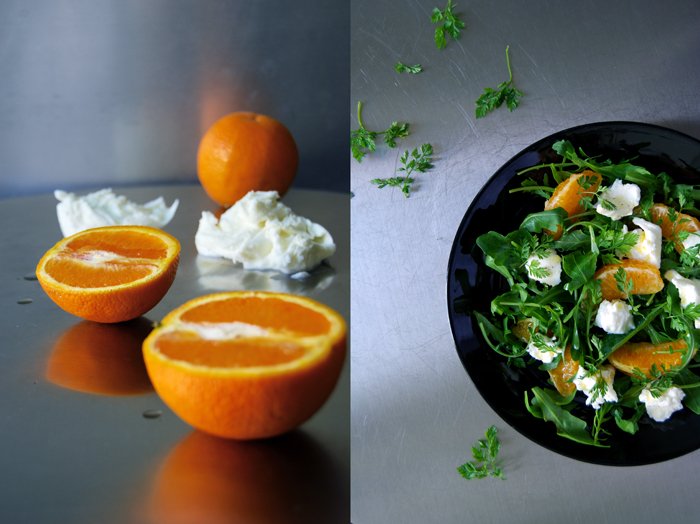
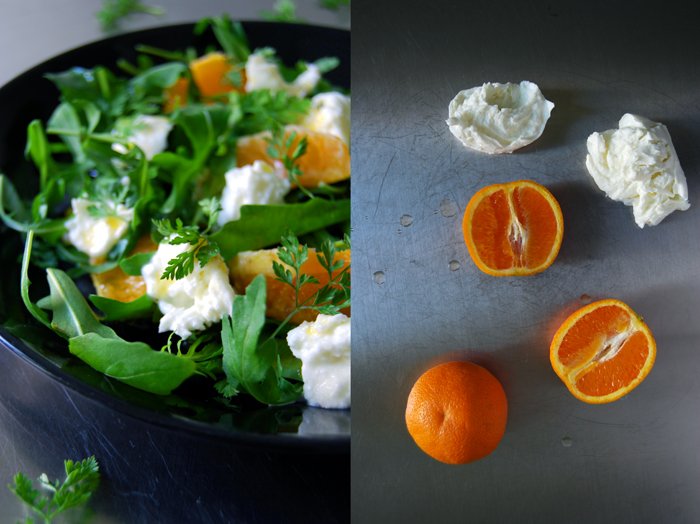
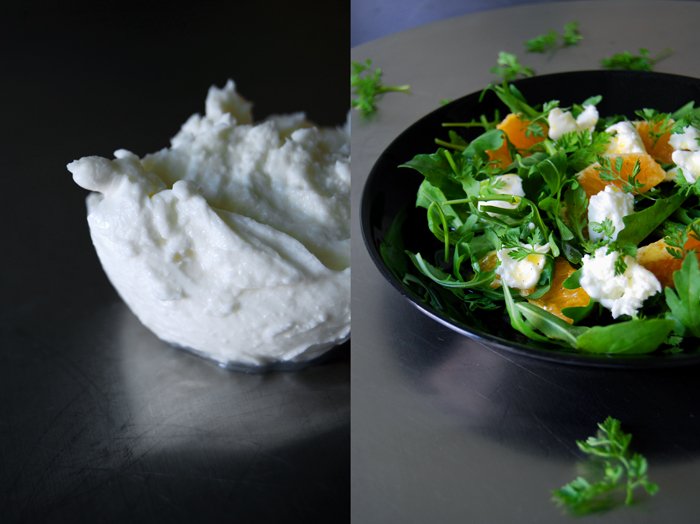
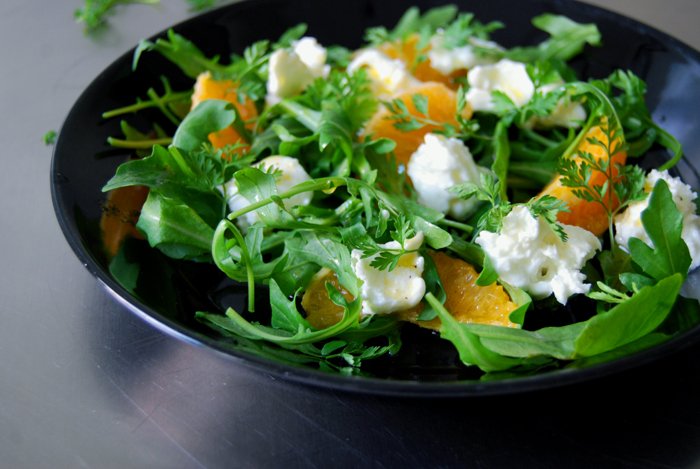
Mozzarella di Bufala, Rucola, Orange and Chervil Salad

Mozzarella di Bufala, as creamy as a fresh Burrata, Italian oranges dripping with sweet juices, crunchy rucola (arugula) leaves, delicate chervil (Kerbel in German) and a fruity vinaigrette! This salad is luscious and fresh, a perfect combination of green, fruity and milky flavours.
It's a light culinary break while I'm bustling in my kitchen on the weekend, my little weekly feast when our meals become a bit more lavish and sumptuous. We spend even more time sitting at the table extending our dinners with some cheese, fruit and chutney before we finish it off with dessert. Good food and company, some music, a nice bottle of wine, it's so easy to celebrate those moments when everything feels just right! The end of the week is also my favourite time to bake and to fill the air with the smell of fresh bread, cinnamony cakes and cookies, that's my kind of wellness treat. So, to fully enjoy my numerous kitchen creation, I keep my breakfast and lunch lighter than normally but not necessarily more simple and spartan. I just focus on a few delicate ingredients, like in this salad.
Mozzarella di Bufala, Rucola, Orange and Chervil Salad
For 2-3 people you need
Mozzarella di Bufala, torn into pieces, 125g / 4.5 ounces
orange, peeled and cut into slices, 1
rucola (arugula) leaves, a big handful
chervil (Kerbel), the leaves of a small bunch
olive oil 3 tablespoons
white balsamic vinegar 1 tablespoon
freshly squeezed orange juice 1 1/2 tablespoons
salt and pepper
Whisk the olive oil, vinegar and orange juice and season with salt and pepper to taste.
Arrange the rucola, orange and mozzarella on plates and sprinkle with dressing and chervil.

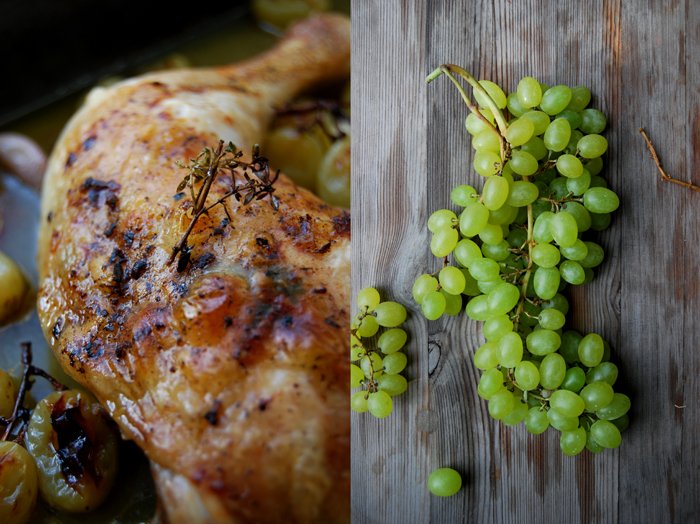
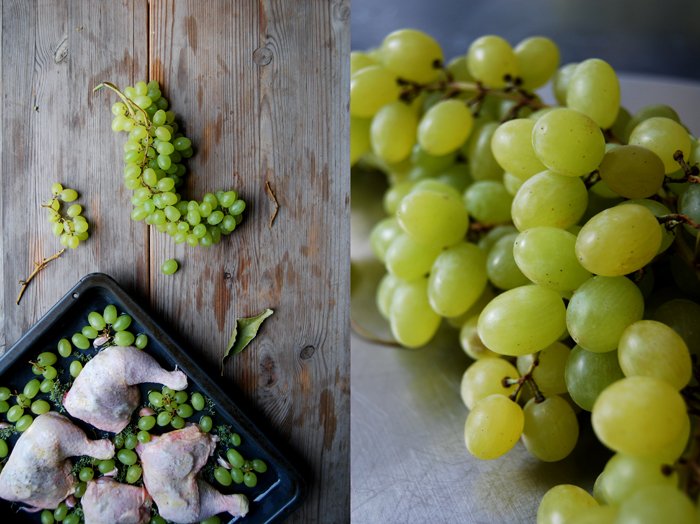
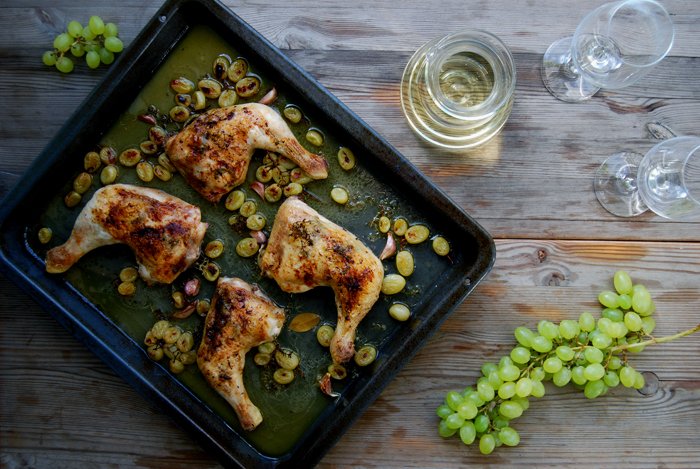
Moscato Chicken with Grapes and Thyme
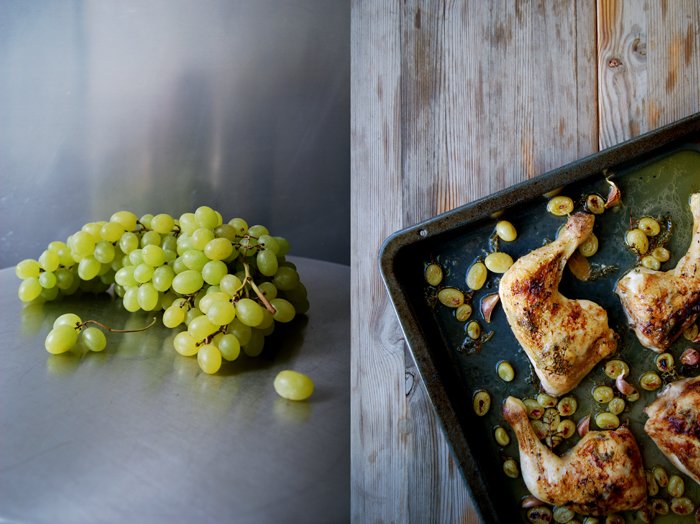
A luscious sauce needs time, herbs, spices and wine but sometimes a good 20 minutes in the oven works just as well, when there are chicken legs, Moscato grapes and wine, thyme, bay leaf and garlic on the tray. The meat's roasting juices mix with the sweetness of the fruit and wine and turn into a heavenly rich sauce. We left the roasting pan clean and spotless after we soaked up the last drops with fresh baguette!
This recipe needs lots of garlic! I pushed some thin slices of garlic together with some small sprigs of thyme under the chicken's skin to infuse the meat with their aroma. I also cooked quite a few whole garlic cloves in their skin on the tray which makes a wonderful smooth paste. It tasted so good spread on a slice of bread with a couple roasted grapes and a piece of tender chicken with its crisp skin!
I like to cook with Moscato wine a lot, I use it often in my kitchen as it adds a mellow fruitiness. A Pinot Gris or a Riesling would also be nice for this recipe but it comes down to your personal preference and how much you want to invest in your sauce. Personally, I believe that the wine you use for cooking can easily be more simple than the one you fill into the glasses to accompany your dinner.

Moscato, Grape and Thyme Chicken
For 2-4 people you need
chicken legs 4 (around 1.2kg / 2.5 pounds)
sweet green grapes (like Moscato grapes), on their stalks, 250g / 9 ounces
thyme sprigs, a small handful
garlic, 8 cloves in their skin and 2 cloves cut into very thin slices
fruity white wine (like Moscato) 250ml / 8.5 ounces
small bay leaves 4
olive oil
flaky sea salt
pepper
Set the oven to 200°C / 390°F (I use the Rotitherm setting which works perfectly for poultry).
Spread the chicken legs on a baking dish or tray and push a few thyme sprigs and slices of garlic under the skin of each of them. Rub them on all sides with olive oil and season with sea salt and pepper. Arrange the grapes, garlic cloves and thyme around the meat, put 1 bay leaf under each chicken leg, sprinkle with a splash of olive oil and pour the wine over the meat and fruits.
Cook the chicken legs in the oven for about 20 minutes or until golden brown, pour some of the juices over the meat a couple times while it's cooking. After 20 minutes, check the meat with a skewer, only clear juices should come out. Turn the grill on for a few minutes until the skin starts sizzling and turns dark and crisp. Serve with baguette.
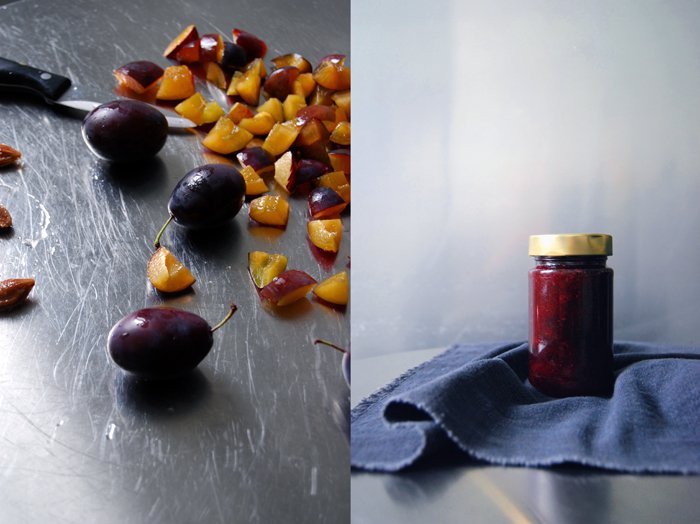
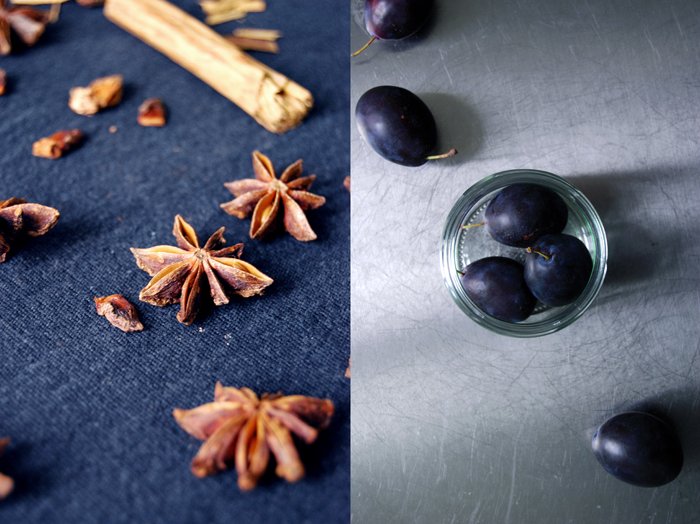
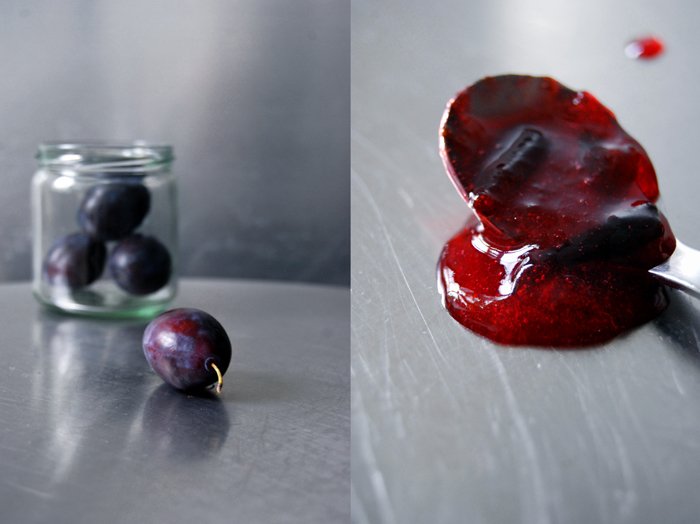
Tyrolean Plum Jam with Cinnamon and Star Anise

This is the kind of jam I would eat for breakfast in the mountains, in an old wooden hut, the morning table strewn with rustic delicacies, thick slices of a hearty loaf of bread, Tyrolean prosciutto, strong cheese, rich butter and this dark jam. It's very fruity and concentrated. The purple fruits cook for around 20 minutes with cinnamon and star anise which gives this thick spread a warm autumn touch (I don't really like to call it wintery yet, it's still too early in the year). The little pieces of the fruits' skin curl up and turn into caramelised fruit bites, delicious!
For my jams, spreads and chutneys, I always try to find the ripest fruits possible, it makes such a difference in taste! Especially when it comes to plums which develop the best side of their strong aromas when they start to soften. Natural sweetness, that's all you need! A hard and sour fruit won't develop its whole range of flavours in a jam.
I call this my Tyrolean Plum Jam as my mountain memories lie in Corvara in the Alta Badia region in South Tyrol. We used to spend many winter holidays in the Italian Dolomite Alps when I was a child, a time of hearty mountain food, aromatic cakes and strudels and some of the best breakfast tables I've ever had!
Tyrolean Plum Jam with Cinnamon and Star Anise
When you cook jam you should always use a tall pot to prevent the jam from boiling over. The fruits will be two to three times as high when they’ve reached boiling point! My pot is 24cm / 9.5″ high and 20cm / 8″ wide.
For 3-4 medium sized jars you need
ripe dark plums (preferably damson plums), pitted and chopped, 1kg/ 2 1/4 pounds
granulated sugar 600g / 1 1/4 pounds
star anise 4 single pieces
ground cinnamon 3 heaping teaspoons or 1 cinnamon stick
Sterilize the jars and lids in boiling water for 5 minutes. Dip the rims of the jars in spirit and wash out the lids, wash the ladle (you will use to fill the jars) with the alcohol as well. If you can get a thick foil for jam jars (thicker than cling film), cut out 3-4 circles roughly the size of the jars and put into the spirit as well.
Put the fruits, sugar and spices in a pot and bring to the boil, stirring with a long wooden spoon every now and then. When the boiling point is reached (you should see quite a few bubbles coming up), let the jam boil for 20 minutes, carefully stirring a couple times (without burning your hand, hence the long spoon!).
Take the pot off the heat and fill the prepared jars with the sterilized ladle almost to the top. Cover with the circles of foil and close tightly immediately. Let the jam sit for a day (or even a month) before you put it on your breakfast table and store the jars in your pantry.

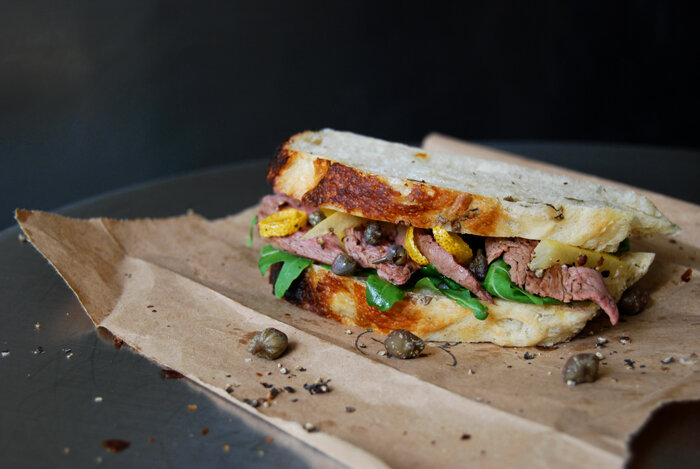
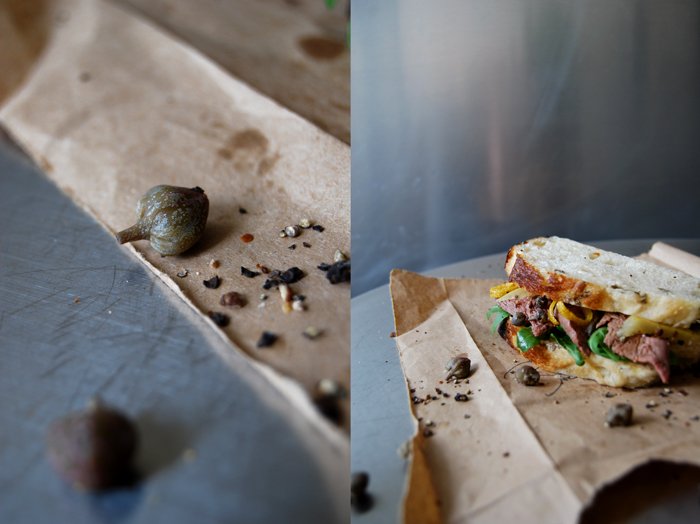
Juicy Lamb, Moroccan Lemon and Caper Sandwich
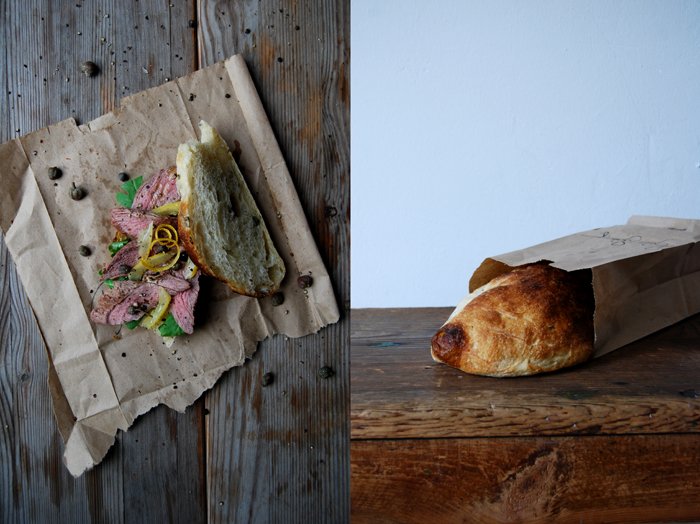
Maltese capers, dried tomatoes, wild fennel seeds, honey and sea salt, these were just some of the goods I took home with me from my last trip to the Mediterranean island and these were also the ingredients I offered Malin from The Bread Exchange to choose from for our next sandwich. The sourdough queen went for salty capers and then it was my turn to come up with an idea for our next eat in my kitchen x The Bread Exchange creation.
Malin called me in the morning when the bread was done, after a night without much sleep as she had to get up a couple times to take care of her caper sourdough bread. I jumped on my bike excitedly to meet her in her kitchen which was already filled with the sweetest smell of freshly baked bread when I arrived. When she showed me her beautiful loaf of bread, juicy and spongy on the inside as always, refined with capers and the amazing oily crust that Malin mastered to perfection, I couldn't wait to get started in my kitchen! A colourful composition of a few strong flavours, a wave of tastes on the tongue, that was my idea when I held the warm bread in my hands.
This inspiration led to a rich sandwich voluptuously stuffed with tender slices of lamb fillet, cooked for just a few minutes to keep it pink on the inside, thin strips of my Moroccan preserved lemons, crisp lemon peel roasted in olive oil (I used both the infused oil and the rind), salty capers and spicy rucola leaves. This was one of those moments when I wasn't sure if I went a bit overboard with the flavours, especially when they are all so powerful on their own. But the first bite cleared any doubts, there wasn't too much of anything, it was just right!
This sandwich has been featured on Food52!


Lamb, Moroccan Lemon and Caper Sandwich
For 4 sandwiches you need
the best sourdough bread you can get, 8 thick slices
lamb fillet 250g / 9 ounces
Moroccan preserved lemons, cut into thin strips, 1/4
lemon peel, 6 long strips
olive oil 3 tablespoons plus more for frying
capers, rinsed and drained, 1 heaped tablespoon
rucola (arugula) leaves, a small handful
black peppercorns, crushed in a mortar
salt
Set the oven to 200°C / 390°F.
In a small baking dish, mix 3 tablespoons of olive oil with the lemon peel and roast in the oven for 6 minutes or until the lemon is crisp and golden (it shouldn't be brown!). Set the oil and roasted peel aside.
In a heavy pan, heat a splash of olive oil, season the lamb fillet with salt and pepper and brown for 1 1/2 -2 minutes on each side. The meat should stay pink to keep its juiciness. Wrap the fillet in aluminum foil and set aside for a few minutes.
Drizzle a little of the lemon oil on a slice of bread and cover with a few rucola leaves. Cut the lamb fillet into thin slices and spread on top of the greens. Scatter over some strips of Moroccan lemon, roasted lemon peel, capers and lemon oil. Sprinkle with some crushed black pepper and close with another slice of bread.
Here are more eat in my kitchen x The Bread Exchange sandwiches:


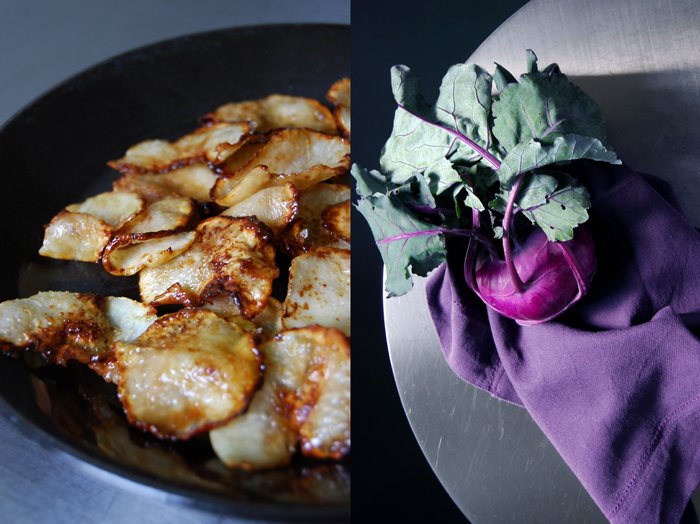
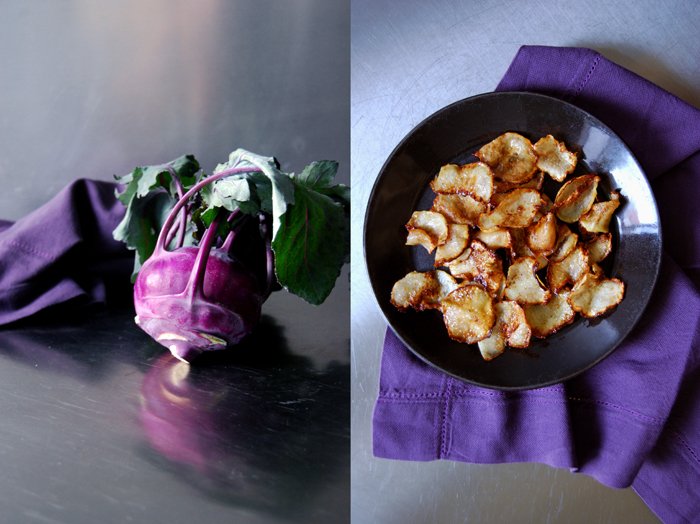
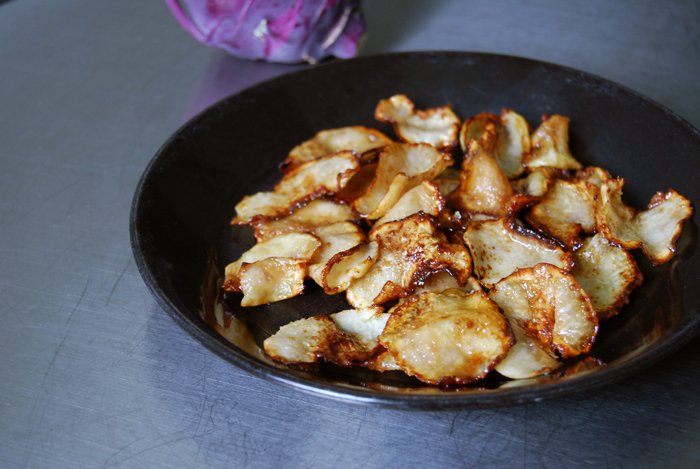
Caramelized Kohlrabi Chips
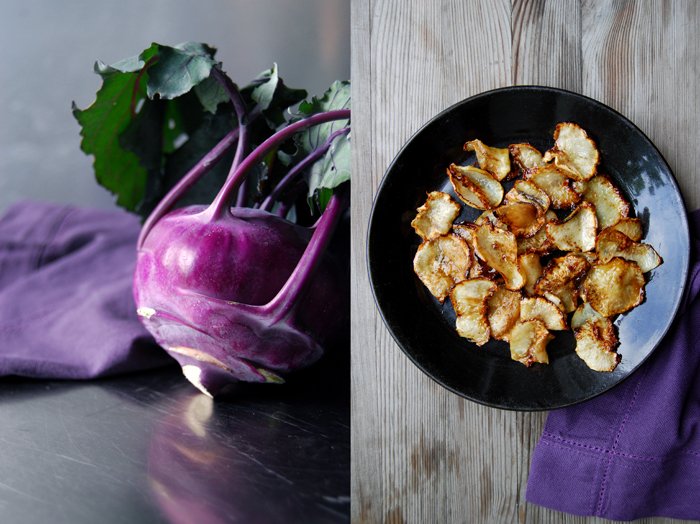
After I stared at this stunning vegetable, a glowing purple kohlrabi, for about five minutes, I could see them right in front of my eyes: sweet, caramelized kohlrabi chips! Thin and sticky with crispy edges!
Normally I buy green kohlrabi as that's what I find at the market most of the time and to be honest, there isn't really a difference in taste, but the deep colour, somewhere between red, blue and the faded green of the leaves makes me grab this one whenever I see it. As soon as it's cut and sliced there isn't much left of its outstanding beauty but that doesn't matter, the taste makes up for it. Especially when the paper thin slices turn into chips which combine the hearty taste of cabbage with the bitter sweetness of caramel.
Caramelized Kohlrabi Chips
For a sweet nibble for 2 you need
kohlrabi, peeled and thinly sliced with a cheese or vegetable slicer, 160g / 5.5 ounces
butter 1 1/2 tablespoons
granulated sugar 1 tablespoon
In a large heavy pan, melt the butter and sugar on a medium-high heat, add the vegetables and spread them flat next to each other. Cook for 2-3 minutes, turn and cook for another minute until golden brown on both sides. Take the chips out and spread them on kitchen roll for just a few seconds. Don't let them cool on the paper or they will stick to it. Nibble cold or warm.

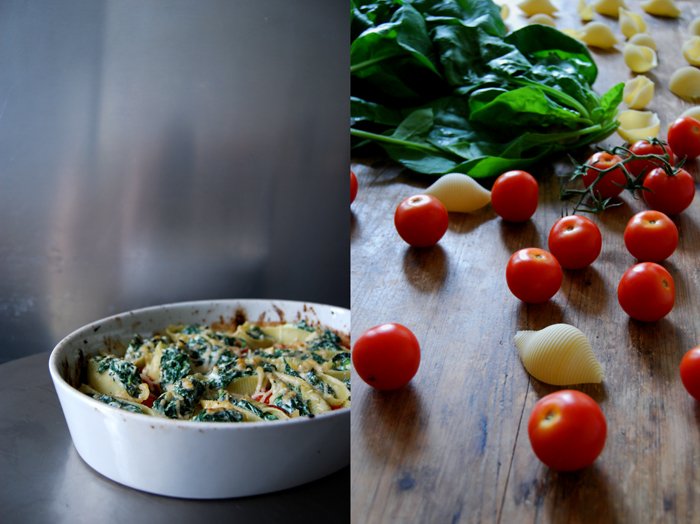
Spinach Ricotta stuffed Conchiglioni on Grilled Cherry Tomatoes
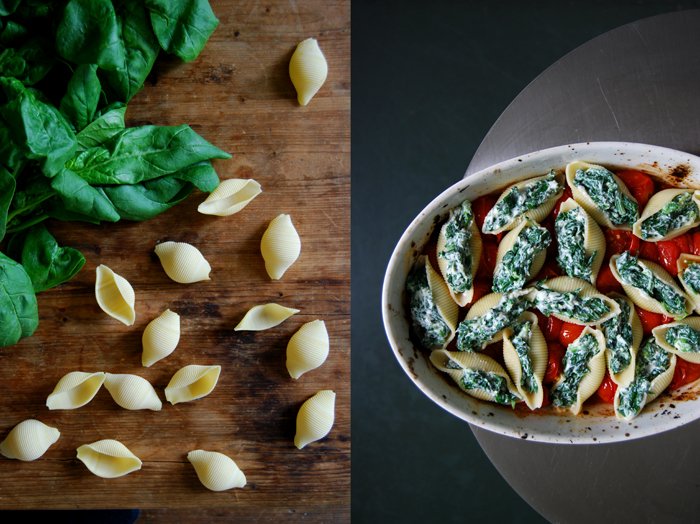
The trilogy of spinach, ricotta and tomatoes is one I use a lot for my pasta dishes, be it in lasagna, ravioli or canneloni. And if I need a really quick dinner I go for conchiglioni, the pretty pasta shells. It's so convenient to stuff these little beauties with all kinds of sauces and vegetables, a thick Bolognese or Ratatouille, mashed pumpkin or a tuna stew, they deliciously carry whatever I choose to fill them with! I also like that I can cook them in advance and just bake them with some cheese under the grill to warm them up, another easy solution for a spontaneous dinner party!
For this recipe I can skip all of the preparations that my classic lasagna requires, no Béchamel, no slow cooked red or meat sauce. I just put a bunch of cherry tomatoes under the grill until their skin starts to burst, it's the same preparation that I used for my orecchiette recipe in July. The roasted fruits are so soft and sweet that I only need to stir in some olive oil, Balsamico vinegar, salt and pepper to turn them into an aromatic and juicy sauce. I spread the conchiglioni on top of the tomatoes in the same dish as soon as they are done, lusciously stuffed with blanched spinach and creamy ricotta and sprinkled with Parmesan. Another 3 minutes under the grill and dinner is served!


Spinach Ricotta stuffed Conchiglioni on Grilled Cherry Tomatoes
For 3-4 people you need
conchiglioni, cooked al dente, around 25 pasta shells
spinach, the hard stems cut off, cleaned, 400g / 14 ounces (mine weighed 600g / 21 ounces before I prepared it)
ricotta 200g / 7 ounces
cherry tomatoes 500g / 1 pound
balsamic vinegar 1 teaspoon
olive oil 2 tablespoons
nutmeg, freshly grated, to taste
salt and pepper
Parmesan, grated, around 40g / 1.5 ounces, for the topping
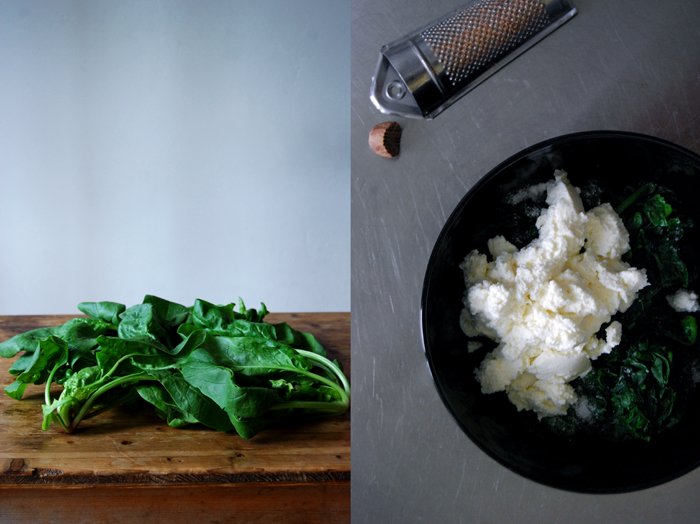
In a large pot, bring salted water to the boil. Blanche the spinach for 1 minute, rinse with cold water in a colander, drain and squeeze out the water with a spoon. Chop the spinach roughly, mix with the ricotta and season with salt, pepper and nutmeg to taste.
Put the cherry tomatoes in a baking dish (big enough to spread the stuffed conchiglioni on top when the tomatoes are done) and roast the fruits under the grill for 15 minutes or until their skin starts to burst, turn them once or twice. When the tomatoes are done, stir in the balsamic vinegar and olive oil, season with salt and pepper and gently squeeze the tomatoes with a spoon.
Fill the pasta shells with the spinach ricotta stuffing, spread them on top of the tomatoes and push them gently in between the tomatoes. Sprinkle the shells with the Parmesan and some more pepper and put under the grill for around 3 minutes or until the cheese is melted and golden brown. Like with lasagna, it's best to let the dish sit for a few minutes before serving.


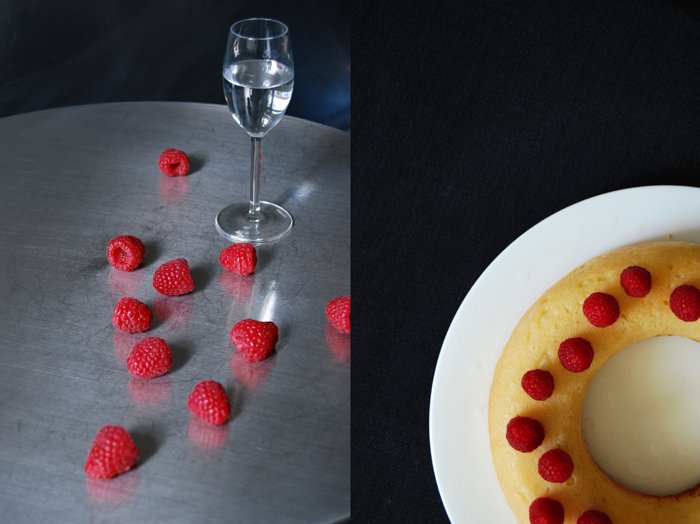
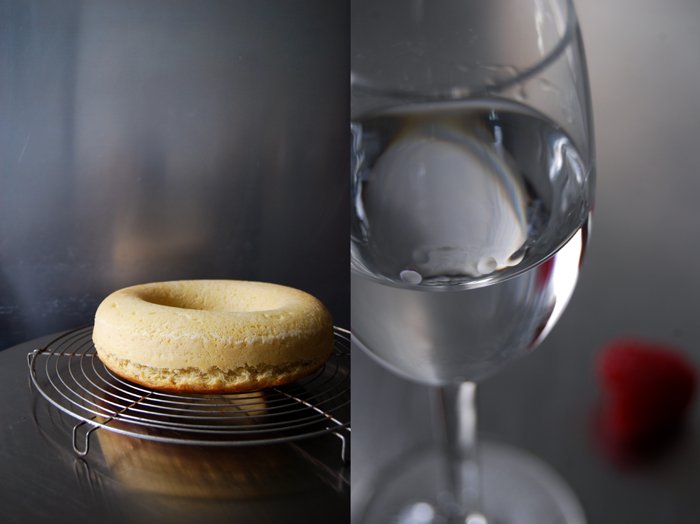
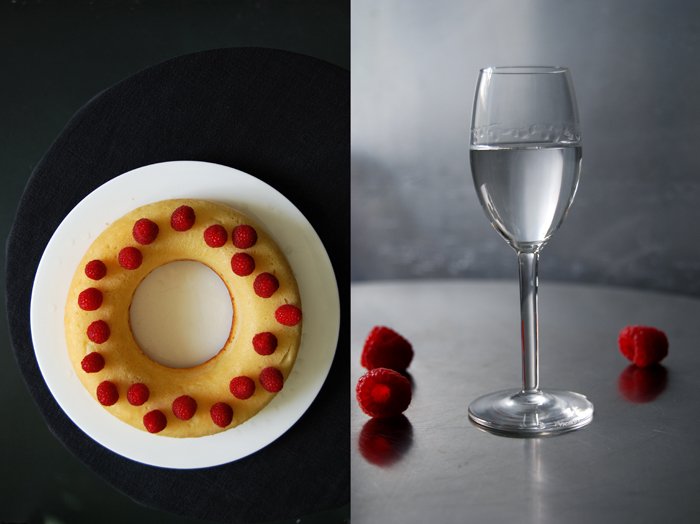
Raspberry Savarin or a giant Rum Baba
Giorgio's Cafe is a busy bistro in Malta on the Sliema promenade where I love to go for a morning espresso. It's right opposite Valletta and you can see the capital's majestic bastions right across Marsamxett Harbour. Just sitting there, enjoying my breakfast and watching people passing by is one of my favourite Saturday morning activities when I'm on the island. On that day of the week, lots of Maltese ladies meet at Giorgio's amongst a few business men for a little break and a snack in between their weekend shopping. Everybody is dressed up, the mood is chatty and you can see the season's latest sunglasses collections presented at every table. It's a wonderful Mediterranean scene, la dolce vita!
It wouldn't be one of my most beloved cafes on the island if there wasn't a culinary treat involved. In this case, it's Rum Baba, a little yeast cake soaked in syrupy liqueur topped with fresh fruits! It's sticky and sweet. The cake is so saturated in syrup that it feels like a soaking wet sponge when you cut off a piece. I've been wanting to make a lighter version of this sweet dish for years, in a bigger pan and with less syrup, in essence, a Savarin which is like a giant Rum Baba. The only difference between the two cakes is the size and the amount of syrup, apart from that, both use the same rich yeast dough which is similar to a brioche. Another recipe that I will share with you in the next few weeks!
I prefer to use less syrup as it's so sweet that it can easily become too dominant in this composition and you wouldn't be able to taste the cake anymore. To accompany my fruits, slightly tart, delicate raspberries, I used a liqueur also made of the red berries, a German Waldhimbeer Geist which is a traditional spirit made of wild raspberries. I cooked the liqueur with Riesling wine, sugar, lemon juice and water for a few minutes to turn it into an aromatic syrup. It wasn't just sweet, it was rich in flavours! Some Savarin and Rum Baba recipes add whipped cream, which is nice too but it takes away a bit of the fresh touch that the fruity cake has without it. For me, it depends on my mood and the weather, the colder it gets the more I like rich cakes. If it's a warm day I like my tea time treat light and fruity!

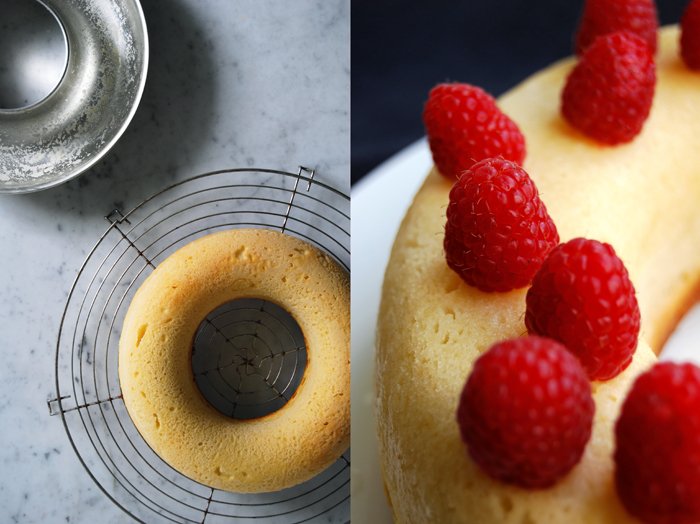
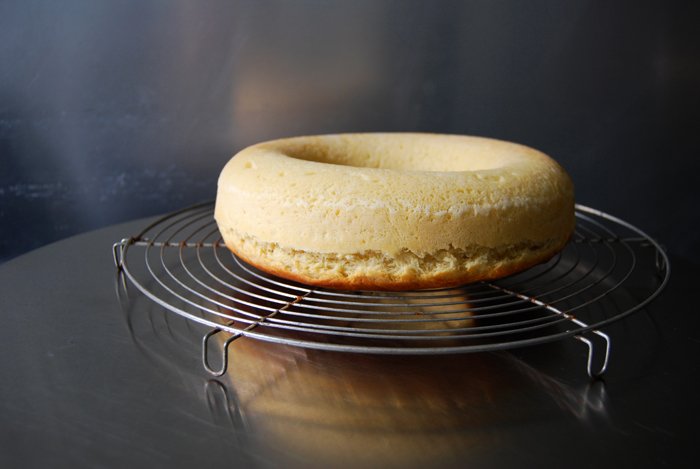
Raspberry Savarin Cake
For a 1 litre / 2 pint Savarin or Bundt pan you need
For the topping
raspberries 125g / 4.5 ounces
For the cake
plain flour 210g / 7.5 ounces
dry yeast 2 teaspoons
granulated sugar 30g / 1 ounce
a pinch of vanilla
a pinch of salt
milk, lukewarm, 80ml / 3 ounces
butter, melted, 80g / 3 ounces
organic eggs 2
In a large bowl, combine the flour, yeast, vanilla, salt and sugar. Whisk the milk, melted butter and eggs, the temperature should be lukewarm! Add the liquid mixture to the dry ingredients and mix with your dough hooks for a few minutes until well combined, on high speed for the last minute. The dough will be thick but runny. Cover with a tea towel and let the dough rise in a 35°C / 95°F warm ( top / bottom heat, no fan!) oven for 45 minutes.
Butter the cake pan, dust with flour and fill the dough (best with 2 tablespoons) into the pan. Even out the top, cover with a tea towel and let it rise for 20 minutes in a warm place.
Set the oven to 200°C / 390°F (top/ bottom heat).
Bake the cake for 20 minutes or until golden on top. Check with a skewer, it should come out clean. Let the cake cool for a few minutes and take it out of the pan.
For the syrup
white wine (preferably Riesling) 100ml / 3.5 ounces
fruity schnaps (preferably raspberry) 60ml / 2 ounces
freshly squeezed lemon juice 30ml / 1 ounce
water 60ml / 2 ounces
granulated sugar 100g / 3.5 ounces
In a sauce pan, mix the ingredients for the syrup, bring to the boil and cook down for 2 minutes.
The Savarin
Pour the warm syrup into a pot or dish just big enough for the cake to fit in. Put the warm cake into the pot with the syrup (the soft, top side of the cake first). Gently turn the pot around a little to help the cake soak the syrup. After the syrup is completely soaked (after around 15-20 minutes), put a big plate on top of the pot and turn it around, carefully but quickly! Top with the fruits and serve with or without whipped cream, as you prefer.

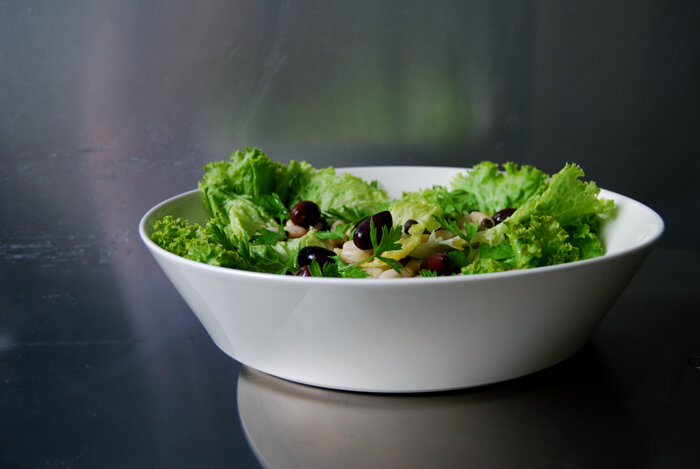
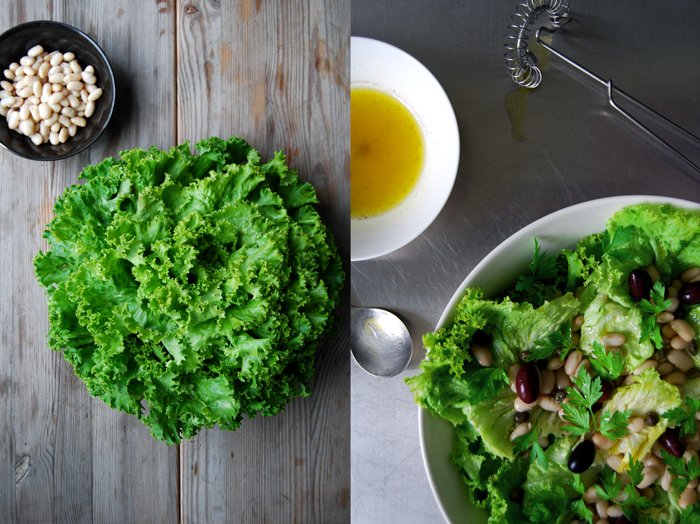
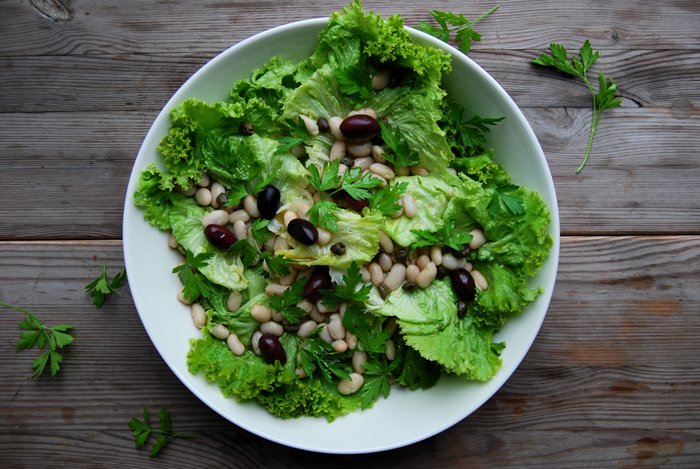
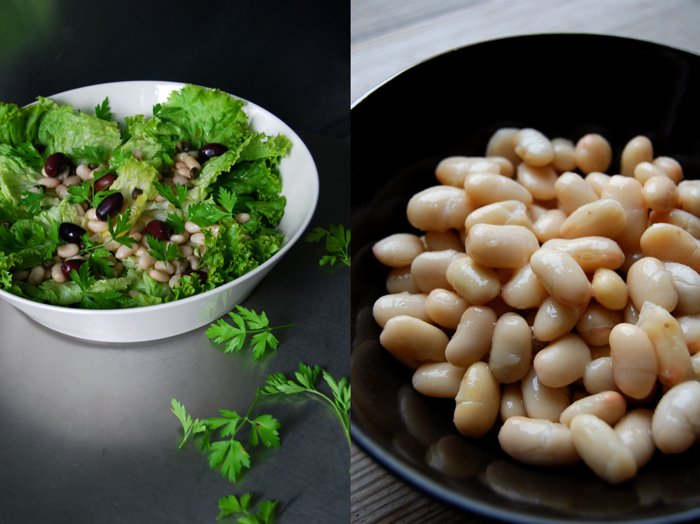
A Salad with Greens, Cannellini Beans, Capers and Olives

Some days call for a quick salad and today is one of them, a little snack at noon!
We had a friend over from Costa Rica for a couple nights with her two young kids, so my kitchen creations had to be child friendly. Lasagna, pizza and cake made them very happy (I didn't expect anything else)! We were lucky, summer has come back to the city so we spent many hours out at playgrounds, lots of walking and running around for those little legs which made them hungry all the time!
It was only a short visit but we enjoyed every second of it! Now that they left, the flat is quiet again and I feel like some lighter food. I hadn't made any kitchen plans so I had to work with what I found and inspired me, a big lollo bionda lettuce in the fridge, some parsley on the kitchen window sill, a small can of cannellini beans, my Maltese capers and some black Kalamata olives (this jar is never missing in my pantry). All this thrown together in a large bowl and mixed with a light vinaigrette can make two people very happy. You could also add some canned tuna or tomatoes but I found my Saturday snack perfect as it was.
A Salad with Greens, Cannellini Beans, Capers and Olives
As a lunch for 3 or a side dish for 4 you need
lettuce (lollo bionda or rosso), rinsed, dried and torn into pieces, 1 big head
canned cannelli beans, rinsed and drained, 240g / 8.5 ounces
Kalamata olives 12
capers 4 tablespoons
leaves of a small bunch of parsley
For the dressing
olive oil 3 tablespoons
white balsamic vinegar 2 tablespoons
salt and pepper
Whisk the ingredients for the dressing and season to taste.
In a large bowl, mix the lettuce, beans, olives, capers, parsley and dressing.

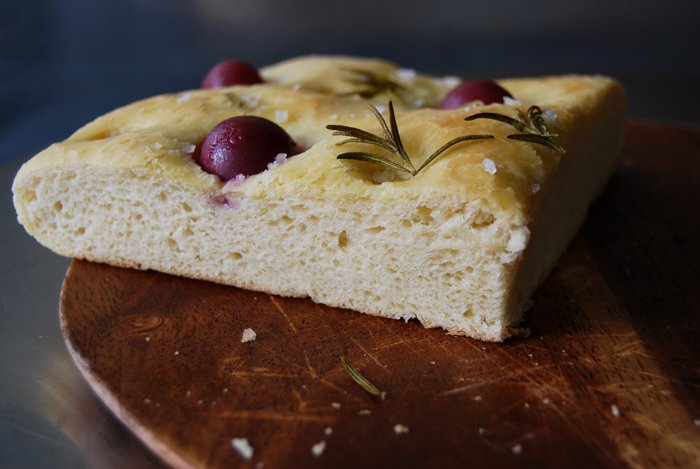
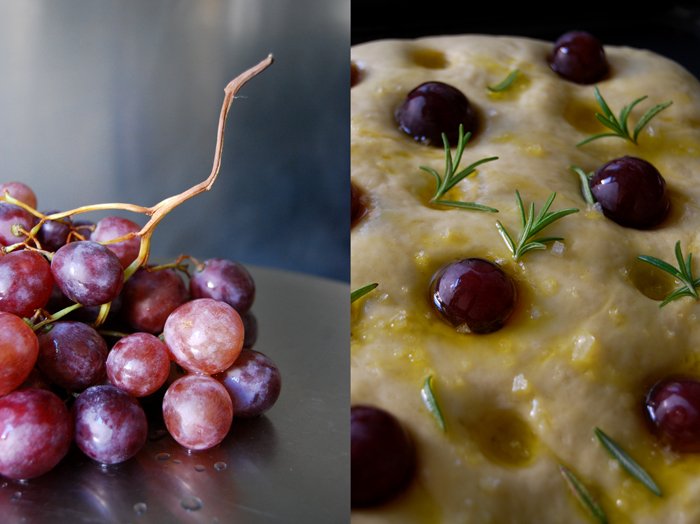
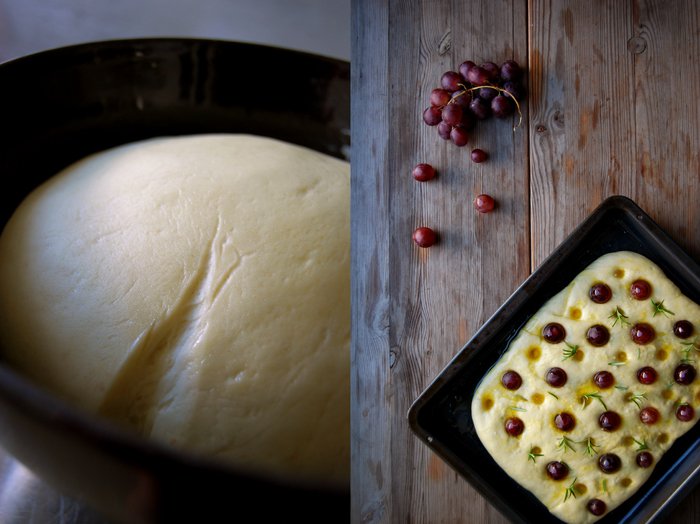
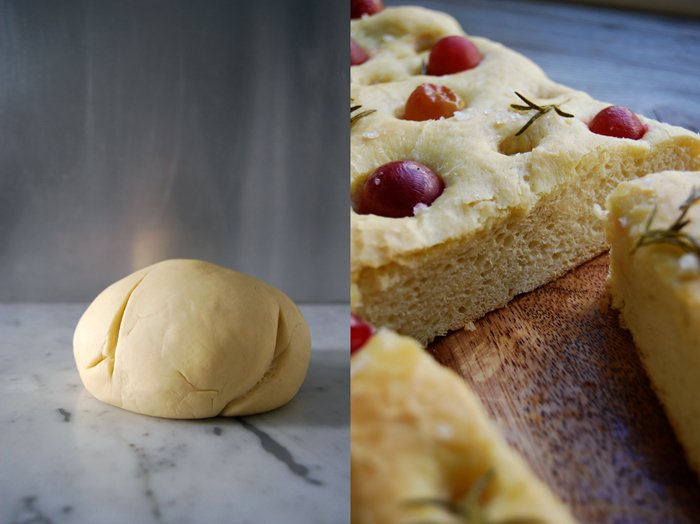
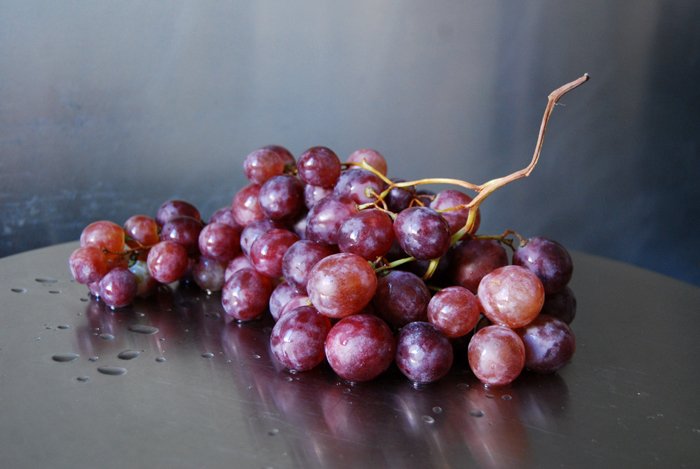
Focaccia with Grapes, Rosemary and Gozitan Sea Salt

This is the best focaccia I ever made! One reason might be the excessive use of very good olive oil. Sometimes there's just no way around, if you spare on oil you spare on taste and texture, it's just that simple. The second reason is the unbelievably delicious combination of baked ripe dark grapes and rosemary! The fruits add a soft sweetness and juiciness to the bread which is better than any other flavouring I ever tasted in combination with this Italian classic.
So, the air in my kitchen was filled with the addictive smell of freshly baked bread mixed with the woody aroma of rosemary. I sat in front of the oven like a hungry cat and I couldn't wait for the focaccia to be done, it was so tempting! I took the photos as quickly as possible as the aromas teased my nose even more after I cut the first piece off the thick and flat loaf. Then, finally, when I took the first bite, I just enjoyed the spongy softness, the oily crust which was almost flaky, the grapes which released their juices and this heavenly taste topped with roast rosemary sprigs and my Gozitan salt from the Cini family!
More focaccia inspiration:
Focaccia with Grapes, Rosemary and Gozitan Sea Salt
For a 25 x 32cm / 10 x 12.5" focaccia you need
plain flour 500g / 17 1/2 ounces
dry yeast 1 sachet (7g / 1/4 ounce)
salt 1 teaspoon
granulated sugar 1 heaped teaspoon
water, lukewarm, 260ml / 9 ounces
olive oil 110ml / 3 3/4 ounces (60ml / 2 ounces for the dough and 50ml / 1 3/4 ounces for the topping)
red grapes around 25
fresh rosemary needles, a small handful
flaky sea salt for the topping
In a large bowl, combine the flour, yeast, salt and sugar. Add the water and 60ml / 2 ounces of olive oil and mix with your dough hooks for 5 minutes until well combined. Continue kneading with your hands for around 5 minutes until you have an elastic dough ball. Put the dough back into the bowl and cover with a tea towel. Let the dough rise in a 35°C / 95°F warm ( top / bottom heat, no fan!) oven for 40 minutes.
Take the dough out, punch it down and knead for 1 minute. Roll out the dough until it measures around 25 x 32cm / 10 x 12.5" and put it carefully on an oiled baking sheet. Cover with a tea towel and let it rise for 20 minutes in a warm place.
Set the oven to 220°C / 430°F.
Punch about 6 x 7 holes into the dough with the round bottom of a wooden spoon and put a grape into every second hole. Pour the remaining 50ml / 1 3/4 ounces of olive oil over the dough and into the holes. Sprinkle with rosemary and sea salt and bake for 20 minutes or until golden on top.


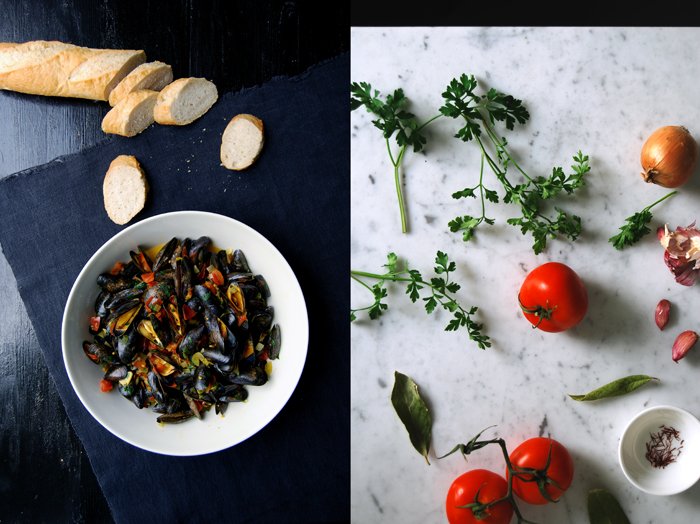
Saffron Bouchot Mussels with Tomatoes, Garlic and Parsley
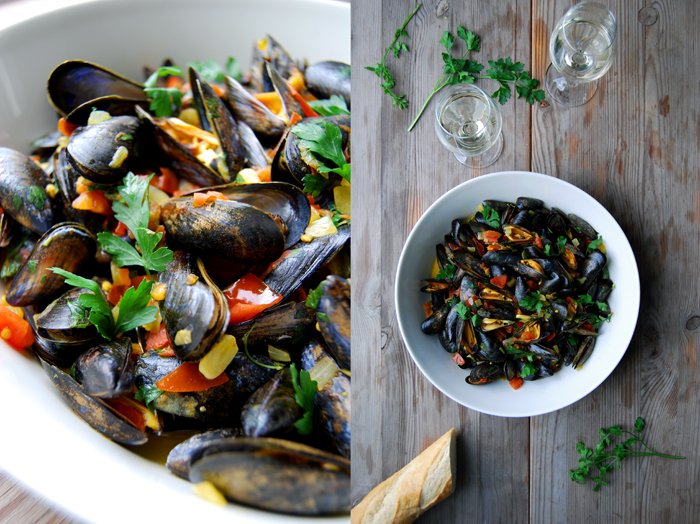
When I have mussels on my cooker I like to add spices, herbs and chopped vegetables, lots of flavours to enrich the broth they're cooking in. I love to dip a piece of fresh baguette into the concentrated juice of wine cooked with mussels, garlic and parsley as much as I like the tender flesh.
The last time I wrote about a recipe with mussels, it was an aromatic bomb inspired by my friend Essa's kitchen. The list of spices was long with turmeric, coriander, fresh and seeds, cayenne pepper, ginger and lemongrass. Not too long after I shared this recipe, Marilena from the Molise region in Italy got in touch with me as she holds a completely different position when it comes to cooking mussels and seafood in general. Pure without too many distractions, that's how it should be cooked in her opinion. I understand her point, and agree partly. I prefer prawn and lobster dishes that focus mainly on the seafood. When it comes to grilled steak fish, I feel the same. That's also one of the reasons why my fish recipes in Malta were quite minimal. Although mussels have a very fine taste of the sea, almost sweet, I find they work very well in combination with exotic aromas. We all have our cooking preferences, our likes and dislikes which makes the product of each kitchen so unique! When it comes to baking, Marilena and I found common ground again. She asked me to bake her Milk Pan di Campobasso, a traditional dolci of the region where she lives. This cake is packed with saffron and Strega (an old Italian saffron liqueur) infused milk and covered with hazelnut icing. I had never heard of this combination before but since then I'm in love with saffron combined with nuts!
Today's recipe for my mussels also works with the strong aroma of this precious, red spice. I felt like a strong broth with a dominant note of saffron mixed with tomatoes, bay leaf, parsley, onions and garlic. The dish looked and tasted like autumn! Warm flavours and colours, red, yellow and green on the shimmering Moules de Bouchot from the Mont-Saint-Michel bay between Brittany and Normandy. The mussels grow on ropes in the sea and that's the taste they bring to the plate, the fresh sea!

Saffron Bouchot Mussels with Tomatoes, Garlic and Parsley
For a lunch for 3-4 people served with baguette you need
mussels in shells (preferably Bouchot mussels) 1 kg / 2 pounds
medium tomatoes, finely chopped, 3
medium onion, finely chopped, 1
garlic, thinly sliced, 3 cloves
white wine 200ml / 7 ounces
bay leaf 1
saffron a pinch
salt 1/2 teaspoon
pepper
olive oil
fresh parsley, roughly chopped, 4 tablespoons plus a few leaves
Rinse and scrub the mussels under cold water and cut off the beard, discard any broken mussels.
In a large pot, heat a splash of olive oil and cook the onion and garlic on a medium heat for a few minutes until soft and golden. Add the tomatoes, bay leaf, wine, saffron, salt, pepper and the mussels. Shake the pot gently to mix or stir with a slotted ladle. Bring to the boil, close with a lid and cook on lowest heat for 5 minutes or until the shells open (shake the pot once or twice while cooking). Discard any mussels that didn't open! Sprinkle the mussels with parsley and serve immediately, in deep plates with a bit of broth and baguette.
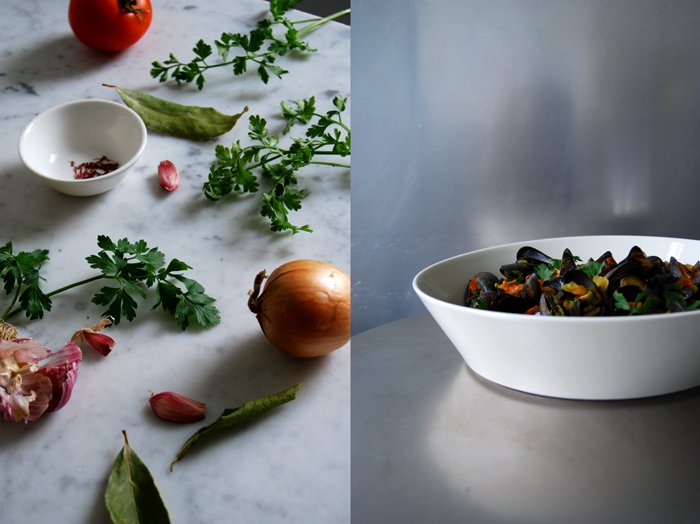


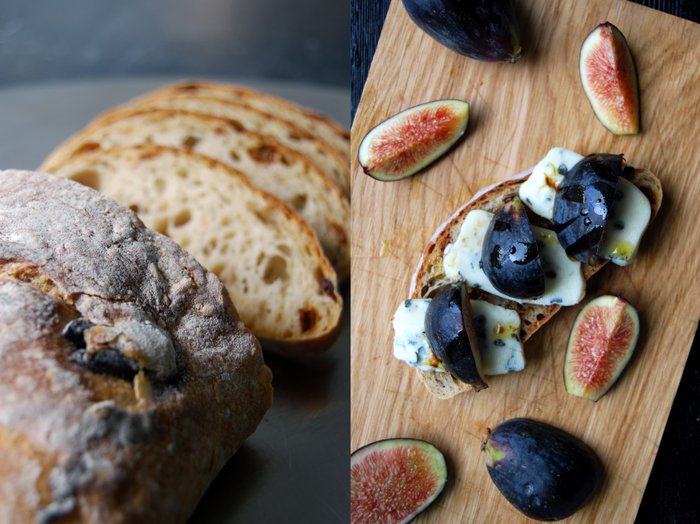
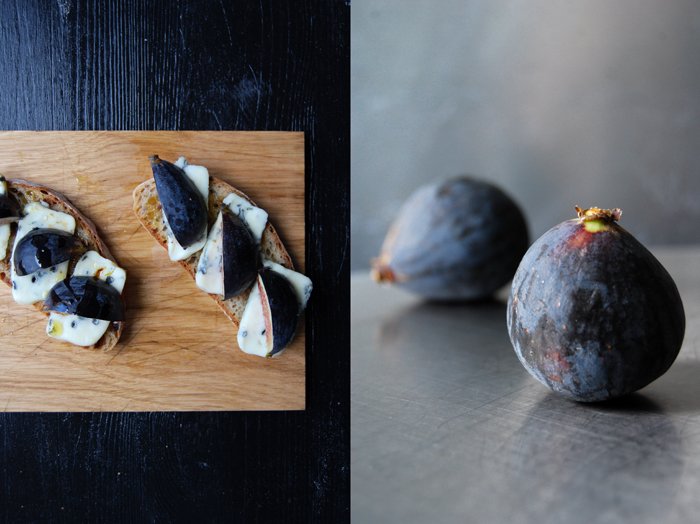
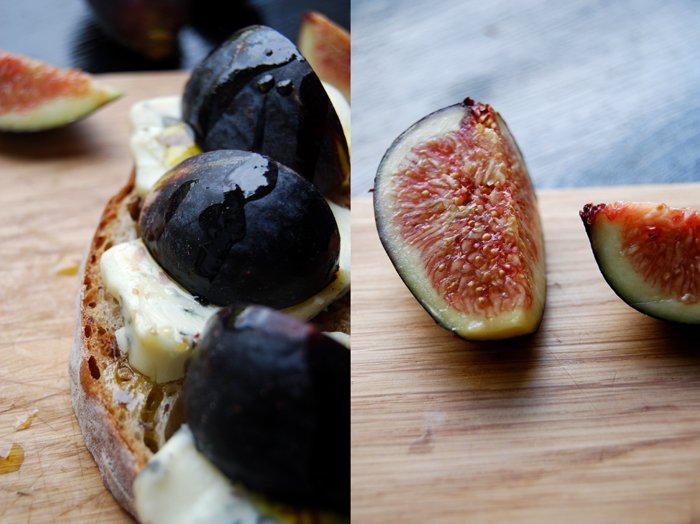
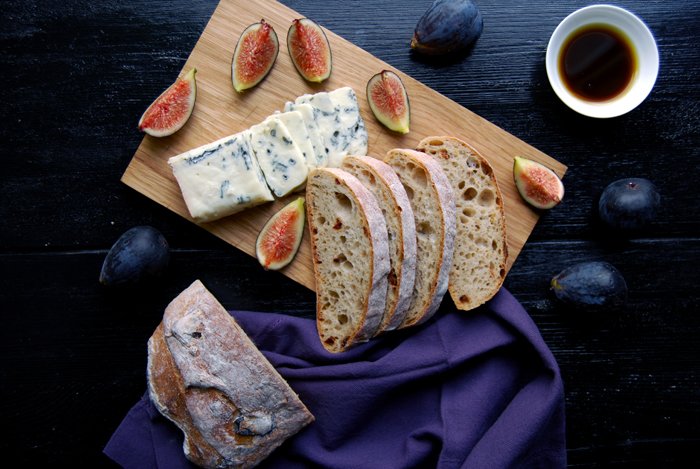
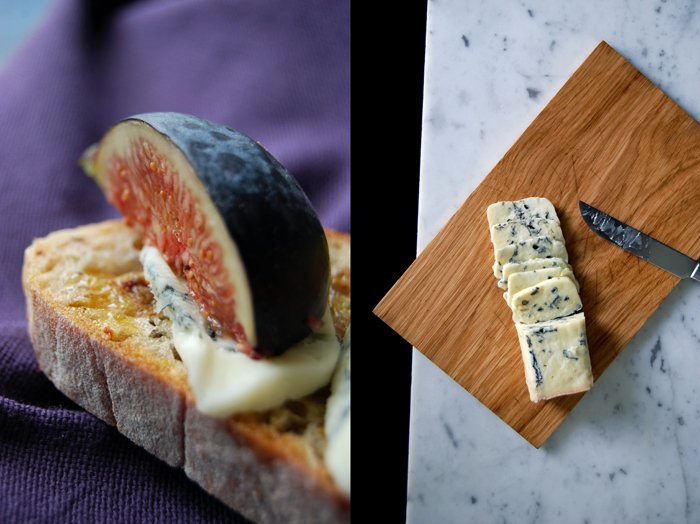
Fig and Gorgonzola Ciabatta Sandwich
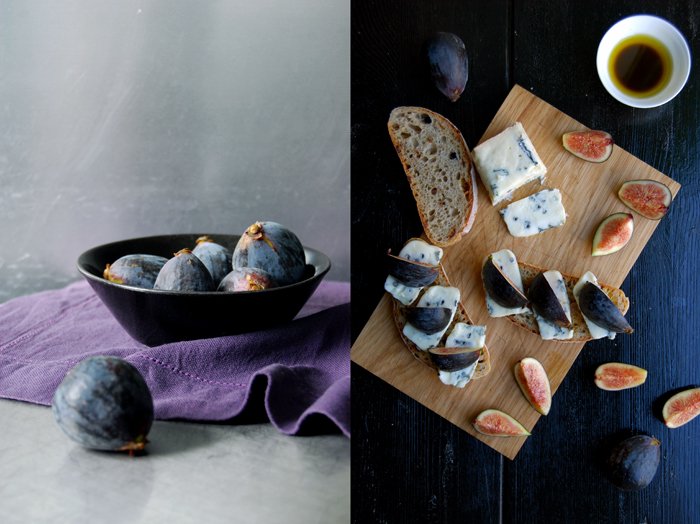
Late summer figs call for a late summer sandwich, an effortless combination of honey sweet fruit and creamy blue cheese. There's no cooker involved in the preparations, no oven or grill, just 5 ingredients put together in less than 5 minutes and a glass of red wine to go with. This is an early evening sandwich, when you sit outside on your balcony or in the garden, some cheese and prosciutto on the table, a quick salad of rucola thrown together with the last ripe tomatoes from the vine and a light vinaigrette. All you need are some candles, a friend to talk, some music maybe, a glass of dark red wine and this marvelous duo of figs and Gorgonzola.
Figs are one of those fruits that I could eat all year round but, unfortunately, the pleasure of their sweetness, taste and delicateness is limited to only a few summer months. In Malta I pick them off the trees but here, in the city, they are quite a luxurious treat and the quality barely justifies the price. They are never as ripe, soft and tasty as in the Mediterranean, it would be impossible to transport them. So when I spotted a box of organic Italian figs at the market, soft and thin skinned, nothing could stop me. I bought a big handful of them, enough to make a dozen of these late summer sandwiches!
For 6 open tartines, you need a loaf of fresh ciabatta bread, the slices lightly brushed with a dressing of 2 teaspoons of olive oil and 1 teaspoon of Balsamico vinegar which makes the bread soft and juicy. I cut 130g (4.5 ounces) of Gorgonzola into slices and quartered 6 ripe Mediterranean figs. Their skin was was so thin that I didn't even need to peel them, I rinsed them off and spread them with the cheese on the bread and sprinkled the remaining dressing over them.

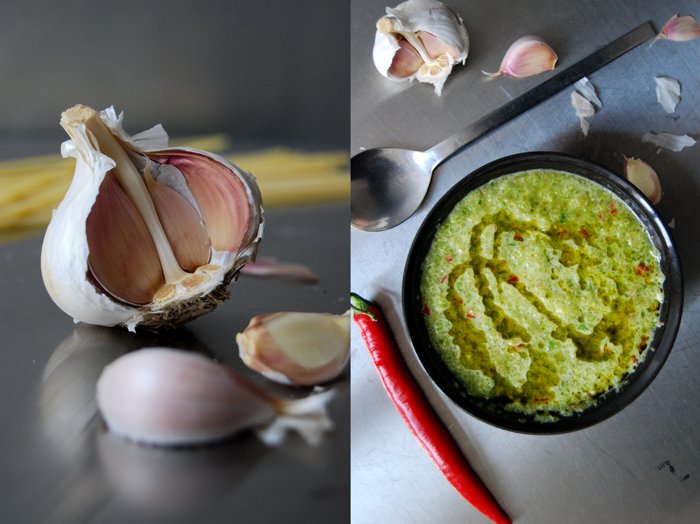
Mojo Verde inspired by the Canaries
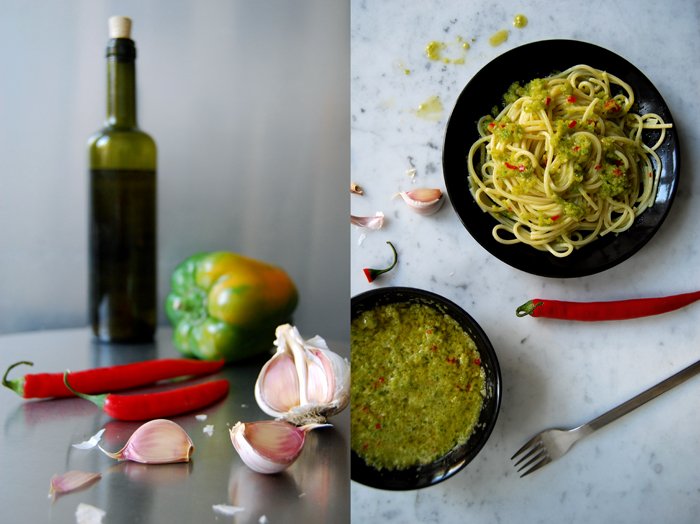
When our friends came back from the holiday they spent on Gran Canaria, one of the Canary Islands, they told me about their culinary discovery with such passion that I had to try it, Canarian Mojos! The name derives from the Portuguese word molho (meaning sauce) and stands for an endless variety of sauces made of (fresh or dried) green or red peppers, olive oil, garlic, lemon juice, fresh herbs, like coriander or parsely and spices, like cumin, caraway seeds or sweet paprika. Most of these traditional Canarian dishes praise the local peppers which must be extremely aromatic and strong in flavour and cover the whole range from mild to very hot and spicy. Some sauces are made just with herbs, similar to a thick pesto or with dried spices mixed with breadcrumbs. I also read about a sauce which mainly features grated hard cheese, the Almogrote which originates from the Canarian island La Gomera. There are so many delicious sounding names like the spicy, red Mojo Rojo Picón made of dried red hot peppers or Mojo de Almendras mixed with roast almonds. These sauces will be one of my winter kitchen projects as many of them can be made with dried peppers and they offer a great field to experiment with strong aromas.
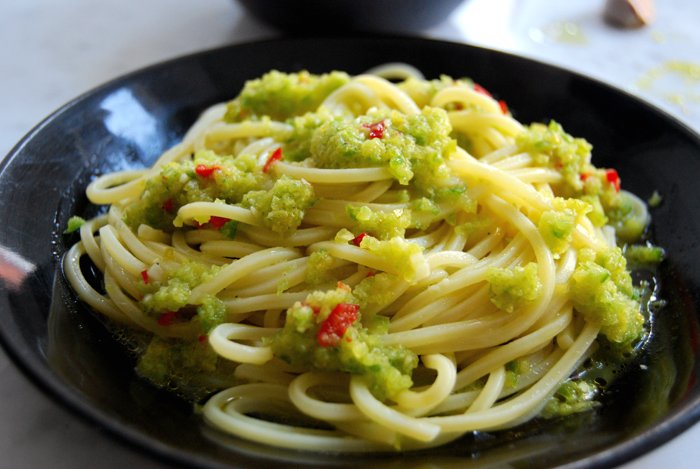
My friends told me that they savored these sauces with almost every dish, with fish, meat, vegetables and potatoes and they encouraged me to give them a try although I've never visited the Canarian Islands myself. So I don't claim authenticity, I just felt inspired to mix my own Mojo inspired by these islands' signature dishes. For my Mojo Verde, I mixed mild green bell pepper with garlic, fresh hot chili pepper, (lots of) olive oil, lemon juice, a pinch of cumin and salt and pepper and I was very pleased with the result when I mixed it with my pasta!
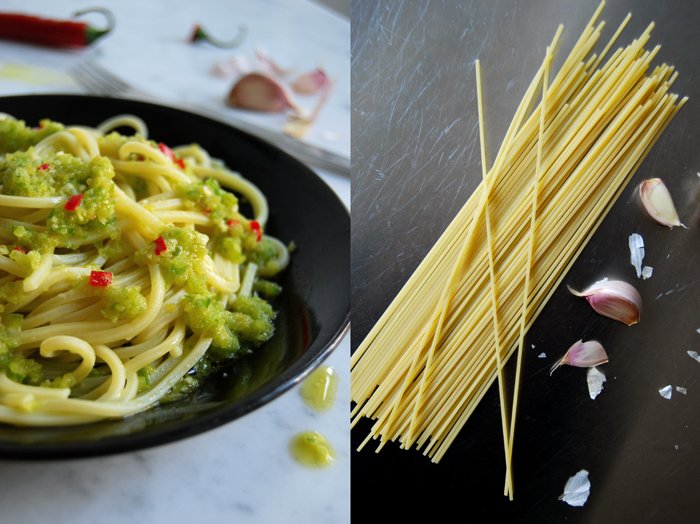
Mojo Verde
For 4 people you need
long or round green bell pepper (preferably organic as they taste stronger) 1
olive oil 2-4 tablespoons
fresh red chili pepper 1
garlic, 2 big cloves
freshly squeezed lemon juice, to taste
salt and pepper
optional: a pinch of cumin, to taste
Mix the ingredients in a blender, or more authentically but also more time consuming, grind them in a mortar to a thick paste. Season to taste and serve with pasta or on grilled bread or vegetables.

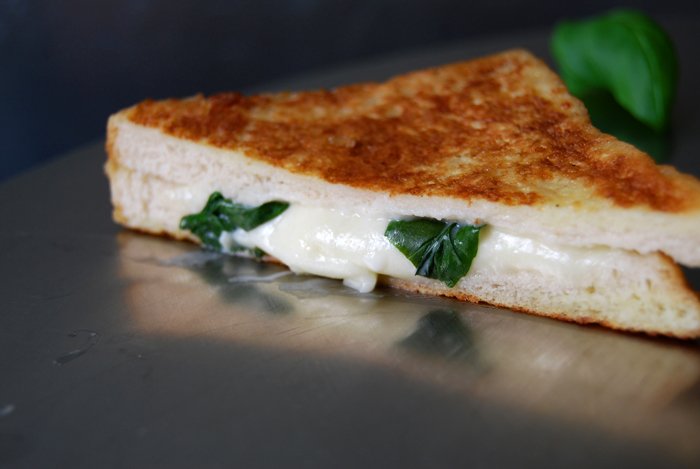
Mozzarella and Basil in Carrozza
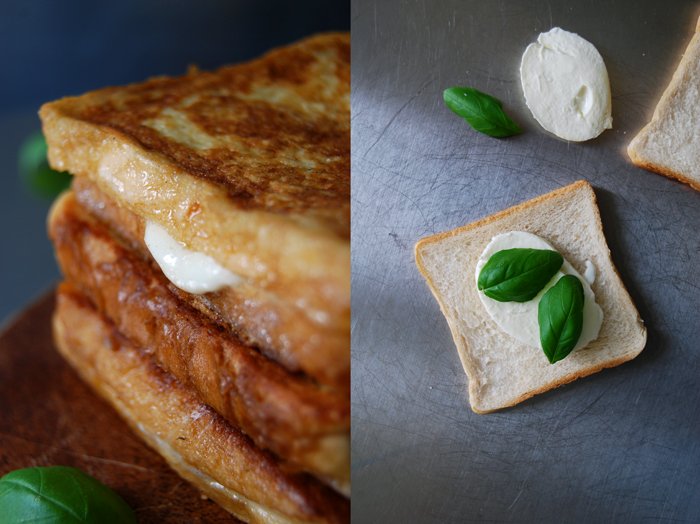
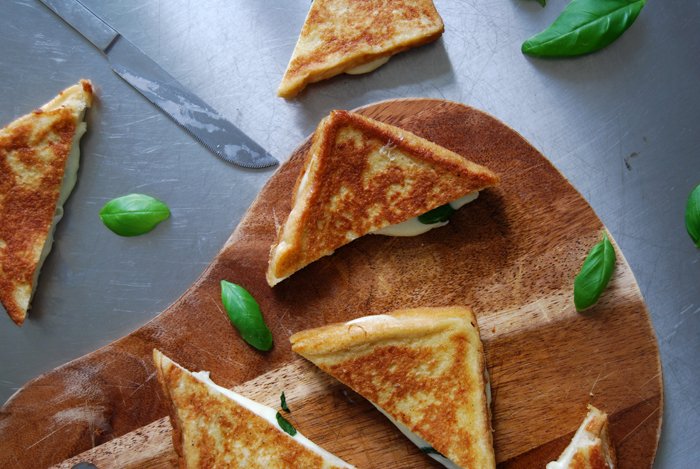
Here's a savory French toast, filled with mozzarella and basil, or the sweeter sounding Italian name, Mozzarella in Carrozza - meaning mozzarella in a carriage!
I'm a big fan of sticky and cinnamony French toast with lots of maple syrup. There were times when I cooked them almost every morning! Mozzarella in Carrozza is the perfect savory alternative, with a filling of fresh basil leaves softly melted into creamy mozzarella. Great for a late breakfast, Sunday brunch or as a quick snack! You could also introduce some stronger flavours and replace the summery herb with anchovy or capers, or add some tomato slices or prosciutto. There are endless variations on this recipe, with dried tomatoes, smoked mozzarella, blue cheese, bacon, different fresh and dried herbs... I can even imagine a French version with slices of ripe camembert infusing the warm bread with its strong aroma while it's cooking in the pan. French toast, it would close the circle again! Mozzarella in Carrozza doesn't really feel like a normal sandwich, it's a bit like a pizza - with much less preparation!
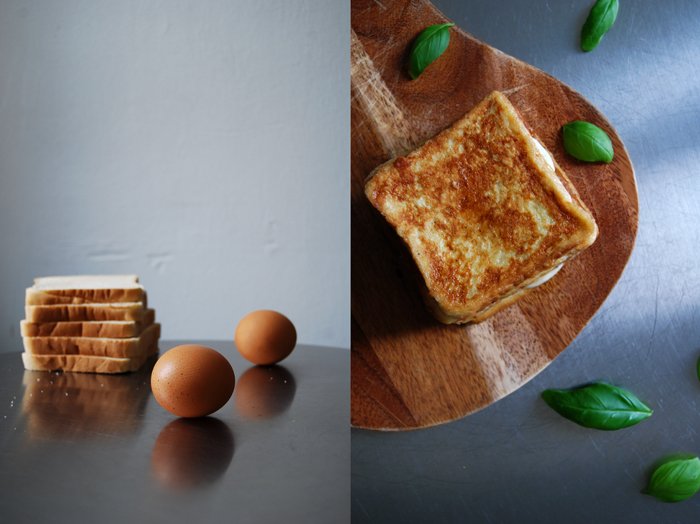
The recipe is quick and easy: You just need to fill the bread with mozzarella and basil leaves, dust both sides of the bread with a thin layer of flour before you dip it in an egg and milk mixture and fry the sandwich in a pan until it's golden on both sides. Although the bread tastes really good when it's just out of the pan, still fresh and warm, we enjoyed a couple an hour later just as much!

Mozzarella and Basil in Carrozza
For a lunch for 2 you need
white bread 6 slices (you could cut off the crust but I prefer to leave it on)
mozzarella, drained, 125g / 4.5 ounces, cut into 6 slices
fresh basil leaves 9
organic eggs 2
milk 4 tablespoons
salt and pepper
plain flour
olive oil for frying
butter, 1 tablespoon, for frying
Whisk the milk, eggs, salt and pepper in a bowl.
Spread some flour on a plate.
Put 2 slices of mozzarella and 3 slices of basil in between 2 slices of bread, leaving a little margin around the edges. Press the bread together and dip both sides in flour (they should be lightly dusted). Turn the sandwiches in the egg and milk mixture until all the liquid is soaked up.
In a non-stick pan, heat a splash of olive oil and the butter and fry the sandwiches on both sides until golden. When you turn them around, gently push them down with a spatula. Take the bread out and cut in half. It's best to enjoy it immediately while the bread is still warm and the cheese is melted.


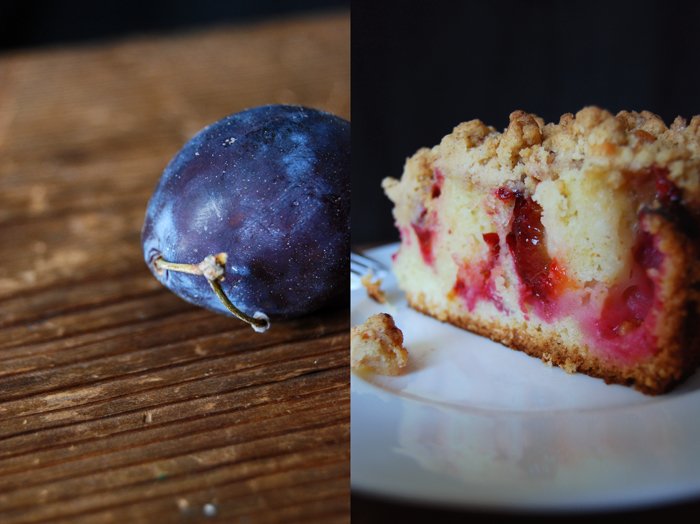
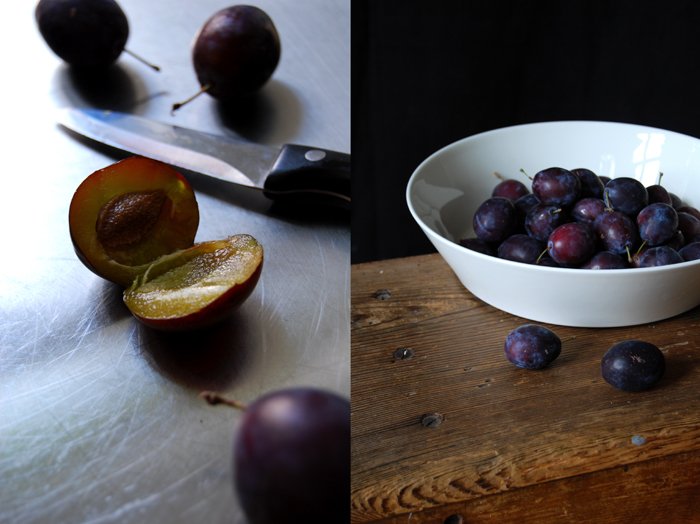
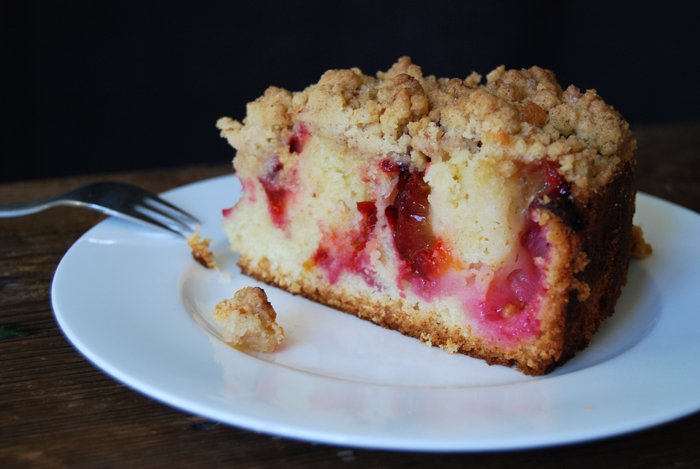
Plum Cinnamon Crumble Cake
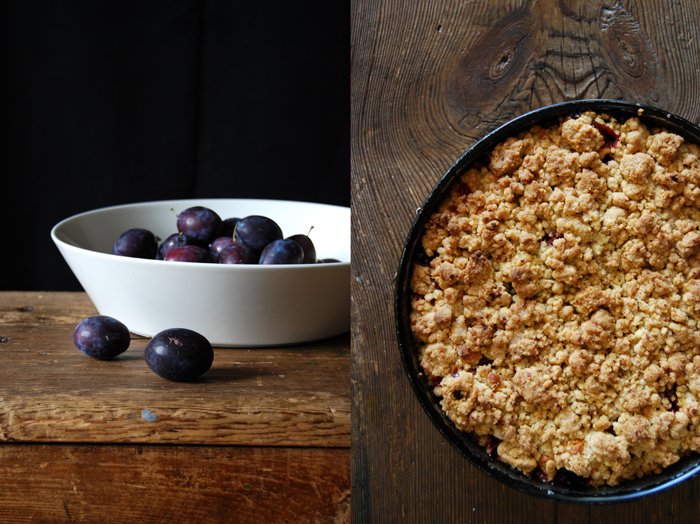
Here is the final of my crumble cake trilogy, the wonderful, Plum Cinnamon Crumble Cake! I started this series in winter, I began with my Apple Crumble, which was one of the first cake recipes on the blog, before I welcomed spring with my Rhubarb Crumble. I love all three of them, I think there is no other sweet recipe I've used more often in my life! These three fruits are my classics but you could easily replace them with gooseberries, peaches, pears or whatever comes into your mind and that fits to cinnamon (which is almost every fruit in my opinion). The base of this cake is spongy but strong enough to carry the juiciest of fruits.
My absolute highlight of this cake are the crumbles, the best buttery crumbles you can imagine! I know I'm repeating myself, but if you find something so perfect in your kitchen you just can't talk about it enough. So, the next layer, the fruits, are as important. I use 2 pounds of fruity juiciness to balance out the two pastry layers of crumbles and the bottom. No matter what fruit you choose they always add a different feel to this cake. The rhubarb's sourness gives it a lighter touch and the plums and apples are perfect for a cosy Sunday afternoon cake in autumn. Relaxed on the sofa, with a cup of tea and a book in my hands, I can't think of a better cake!

Plum Cinnamon Crumble Cake
Prepare the dough for the base first, the plums afterwards and the crumbles at the end.
For a 26cm /10″ springform pan you need
plums, cut in half, 1kg / 2 pounds
For the cake base
butter 125g / 4.5 ounces
granulated sugar 125g / 4.5 ounces
a pinch of fresh vanilla
organic eggs 3
plain flour 250g / 9 ounces
baking powder 2 teaspoons
a pinch of salt
For the crumbles
plain flour 200g / 7 ounces (you might need some more if the crumbles are too sticky)
granulated sugar 125g / 4.5 ounces plus 2 teaspoons to sprinkle over the crumbles
a pinch of vanilla
ground cinnamon 2 teaspoons plus a pinch to sprinkle the crumbles
butter, melted, 125g / 4.5 ounces (plus more if the crumbles are too fine)
Set the oven to 180°C / 355°F.
For the base, beat the butter, sugar and vanilla until fluffy. Add the eggs, one at a time and continue mixing for a few minutes. Add the flour mixed with the baking powder and salt and continue mixing until well combined. Scrape the dough into a buttered springform pan and arrange the plums vertically in circles pushing them into the dough.
The crumbles need good preparation as you have to make sure that the mixture is neither too moist nor too dry. Have some extra flour and melted butter close at hand so that you can add some immediately if necessary.
Combine the dry ingredients in a bowl. Pour the melted butter on top and mix quickly with the hooks of your mixer, stop as soon as it crumbles. If the crumbles are too moist and sticky add a bit more flour (1-2 tablespoons). If they are too fine and don’t form bigger crumbles add more melted butter. Spread quickly on top of the plums. If you have bigger lumps of crumbles you may have to separate and spread them.
Mix 2 teaspoon of sugar with a pinch of cinnamon and sprinkle on top of the crumbles.
Bake in the oven for around 60 minutes or until golden brown on top. Check with a skewer, it should come out clean. Let the cake cool for at least 15 minutes.
You can serve the crumble cake with whipped cream or vanilla ice cream.


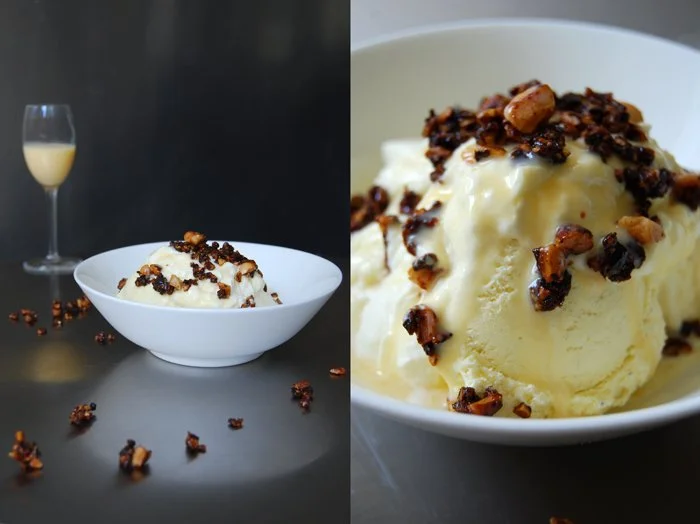
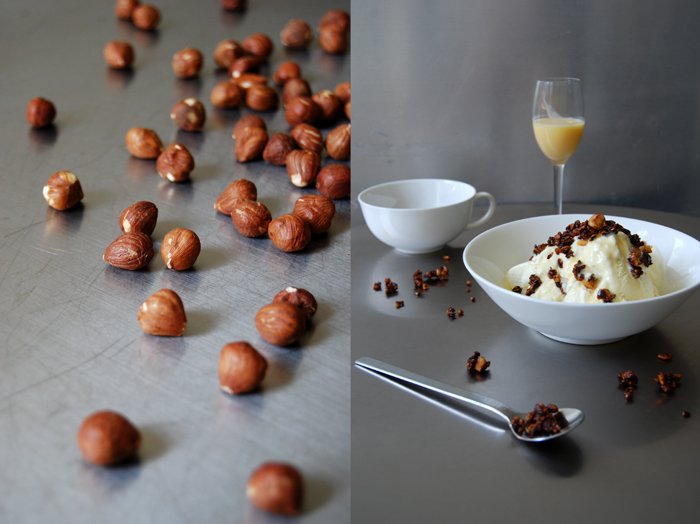
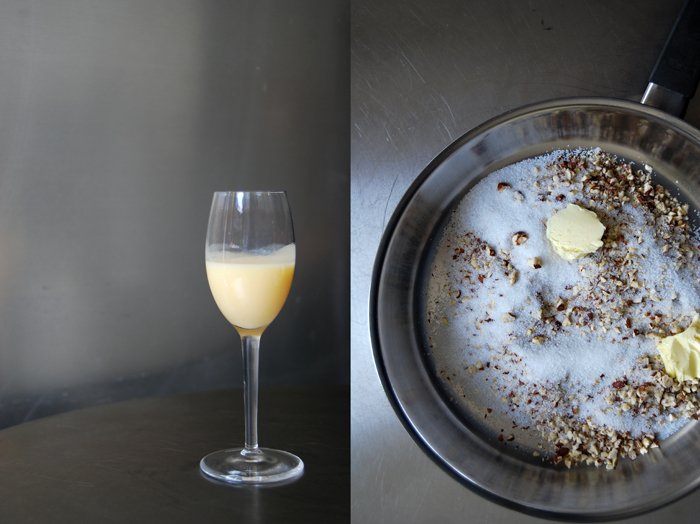
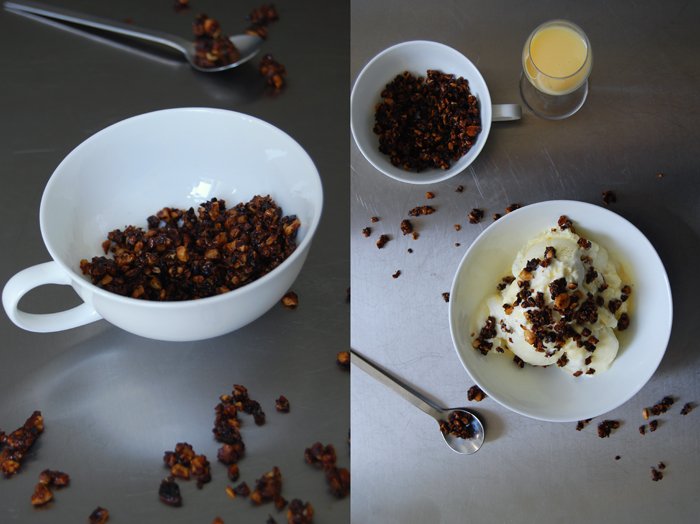
Caramelized Hazelnut, Eggnog and Vanilla Ice Cream Sundae

I'm not a regular client at ice cream shops but if I go there, this is my favourite sundae: vanilla ice cream topped with whipped cream, eggnog and caramelized hazelnuts! It's a sweet, voluptuous bomb, creamy and decadent! Some prefer a light and fruity ice cream composition, or with deep chocolaty flavours, but this one hits my weak spot. It's a bit like an ice cream version of my Frankfurter Kranz. This equally decadent German buttercream cake is also sprinkled with golden caramel nuts and I'm sure that each slice of it includes the same amount of calories as a bowl of this ice cream! And both are perfect Sunday treats!
When I was still at school, we used to meet at the local ice cream shop in the afternoon and I felt so grown up when I ordered my Krokant Becher, the German name for this sundae. This tiny shot of eggnog poured on top made all the difference and it made me feel so much older than I actually was. Apart from that I just loved its smooth and eggy taste, it melts in your mouth together with the vanilla, caramel and hazelnuts!
Caramelized Hazelnut, Eggnog and Vanilla Ice Cream Sundae
For 4 people you need
vanilla ice cream 8-12 scoops
whipping cream 200g / 7 ounces
granulated sugar 1 tablespoon plus more to taste
eggnog 2-4 shots, to taste
For the caramelized hazelnuts
hazelnuts, finely chopped, 50g / 2 ounces
sugar 25g / 1 ounce
butter 1 tablespoon
In a large heavy pan, heat up the hazelnuts, sugar and butter on high-medium temperature and roast for around 5 minutes until golden brown and caramelized, stirring constantly. Take off the heat, spread on parchment paper and let it cool completely.
Whip the cream and add sugar to taste.
Divide the ice cream between 4 bowls and add a big tablespoonful of whipped cream on top of each. Pour the eggnog over the cream, sprinkle with caramelized hazelnuts and serve immediately.

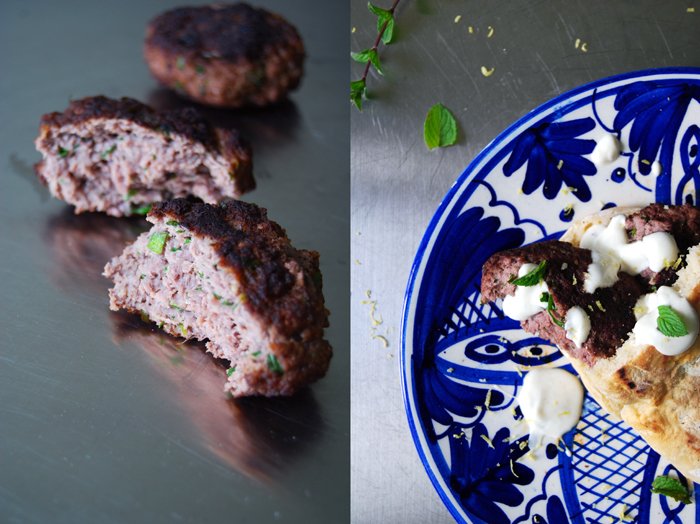
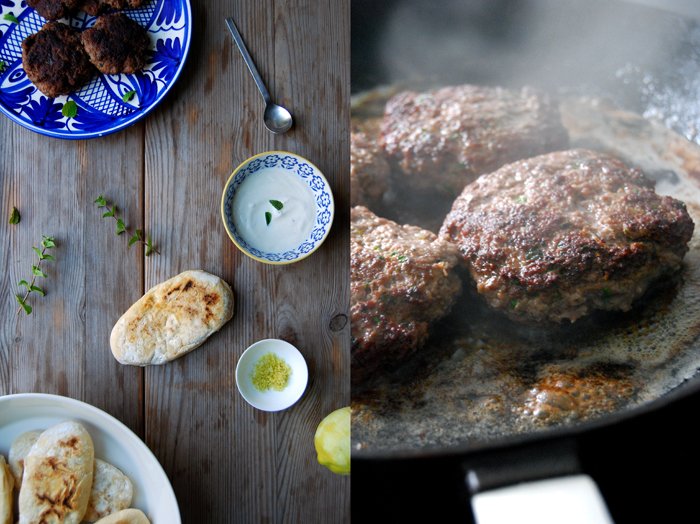
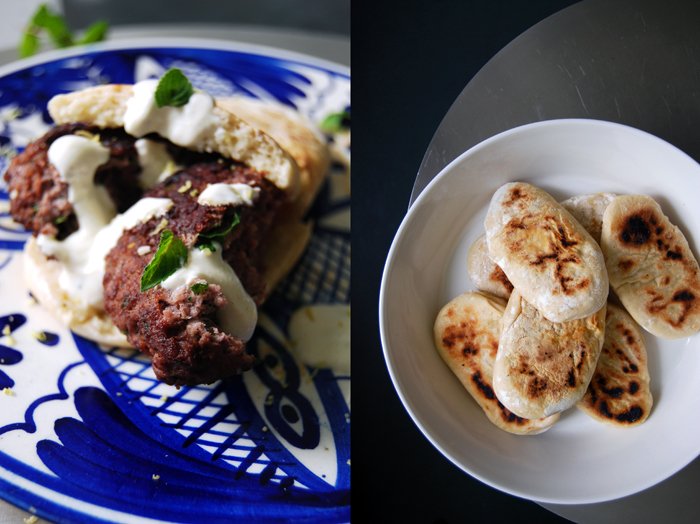
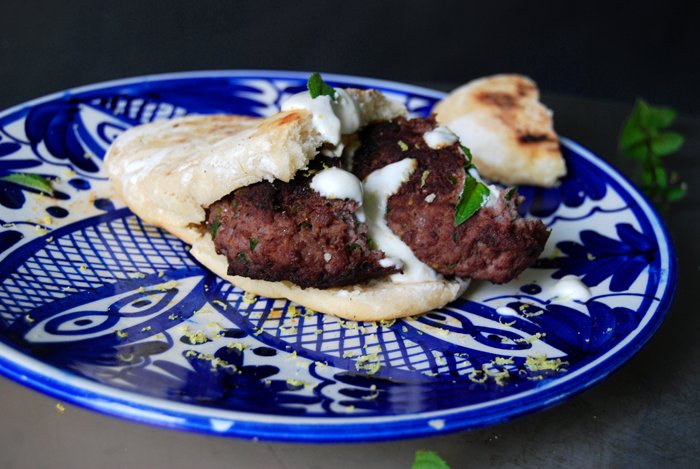
Lemon and Cumin Burger with a Mint, Cardamom and Cinnamon Sauce
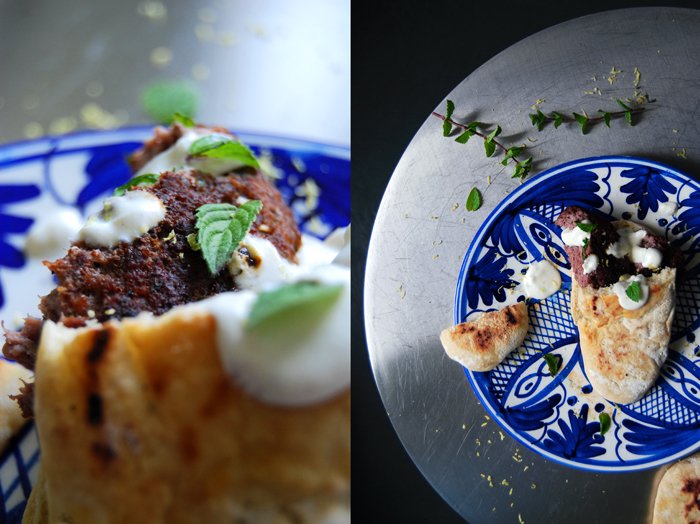
When I go out for a burger I prefer my meat pure and steaky, like at The Bird, my favourite burger place in Berlin. But when I make burgers in my kitchen I like to get out my spice box and play with different aromas. I even add an egg and some breadcrumbs sometimes (which is not acceptable for purist burger lovers!). I don't restrict myself, I just add whatever I feel like.
Yesterday I wrote about my parsley, tomato and mint salad which I love to eat at a Tunisian restaurant and today's burger is the perfect companion for this dish, my lemon and cumin burger with a mint, cardamom and cinnamon sauce!
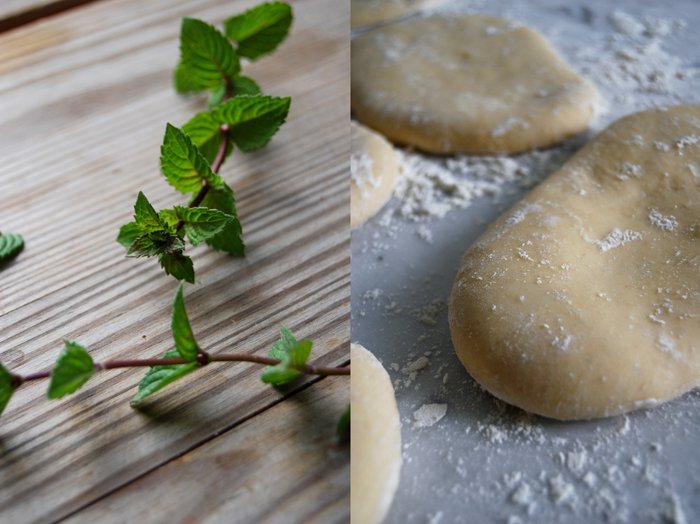
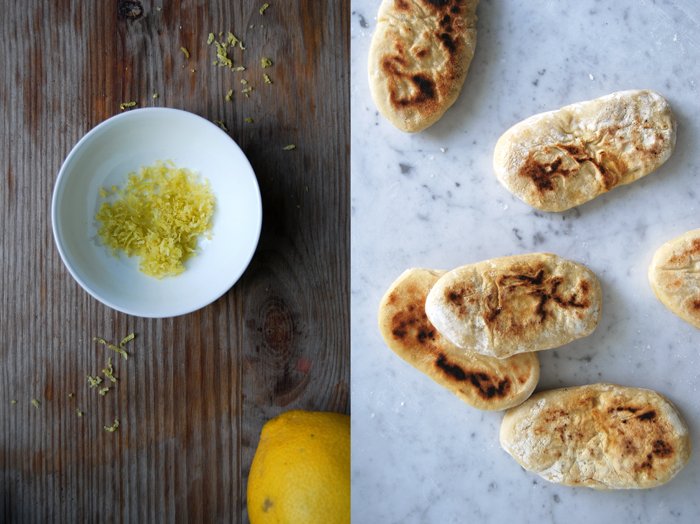
The mixed minced meat is seasoned with lemon zest, cumin, parsley and spicy crushed black peppercorns, it's so rich in aromas but none of them is overpowering. When I came up with this recipe I got so excited that I decided to bake my own flat bread, it's not really necessary but nothing beats warm bread which is cooked in a cast iron pan to accompany a burger. I used my Umbrian Torta al Testo recipe. My idea was to stuff the burger into this pita style bread and add a fresh sauce on top, made of sour cream mixed with cardamom, cinnamon and fresh mint leaves. Just delicious!
Lemon and Cumin Burger with Mint, Cardamom and Cinnamon Sauce
For 4 burgers you need
mixed minced meat (beef and pork) 550g / 19.5 ounces
zest of 1/2 lemon
cumin 1 teaspoon
black peppercorns, coarsely crushed in a mortar, 1/2 teaspoon
salt 1 heaping teaspoon
fresh parsley, chopped, 2 tablespoons
vegetable oil for frying
For the sauce
sour cream 100g / 3.5 ounces
olive oil 1 teaspoon
fresh mint leaves, chopped, 3-5
a pinch of cardamom, to taste
a pinch of cinnamon, to taste
a pinch of salt, to taste
For the bread recipe click here.
Whisk the ingredients for the sauce and season to taste.
Mix the ingredients for the burgers with your hands or the hooks of your mixer and form 4 flat burgers.
In a large heavy pan, heat a splash of oil to cover the bottom of the pan and fry the burgers for a few minutes on medium-high heat until they are done the way you like them. Put each burger between kitchen roll to remove excess oil.
Cut a flatbread in half, fill with a burger and sprinkle with mint sauce.

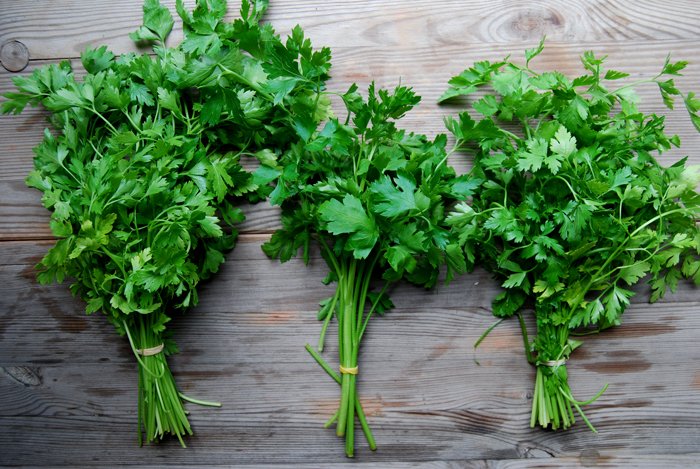
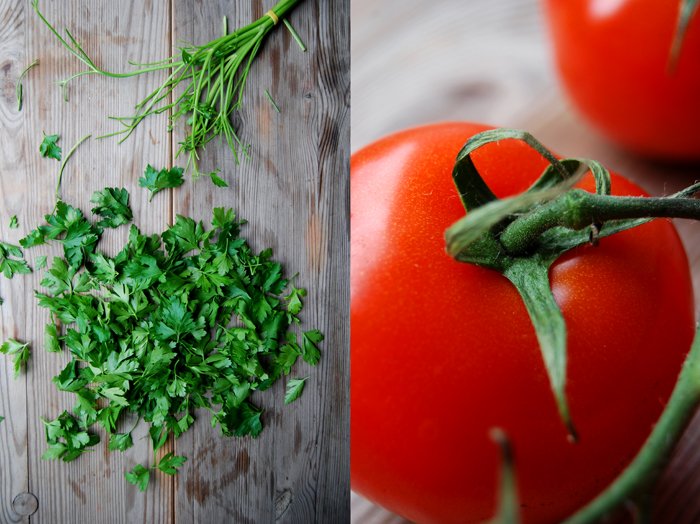
Parsley, Tomato and Mint Salad
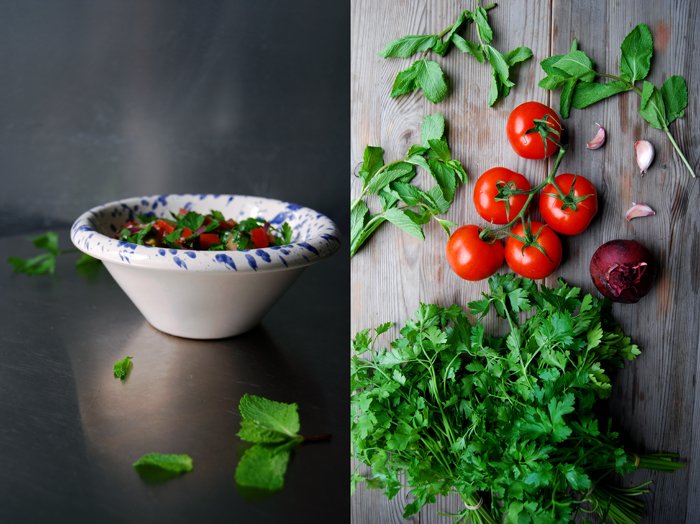
There's a beautiful little take away restaurant close to my flat which offers the best Chickpea Falafel and Chicken Shawarma in town, and this is not just my opinion! This tiny place is called Salsabil and it's run by a very nice guy from Tunis, we've known him for years and he always brings us a cup of hot tea as soon as he sees us, even if we're just passing by! His food is honest and authentic, he doesn't offer that many dishes but each of them is delicious. In summer, we like to sit outside at one of the tables on the pavement and the rest of the year we enjoy the cosiness inside. We sit on wooden benches opposite a photography of the old city walls of Tunis which always reminds me of the Silent City of Mdina in Malta. The light is dimmed and they usually play traditional Tunisian music, it feels a bit like a short holiday in one of the old towns of Tunisia! When it comes to the menu I follow a bit of a tradition, I always order some juicy Falafel in pita bread with different vegetables and sauces, some of their amazing hummus and a very aromatic parsley, tomato and onion salad.
Since I already wrote about my hummus recipe and I'm not experienced enough yet to make my own Falafel in my kitchen (but that will soon change!), I will share my tomato, parsley and mint salad to create a bit of a Salsabil atmosphere at home!
This fresh salad is also great for parties and barbecues!
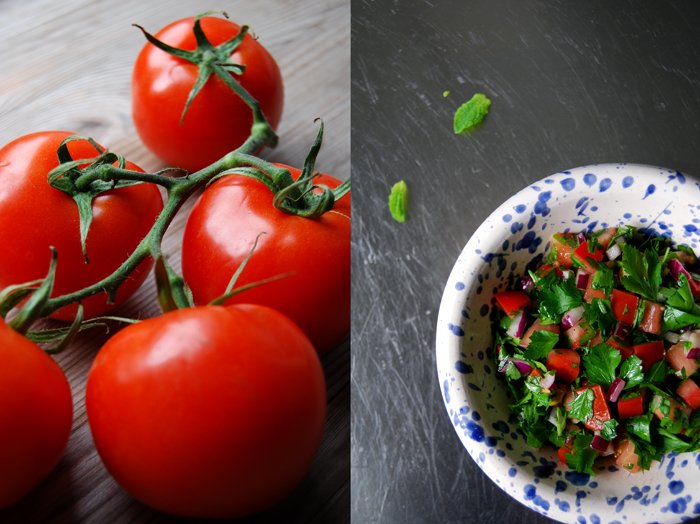
Parsley, Tomato and Mint Salad
For 2 people as a side dish you need
fresh parsley leaves, roughly chopped, 40g / 1.5 ounces
large, ripe tomato, finely chopped, 1
fresh large mint leaves, finely chopped, 6
small red onion or shallot, finely chopped, 1
garlic, crushed, 1 small clove
olive oil 3 tablespoons
freshly squeezed lemon juice 1 tablespoon
white balsamic vinegar 1 tablespoon
salt and pepper
For the dressing, whisk the olive oil, lemon juice, vinegar and garlic and season with salt and pepper to taste. Mix the dressing with the tomato and herbs and serve in a bowl.


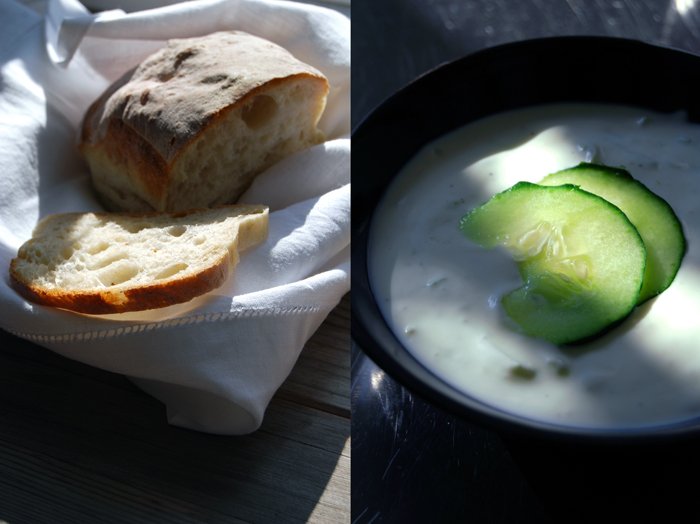
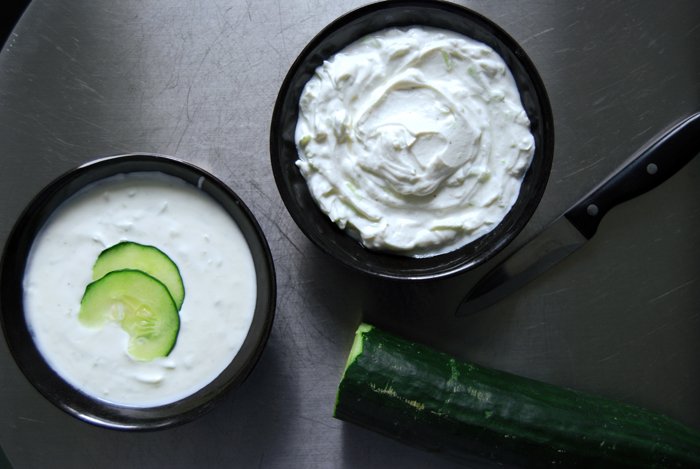
Tzatziki in 2 variations
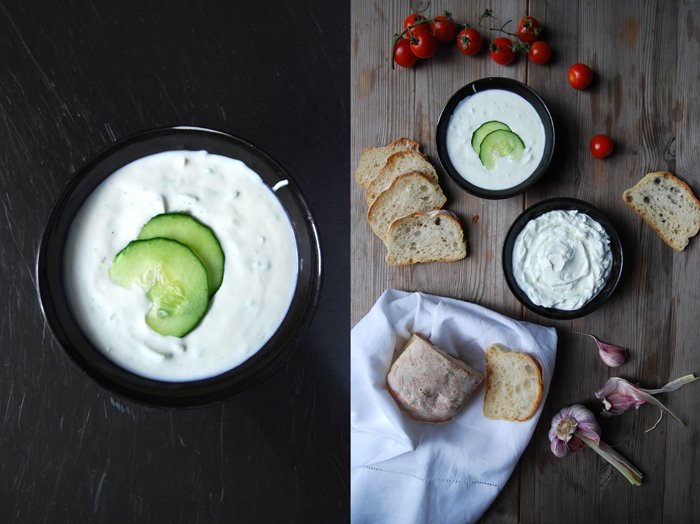
When I find a bowl of Tzatzki in front of me at a Greek restaurant I could (almost) skip the main course. There are two other dishes that have the same effect on me, fresh, warm bread with salted butter and hummus with flat bread! There is something about the Greek dip which is so simple yet it makes me want to dip a piece of bread into it again and again. It's like having a great cake in front of you that you just can't stop eating until you realise half the cake is gone!
When we have a barbecue with our friends, we always start to nibble on some salads, my Tzatziki and bread while we're waiting impatiently for the coal to settle. So often we get carried away with the creamy dip before the meat is even done! So no matter where I prepare this dip for friends and family, I always get requests for the recipe, every time I make it.
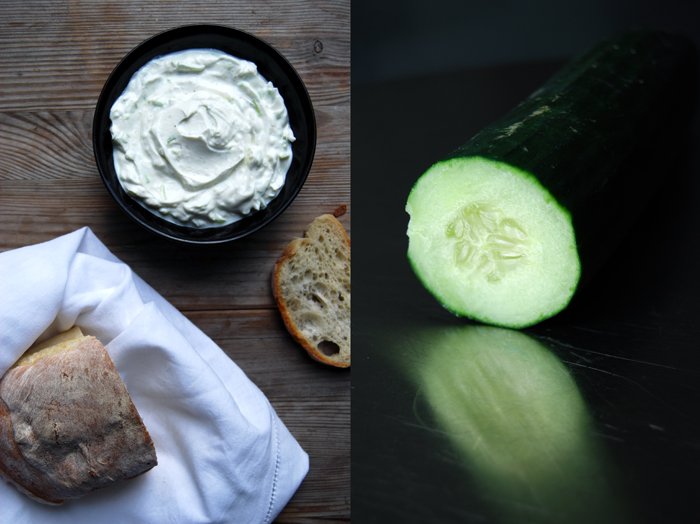
There are many ways to make a delicious Tzatziki, I've tried this dip made with Greek yoghurt, Alex, my Greek-German brother in law uses soured milk and I use quark. I mentioned it when I wrote about my German Cheesecake last Sunday, to me, low fat quark mixed with heavy cream makes the best Tzatziki. Although Alex chooses a different dairy product, he enjoys eating my "German-style" Tzatziki a lot! Another important point of the recipe is the right processing of the cucumber (preferably organic as they have the strongest taste). It has to be roughly grated and pressed between the hands to release some of the vegetable's juices to achieve a more concentrated flavour and a better texture. It's best to use fresh, moist garlic, my favourite is the young French garlic when it's light green and purple, and the rest is a question of the right ratio according to your taste.
It's my Sandwich Wednesday today and I didn't want to leave out those of you who can't get quark, so here are two Tzatziki recipes, one is made with yoghurt. Tzatziki is also great on potatoes grilled in foil at a barbecue!
Let's get started, all you need is a fresh loaf of your favourite white bread and a big bowl of Tzatziki!
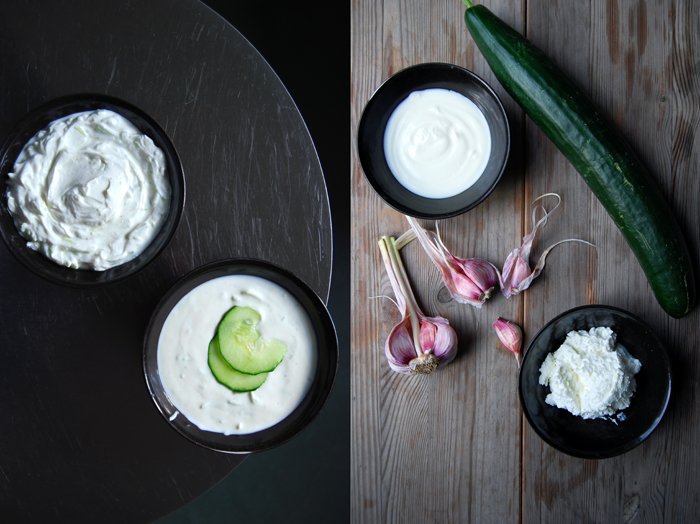
Tzatziki
For 2-4 people you need
cucumber, preferably organic, roughly grated and squeezed between the hands, 80g / 3 ounces (there should be around 60g / 2 ounces of cucumber left after you squeezed it)
Now continue with version 1 or 2 and add:
Version 1
low fat quark 250g / 9 ounces
heavy cream 2 tablespoons plus more to taste
garlic, crushed, 1-2 big cloves
salt and pepper
Version 2
yoghurt 250g / 9 ounces
sour cream 4 heaped tablespoons
heavy cream 4 tablespoons plus more to taste
garlic, crushed, 1-2 big cloves
salt and pepper
Mix the cucumber with the ingredients of version 1 or 2, season with salt, pepper and garlic to taste and whip in more heavy cream if you prefer a more creamy texture.