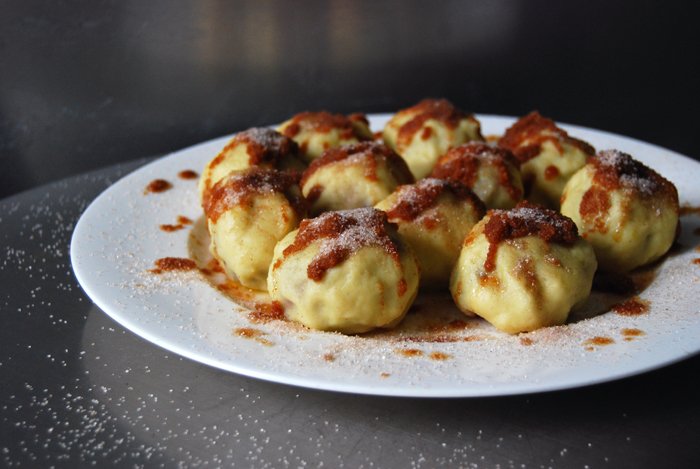
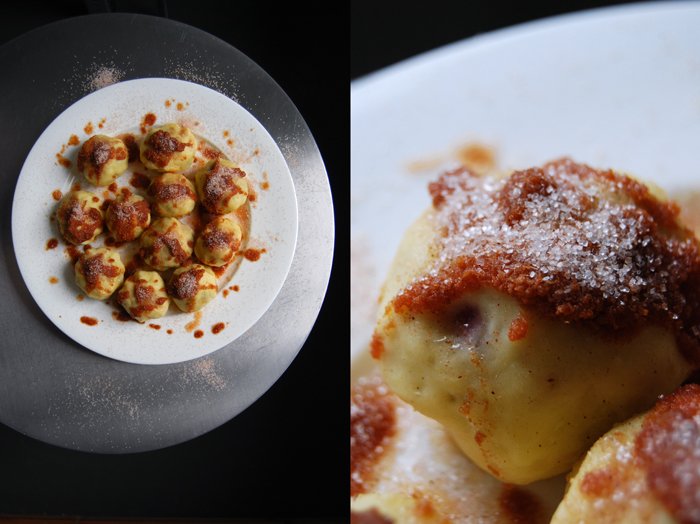
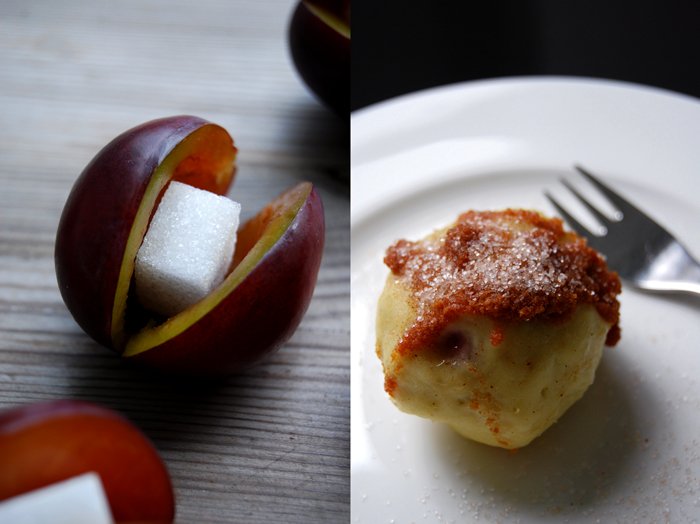
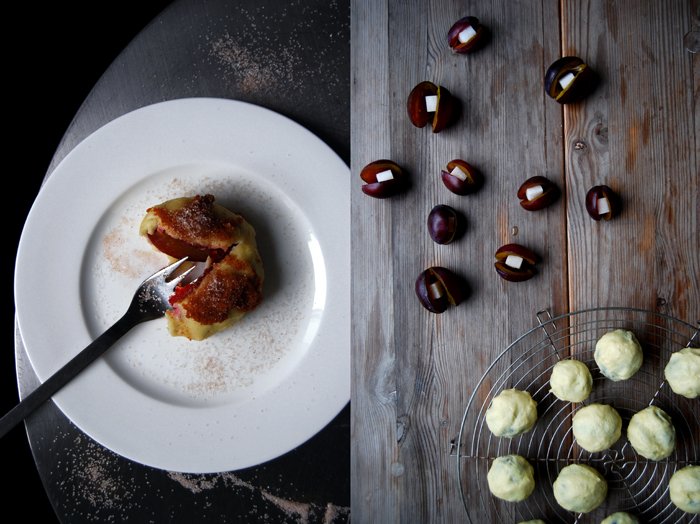
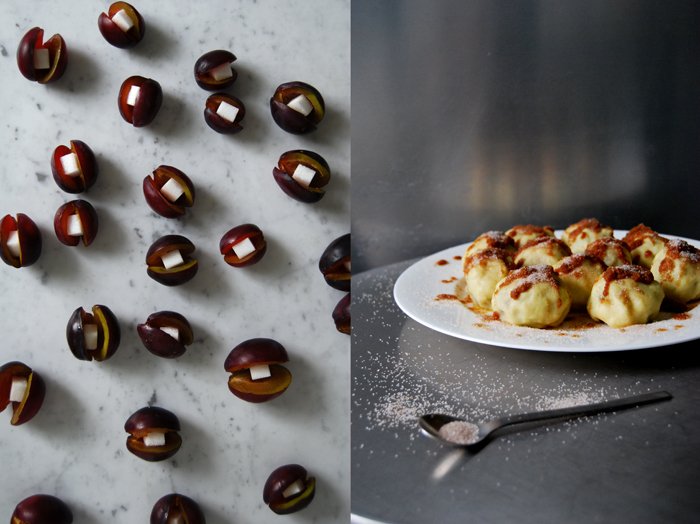
Plum Dumplings with Cinnamon Breadcrumb Butter - Swabian Zwetschgenknödel
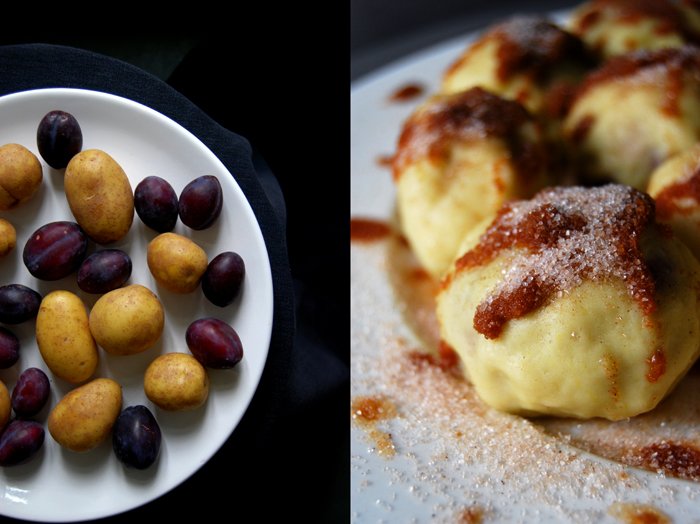
Plums, potato dough, browned breadcrumb butter, sugar and cinnamon - this southern German sweet doesn't call for many ingredients but it puts them together in just the right way. The result is heavenly: sweet plum dumplings with browned breadcrumb butter and cinnamon sugar - or in German - Zwetschgenknödel!
My versatile Gnocchi dough makes another appearance for this recipe. For Friday's Bavarian beer roasted pork, I recommended savory potato dumplings with the same dough. For this traditional Swabian dish, I use it to wrap sweet and sour plums with a thin layer of the potato mixture to turn the blue fruits into sweet, fruity dumplings.
Whenever I make this recipe, I consider reducing the amount of butter and sugar for just a split second, but luckily I never do. This dish really needs all the lusciousness of its decadent topping. I learnt about these dumplings from my Swabian step father Uli and he taught me that a dessert is there to enjoy and not about counting calories. Every time we make the Knödel together in my mother's kitchen, he reminds us to keep the potato dough layer very thin, that's how he learnt to do it from his mother and grandmother. It's our job to form the dumplings but it's his to take care of the quality control, and he is a very picky instructor!
It can be a bit fiddly getting the little balls in shape, to make it a little bit easier you should use small plums like Damsons and keep your fingers moist while you're working with the dough.
Plum Dumplings with cinnamony Breadcrumb Butter - the Swabian Zwetschgenknoedel
For about 30 plum dumplings you need
small plums (like Damsons) 30 (about 800g / 2 pounds)
sugar cubes 30
Cut the plums open on one side, take out the seed and fill each fruit with a sugar cube, close the fruit as well as possible.
For the topping
butter 100g / 3.5 ounces
dry breadcrumbs 50g / 2 ounces
granulated sugar 50g / 2 ounces
ground cinnamon 1 teaspoon
Combine the sugar and cinnamon.
In a sauce pan, melt the butter with the breadcrumbs. Cook the mixture for a few minutes on medium-high temperature until golden brown. Don't let it burn or it will taste bitter.
For the potato dough
potatoes, cut into cubes, 450g / 16 ounces
butter 30g / 1 ounce
organic egg yolks 2
plain flour 120g / 4.5 ounces
salt 1/2 teaspoon
Cook the the potatoes in salted water until soft (around 15 minutes), drain them when they are done. Press the drained, warm potatoes through a potato ricer and mix immediately with the butter and egg yolks. Let the mixture cool completely before you continue with the next step!
With a spoon (or your hands), mix the cold potato mixture with the flour and salt until combined.
The plum dumplings
Your fingers should be wet while you're forming the dumplings, so keep a little bowl of water right next to you.
In a large pot, bring lots of water with 1/2 teaspoon of salt to the boil.
With a tablespoon, take a walnut sized ball of the potato dough. Shape a flat ball and lay it flat in the palm of your moistened hand, pushing down the middle with the thumb of your other hand. Lay the plum (cut side down) into the center of the dough and gently start pushing and rolling up the dough until the whole fruit is covered with a thin layer (the blue of the plums will be just visible in some places, see my second to last picture). If the dough starts tearing, take a little bit more to cover the fruits. Place the dumplings on a grid until you're done with all of them (when you take the dumplings off the grid you might have to even out the grid's mark with your fingers).
Poach the dumplings in batches in the hot but not boiling water (simmering) for about 8-10 minutes or until they start to float on the surface. Take the dumplings out with a slotted ladle and let them drain on a grid for a few seconds.
Put the cooked dumplings into a large bowl or onto a plate, pour over the warm browned breadcrumb butter and sprinkle the cinnamon sugar on top.


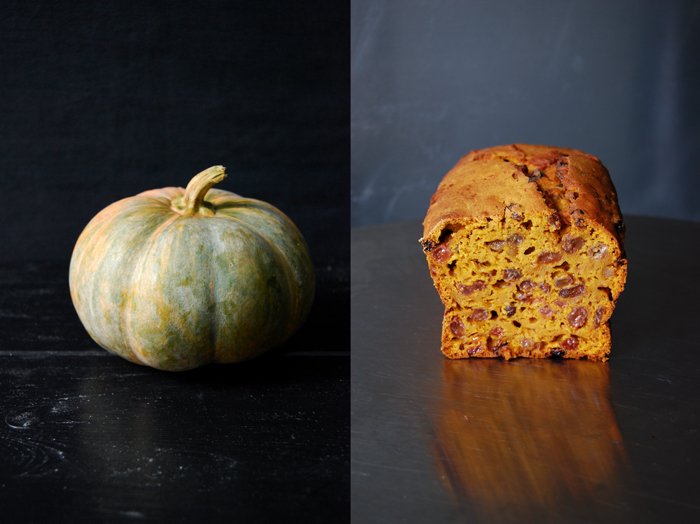
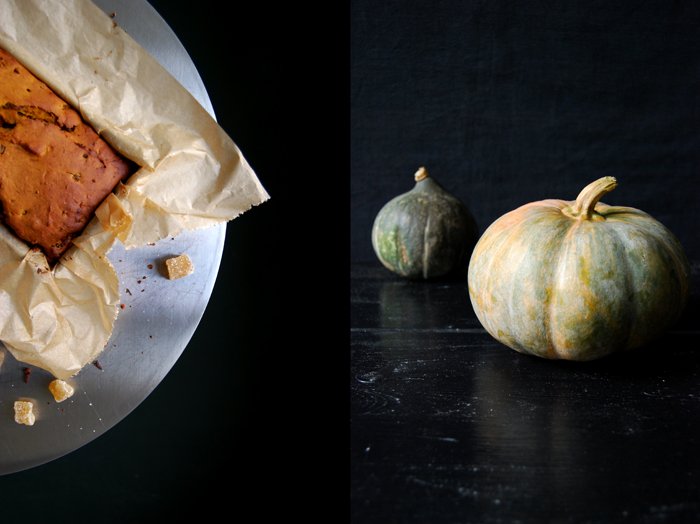
Pumpkin and Ginger Brack - an Irish Tea Cake
When we moved to England a few years ago to live in Whitby in North Yorkshire, it didn't take me too long to fall in love with the locals, the food, the little harbour and its long pier right next to the endless beach. It's a dreamy village, cut off the world - I have a weak spot for these places! I felt great from day one and when I discovered the famous local bakery (it must have been the day after my arrival) with its beautiful name, Botham's written in big letters over the shop on Skinner street I found my second home! You can send me to any village or town in the world and I will find the best bakery or confectionery within 10 minutes, I find my way intuitively and it has never let me down. Through the eyes of a bakery you learn so much about a place and its people. The bread, cookies and cakes, the local delicacies, the whole presentation but also the service tells you many secrets and gives you an insight into a new world. That's one of the many reasons why it's so important to keep up this tradition and support those small local businesses!
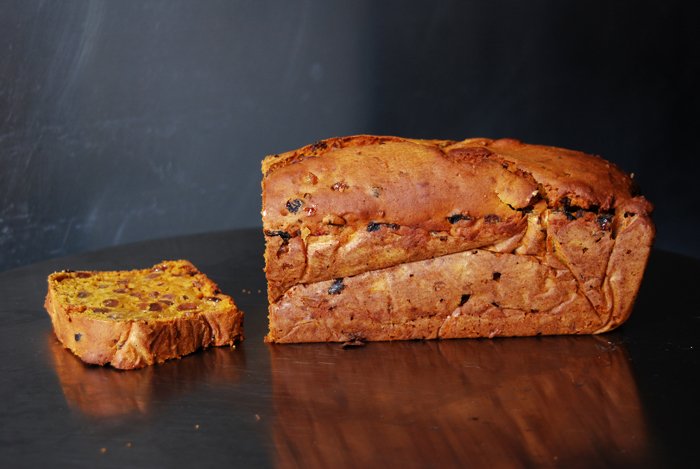
At Botham's, I discovered thin Shah tea biscuits, eccles cakes, English muffins, Sally Lunn loaves, millionaire's shortbread, flapjacks, Maids of Honour and fruit breads. I tried so many different kinds of loaves of this famous English tea time cake, that I lost track at one point. I love the simplicity of this sweet and cakey bread paired with the richness of dried fruits soaked in tea mixed with ginger, spices, citrus zest or nuts. Botham's Stem Ginger Brack was my favourite, an Irish fruit cake made without any fat but with lots of raisins, sultanas, stem ginger and orange zest. It's so juicy and it tastes divine with butter spread on top (the fat had to come in at one point!).
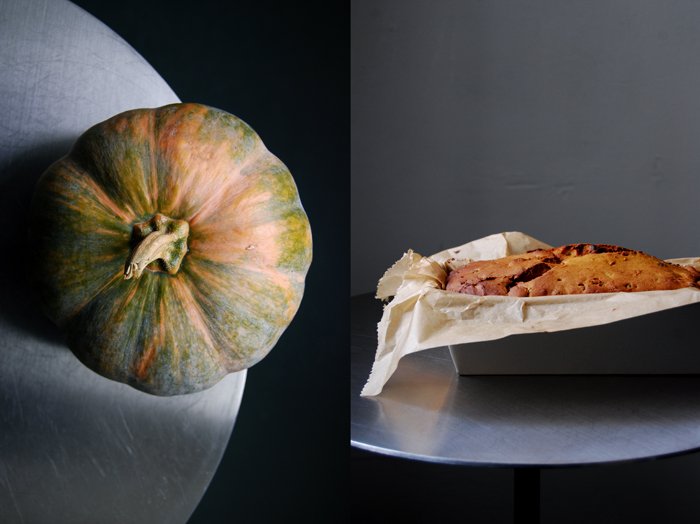
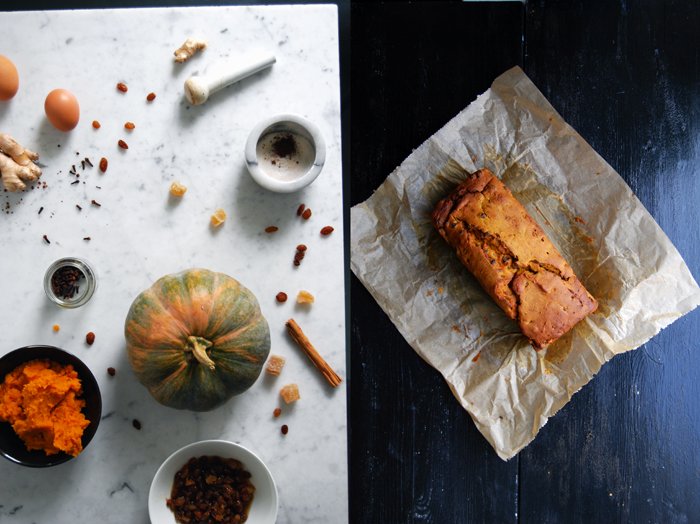
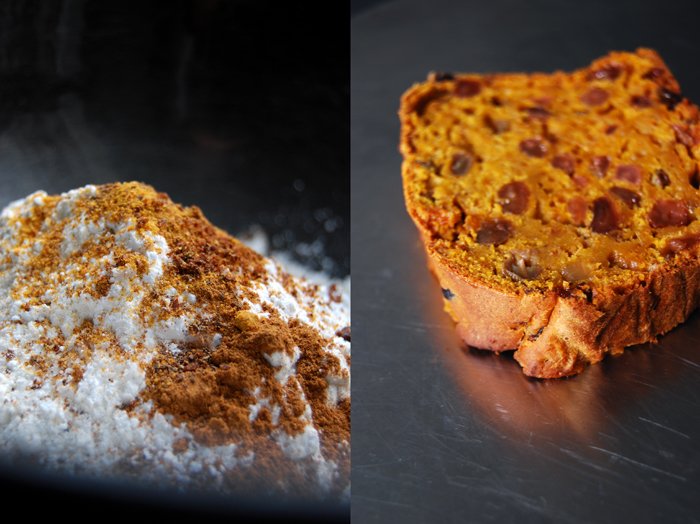
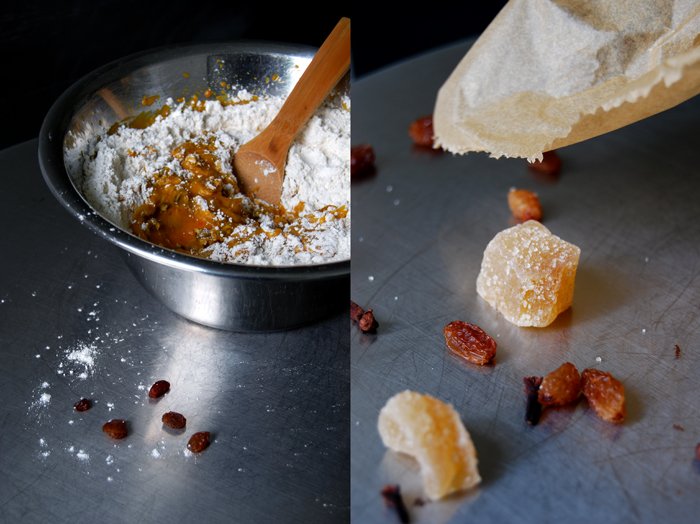
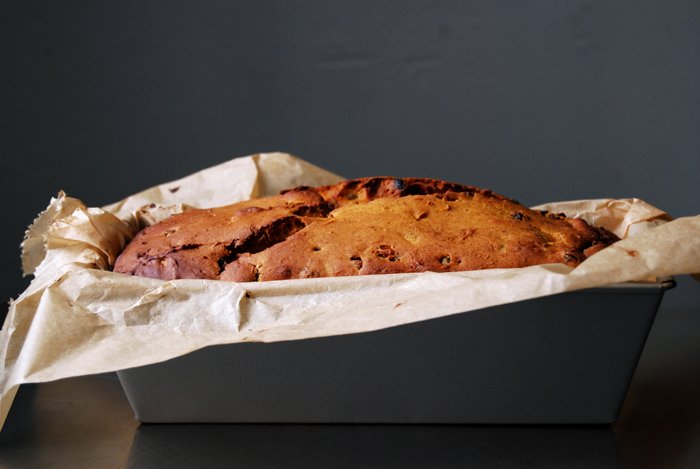
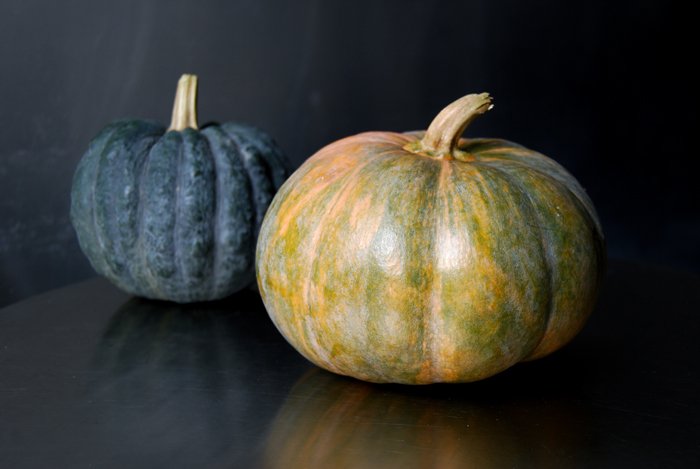
Years later, back in my own kitchen, I started to bake my own bracks. The first loaf was inspired by the one I got to love in Whitby but then I got a bit more experimental. Here's one made with puréed pumpkin in addition to the tea soaked raisins, grated fresh ginger and stem ginger. I also added a nice spice composition of cinnamon, nutmeg, allspice and cloves. The result is aromatic and moist, but still structured. The pumpkin makes the loaf more juicy and smooth than the one I bake without the puréed vegetable. It would be a perfect Halloween cake although it's still a month ahead. In Ireland, bracks are traditionally made for this festive season, but at Botham's (and in my oven) you can find them all year round!
This recipe has been featured on Food52 Halfway To Dinner!
Pumpkin and Ginger Brack
You need to prepare 2 steps in advance for this cake:
1. If you don't buy canned pumpkin purée, the pumpkin has to cook in the oven for 30 minutes before you can turn it into a purée.
2. The dried fruits have to soak in tea overnight.
For a 24.5 x 10cm / 10 x 4″ loaf pan you need
pumpkin purée 400g / 14 ounces or pumpkin (squash), without the fibres and seeds, cut into cubes, 500g / 17.5 ounces (Hokkaido with skin or peeled butternut or Musquée de Provence pumpkin)
strong black English tea 150ml / 5 ounces
raisins and/ or sultanas 250g / 9 ounces
stem ginger, finely chopped, 60g / 2 ounces
fresh ginger, grated, a 3.5cm / 1.5" piece
Demerara sugar 140g / 5 ounces
organic eggs, beaten, 2
plain flour 220g / 8 ounces
baking powder 2 teaspoons
a pinch of salt
ground cinnamon 1 teaspoon
ground nutmeg or mace 1/4 teaspoon
ground allspice 1/8 teaspoon
ground cloves 1/8 teaspoon
For the pumpkin purée
Set the oven to 200°C / 390°F (fan assisted oven).
Put the pumpkin into a baking dish. Cover the bottom of the dish with about 100ml / 3.5 ounces of water. Wet a piece of parchment paper under water, scrunch it a little and cover the pumpkin in the baking dish, tucking the sides in. Cook for 30 minutes in the oven or until the pumpkin is soft. Purée the pumpkin in a blender or with a stick mixer and set aside (you could keep it in the fridge for a day).
For the brack
In a large bowl, mix the tea, raisins, stem ginger, grated ginger and sugar and soak overnight.
Set the oven to 175°C / 350°F (fan assisted oven).
Combine the flour, baking powder, salt and dry spices.
Mix the eggs into the raisin tea mixture with an electric mixer, add 400g (14 ounces) of pumpkin purée and mix until well combined. With a wooden spoon, stir in the flour spice mixture until combined and fill into the loaf pan lined with parchment paper. Bake the brack for 50 minutes, turn the temperature down to 160°C / 320°F and bake for another 30-35 minutes or until the cake is golden brown on top. Check with a skewer, it won't come out clean, there will be a few moist pieces but there shouldn't be any liquid dough left on it. Take the cake out of the pan after 10 minutes and let it cool for at least 10 minutes before you cut off your first slice. The cake is best after 1-3 days, wrapped in parchment paper after it cools down completely. The outside will be soft by then.

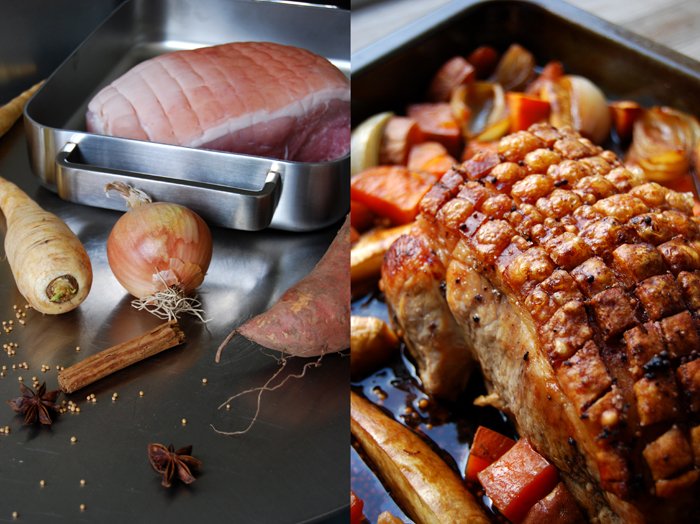
Bavarian Beer Roasted Pork with Sweet Potatoes and Parsnip

Update: You can also find this recipe in my 1st book, Eat In My Kitchen - To cook, to bake, to eat, and to treat.
This is the ultimate roast - Bavarian beer roasted pork, also known as Bayerischer Schweinebraten or Krustenbraten. When I visited the Deyerling siblings last week for a meet in your kitchen feature, they reminded me of this traditional roast. You can't really ask for more, tender, juicy meat and crunchy crackling on top, perfectly roasted and crispy. This is hearty, honest autumn food, for those cold nights after a long walk out in the countryside. That's exactly what we did!
A few days ago we decided to leave the city for a few hours to visit one of Berlin's beautiful lakes that you can reach after a short train ride. The Müggelsee lake is my beloved escape whenever I need a break from the buzz. It's a huge lake, peaceful and quiet surrounded by thick forest. Autumn is just starting to show, so the leaves were still quite green but I could smell the change of the seasons. We have a little tradition, we always stroll down the town's high street before we go to the lake. We visit the local bakery and butcher, for some cake and bread, sausages and to look for some inspiration. Both of them are traditional businesses, and I have to say that I look forward to checking their daily offer just as much as to walking at the lake. This time we made our choice as soon as we got into the butcher's shop. A nice big piece of pork caught our attention and reminded us of the wonderful Bavarian beer roasted pork we cook in winter. The butcher put it aside for us along with a few other delicacies while we continued our walk. On our way back to the train station we picked up our bags and couldn't wait to get started with our oven roast!
There are various ways to roast pork to achieve the perfect crackling. My mother cooks it skin side down first in a little bit of broth before she turns it around. As much as we love to share recipes, here we disagree. I cook mine skin side up without turning the meat. I rub lots of salt and crushed cloves into the scored rind and cook the meat in its own juices for 1 1/2 hours. At this point I add the beer and vegetables, cinnamon, star anise and mustard seeds. I chose sweet potato, onion and parsnip to roast in the strong juices until it's all golden and crisp on the outside and soft inside. I like to season the gravy with some Dijon mustard and fruity jelly, like elderflower or peach, but you could could also use honey or maple syrup.
I can't really say how I prefer this dish, fresh and warm out of the oven with a pint of beer and some potato dumplings on the side or the next day, sliced thinly with some chutney in a sandwich!

Bavarian Beer Roasted Pork with Sweet Potatoes and Parsnip
Update: you can also find this recipe in my 1st book Eat In My Kitchen - To cook, to bake, to eat, and to treat.
For this recipe, you need a well sized piece of pork shoulder, smaller pieces tend to dry out, it can be boned or on the bone. I have made this recipe with both. The rind has to be scored in a pattern (as you can see in the pictures). You can ask your butcher to do this or cut the pattern yourself with a sharp knife, just mind that you don't cut into the meat!
If you want to make potato dumplings on the side, the famous Knödel, you can use my Gnocchi dough. You just have to shape walnut sized balls out of the dough and fill each of them with 3 small cubes of white bread. Cook them in lots of salted water for about 10 minutes on medium-low temperature until the dumplings swim on the surface.
For 4-6 people you need
pork, shoulder piece, boned, scored, 1500g / 3.5 pounds (if you use a piece of pork with the bone leave it in the oven for 1 - 1 1/2h after you poured over the beer)
cloves, ground in a mortar, 10
salt
beer 500ml / 1 pint
medium onions, quartered, 3
sweet potatoes, scrubbed, cut into cubes, 2
parsnips, scrubbed, cut into cubes, 3
cinnamon stick, broken into 3 pieces, 1
star anise 3 single pieces
mustard seeds 2 heaping tablespoons
For the gravy
broth 175ml / 0.5 pints
elderflower (or any other fruity) jelly 1 tablespoon plus more to taste
Dijon mustard 1/2 teaspoon plus more to taste
pepper
Set the oven to 175°C / 350°F (I use the Rotitherm setting).
Mix the cloves with 2 heaped teaspoons of salt and rub into the scored rind, depending on the meat's surface you might need more salt. Put the meat on a deep tray skin side up and cook for 1 1/2 hours.
Take the tray out, pour the beer over the meat and arrange the spices and vegetables on the sides (don't add the jelly and Dijon mustard yet). Cook for another 30-45 minutes until the crackling is crisp. Take out the vegetables and meat and mix the gravy on the tray with the broth, jelly and mustard and season with salt and pepper to taste. Take out the cinnamon stick and star anise and pour into a gravy boat (you can cook it down in a sauce pan for a few minutes if you prefer a more concentrated taste). Serve with the meat and vegetables.
If the rind isn't crisp enough yet, turn on the grill (broiler) for a few minutes after you've removed the vegetables, gravy and spices and cook the meat until the crackling is light and crispy!


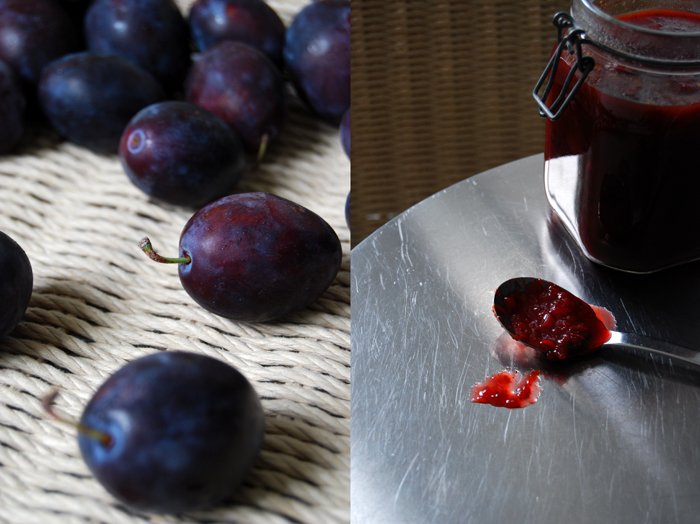
Spicy deep purple Plum Chutney

I'm running out of time! There are still so many plum recipes I want to write about but the local blue fruits are almost at the end of their season. This recipe is one of my classic preserves, a spicy deep purple plum chutney.
I prepare my chutneys all year round so that my pantry is always filled with plums, rhubarb and apples. I try a few others once in a while but these three are my standards, the ones that I can't, or don't want to, live without. I have special combinations with each of them and the plum chutney is my favourite for cold roasts or hard mountain cheese. The one that I cook with apples is the strongest of all and it can take even the ripest French camembert!
When I wrote about one of my early sandwiches, a hearty homemade mountain bun stuffed with ham, cheese and plum chutney, I got so many requests for this chutney. I felt a bit bad as I wrote about it in December not thinking that it would take another eight months for plums to be in season again. So here it is, get started and enjoy with whatever comes into your mind. That's great about chutneys, they taste so strong but they work so well in all kinds of unusual combinations!

Spicy Plum Chutney
For a 1 l / 2 pint jar and one small jar you need
ripe plums, pitted and quartered, 1kg / 2 1/4 pounds
sour apples, peeled, cored and roughly chopped, 3 (around 300g / 10.5 ounces)
small red onions, roughly chopped, 3
apple cider vinegar 350ml / 12 ounces
balsamic vinegar 50ml / 2 ounces
granulated sugar 200g /7 ounces
garlic, chopped, 1 big clove
fresh ginger, grated, 1 heaping tablespoon
fresh red hot chili pepper, without seeds, finely chopped, 1
small dried red chili peppers 2-3
ground turmeric 1/4 teaspoon
ground cinnamon 1 teaspoon
black peppercorns, ground in a mortar, 1/2 teaspoon
star anise, ground in a mortar, 3 single pieces
cloves, ground in the mortar, 20
fennel seeds, ground in a mortar, 1 teaspoon
spirit to sterilise the rims of the jars
Sterilise the jars in boiling water for 5 minutes.
In a large pot, bring all the ingredients to the boil. Cook the chutney (slightly bubbling) without a lid for about an hour on medium temperature until it thickens. After 30 minutes, check the spiciness, either take out the dried chilies or leave them in till the end if you prefer it more hot, but take them out before you fill the chutney into the jars.
Dip the rim of the sterilised jars in spirit and wash out the lids with the alcohol as well. Fill your jars with the chutney and close well immediately.
You can eat the chutney right away but I prefer to let it sit for at least 3 weeks. You should keep an open jar in the fridge (mine stays fresh for months) and the closed jars in your pantry.


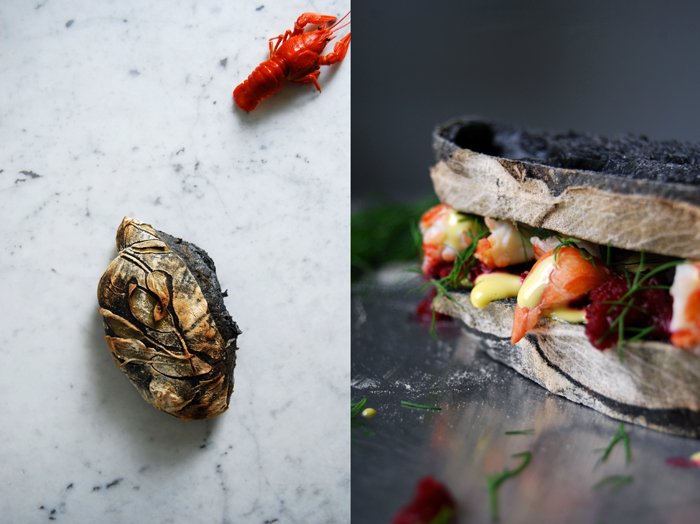
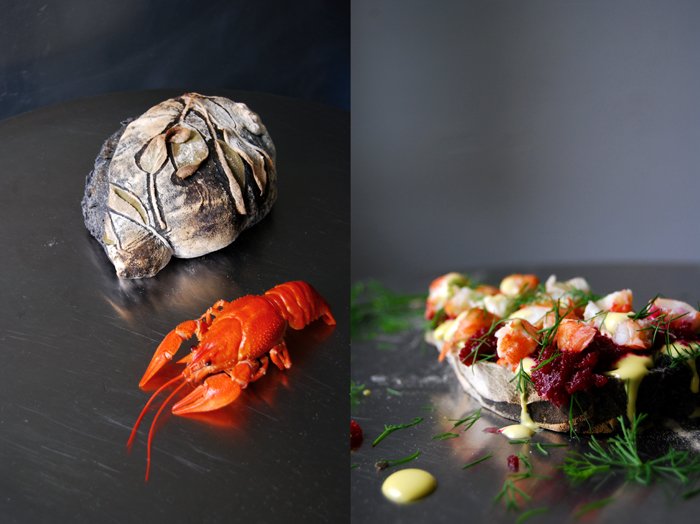
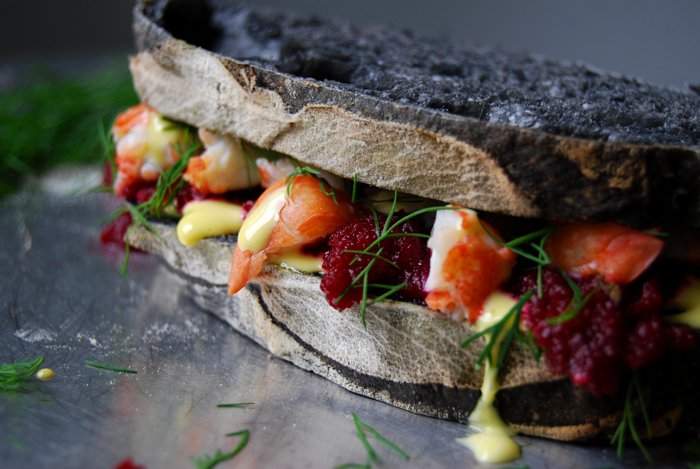
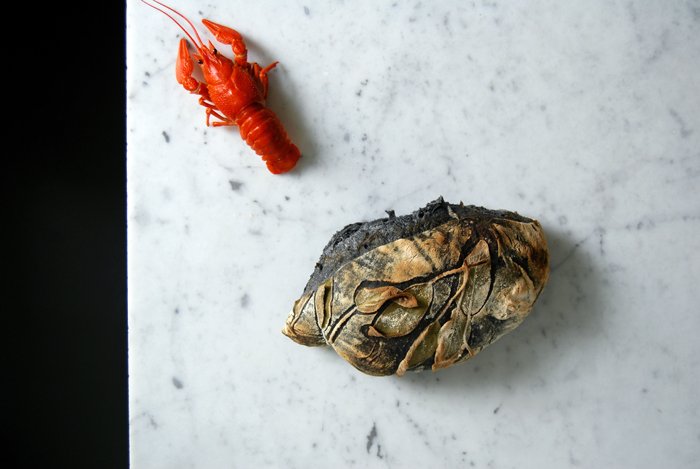
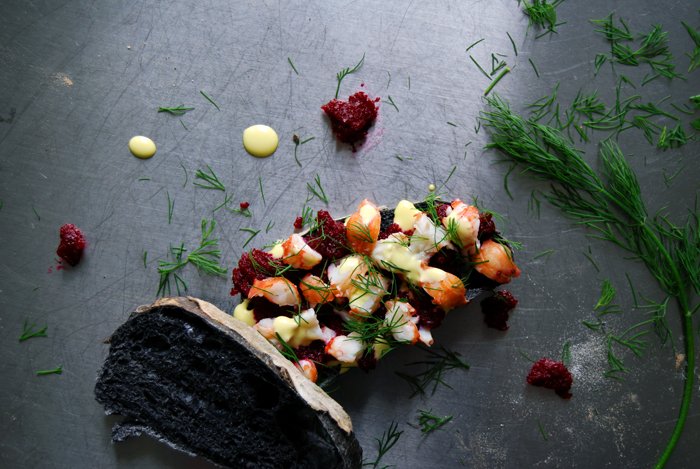
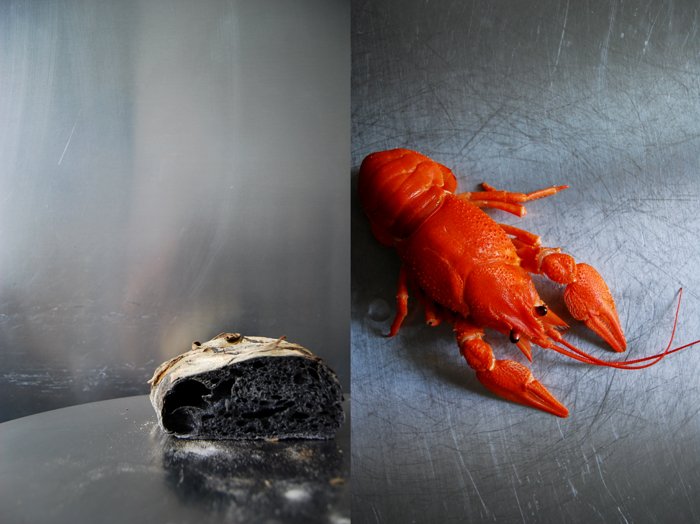
Crayfish and Beetroot Mousse Sandwich - a Swedish Lobster Roll
Today is a special day and a special day calls for a special sandwich!
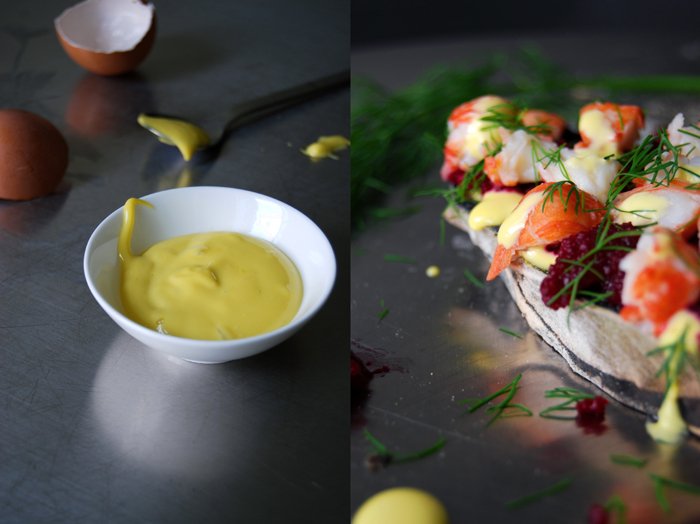
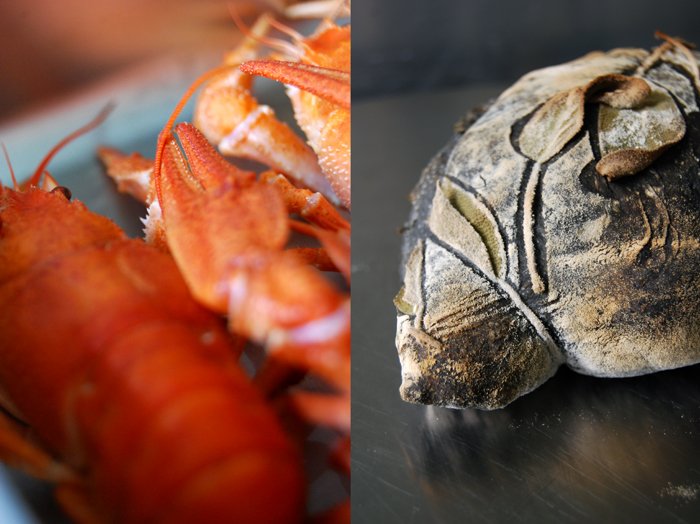
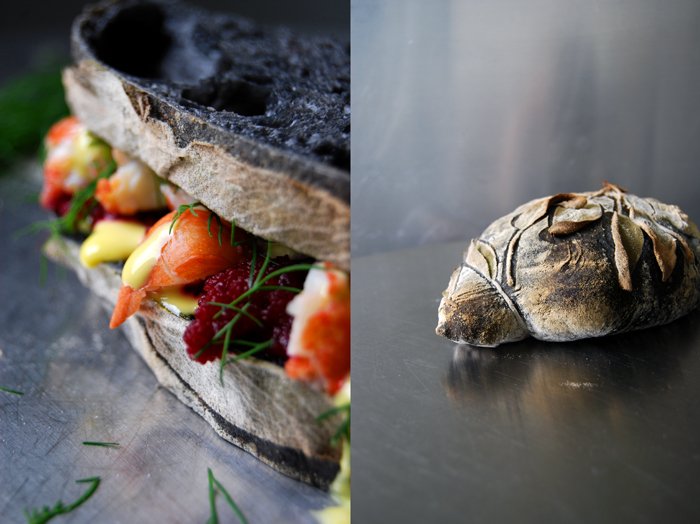
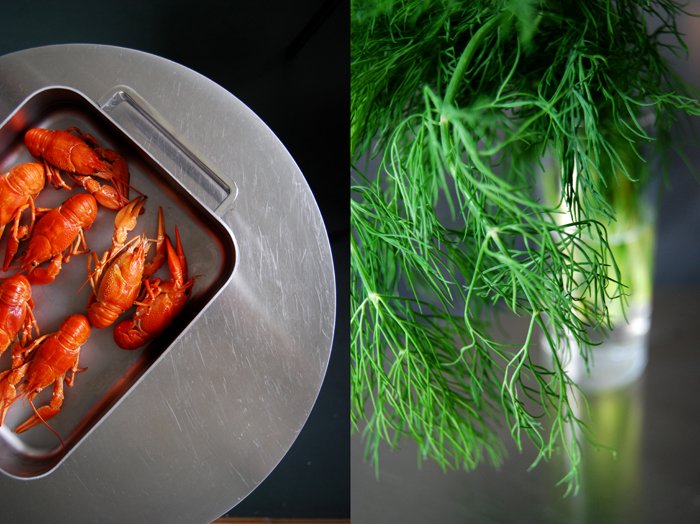
My favourite Swedish baker in Berlin, Malin, releases her wonderful book today named after her exciting project, The Bread Exchange! It's a gem packed with lots of stories and recipes from her bread trading trips which took her around the world. This is a day to celebrate, so I asked Malin to give me her signature black bread for the October edition of our eat in my kitchen x The Bread Exchange sandwich. I wanted to come up with something that's a bit more spectacular and luscious, a creation that can stand up to the dramatic look of the bread which Malin achieves by mixing charcoal powder into the dough (another discovery from her bread trading adventures). One of the most luxurious sandwiches I know is the lobster roll and that gave me the idea to create a Swedish adaptation of this classic. Crayfish, also known as freshwater lobster, beetroot mousse, freshly whipped mayonnaise and dill on thick slices of black sourdough bread! The colours looked stunning but the taste was even better, sweet and creamy!
When I decided to go for crayfish for this sandwich, I didn't think about the preparation. So as soon as I called the fish monger to make my order, I realized that I would have to cook the crustaceans alive to kill them. I'd never done that before but after I got instructions from Malin (and with my boyfriend at my side for support), I felt ready to give it a go. I can't say that it's a nice experience but it's an important one. It makes us appreciate the food that we prepare in our kitchens even more. I'm not a vegetarian, therefore animals are killed for my diet, it's part of the cycle and I prefer to be involved in the whole process which leads to the food on my plate.
Crayfish and Beetroot Mousse Sandwich - A Swedish Lobster Roll
For 4 people you need
crayfish, cooked or alive, 16
sourdough bread 8 slices
dill, snipped, a small bunch
If the crayfish are alive, wash them in cold water (discard the ones that aren't alive). In a large pot, bring lots of water to the boil. Make sure that the water stays boiling hot when you put the crayfish in. Do this one at a time so that the temperature doesn't drop (wait a few seconds after you've dropped one in). When all the crayfish are in the pot cook them for another 1-2 minutes until they all turn red. Take them out of the pot, drain them and let them cool for a few minutes. Peel the meat out of the hard shells and cut into thick slices.
If the crayfish are already cooked, just slice the meat.
For the beetroot mousse
beetroot, unpeeled, 1 (you will need 100g / 3.5 ounces for the mousse)
bay leaf 1
olive oil 1 tablespoon
salt
Cook the beetroot with the bay leaf in salted water for 45 minutes or until the root is soft. Purée 100g / 3.5 ounces of the beetroot in a blender with the olive oil and season with salt.
For the mayonnaise
organic egg yolks 2
olive oil 50ml / 2 ounces
freshly squeezed lemon juice 1 tablespoon
sour cream or crème fraîche 2 teaspoons
a pinch of salt
Drop the egg yolks into a mug which should be just big enough for a stick mixer to fit in it. Start mixing and slowly pour in the oil. When the dip is thick and creamy season with salt and lemon juice and stir in the sour cream.
To assemble the sandwich
Spread some mayonnaise on a slice of bread, add dollops of the beetroot mousse and the sliced crayfish meat on top. Sprinkle with dill and a bit more mayonnaise and close the sandwich with another slice of bread.

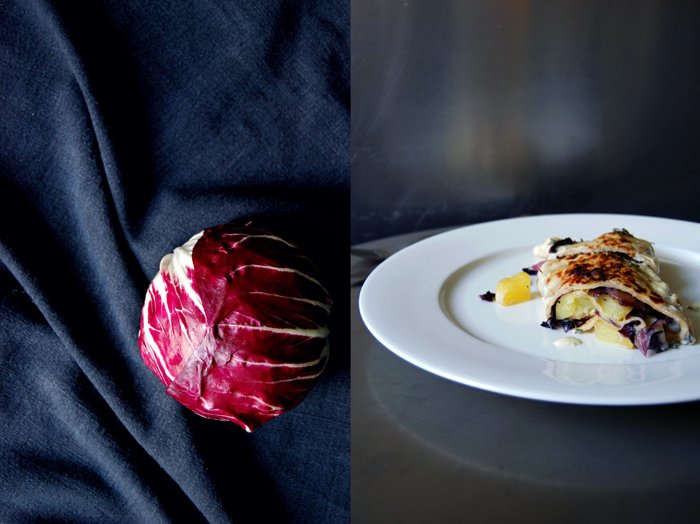
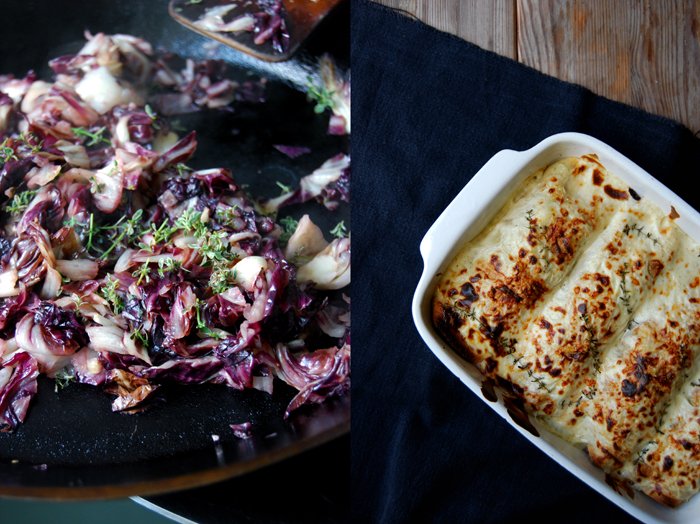
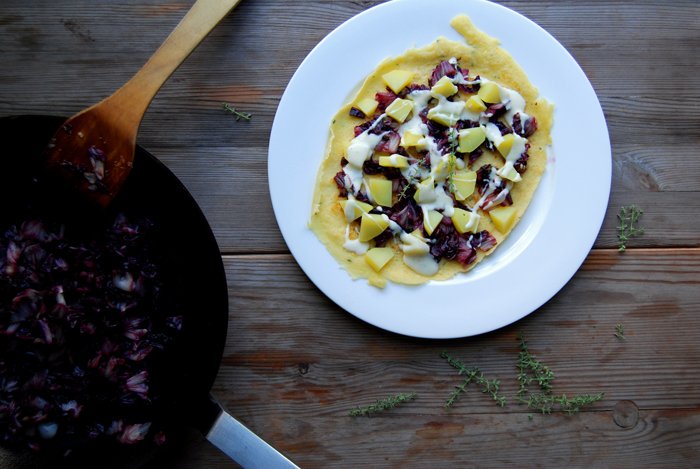
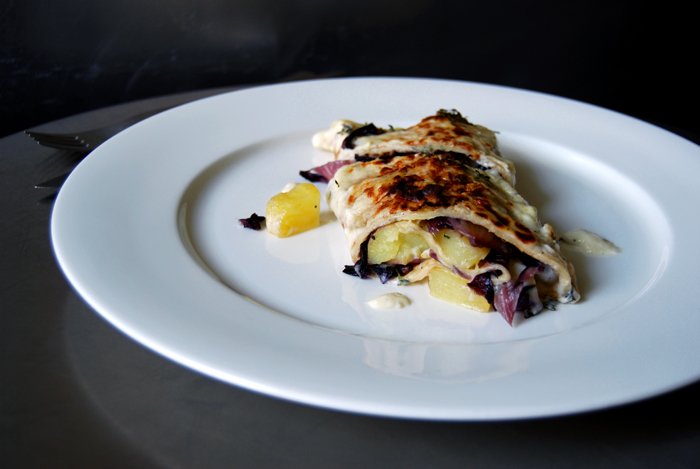
Crespelle with Radicchio, Potato and Thyme
It took me a while to use radicchio not only raw for salads but cooked as well. It was a late discovery, but once I tried it, I loved it, especially for the Italian cuisine! One of my favourites is linguine with radicchio, mustard butter and sautéed chicken liver. My friend Judith told me about this recipe and it became a winter pasta classic in my kitchen. Or my purple risotto with spices and thyme, the colour is beautiful and the mixture of cloves, bay leaf and red wine is so aromatic and rich. Radicchio is great, it's so strong, its unique bitterness is so dominant that it asks for more flavours to be added to it.
A couple days ago I mentioned that we had family from LA staying with us, so our days were split between walking through the city for some sightseeing and food, either from my kitchen or from one of the great places we visited. Italian restaurants, German restaurants, department stores (we focussed on the fish section), various cafés specialized in German cake, American cake or chocolates from all over the world. We savored for days, as always!
Coming back to the purple radicchio and to one of our lunches at home, I cooked crespelle for us one day, filled with a bitter sweet stuffing of radicchio, potatoes and thyme. I used the herb to refine the pancake dough and the filling which made it come though quite strong. It added a bit more taste to the crepes which would have been to soft for this filling on their own. All the bitterness and sweetness wrapped in these thin pancakes with a creamy Béchamel sauce inside and on top made us all enjoy in silence for a short while, until our delicious Italian wraps were gone!
Here's a springy green version of my crespelle that I wrote about in March, filled with spinach.
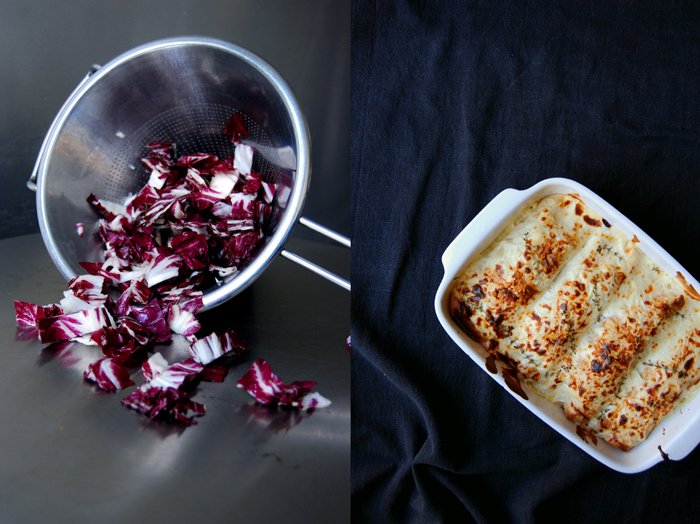
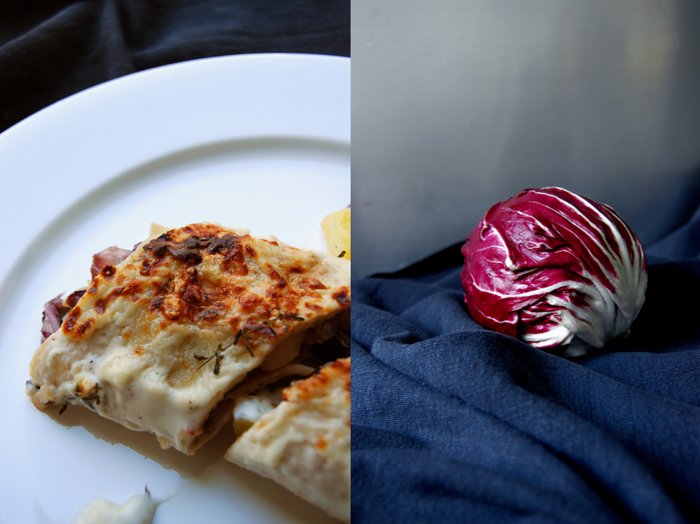
Radicchio, Potato and Thyme Crespelle
For 4 filled crespelle you need
radicchio, quartered and sliced, 300g / 10.5 ounces
potatoes, cooked, sliced and quartered, 400g / 14 ounces
fresh thyme leaves 2 tablespoons
garlic, finely chopped, 2
red wine 60ml / 2 ounces
balsamic vinegar 1 teaspoon
Parmesan, grated, 2 tablespoons
olive oil
salt and pepper
In a large pan, heat a splash of olive oil, add the garlic and radicchio and sauté for about 4 minutes or until soft on medium heat. Deglaze with the red wine, take off the heat and stir in 2 tablespoons of thyme and the vinegar. Season with salt, pepper and vinegar to taste.
For the Béchamel sauce
milk 600ml
butter 30g / 1 ounce
plain flour 30g / 1 ounce
bay leaf 1
a pinch of nutmeg, grated
salt and pepper
In a saucepan, bring the milk with the bay leaf, nutmeg, salt and pepper to the boil.
Melt the butter and whisk in the flour, let it cook on medium heat for 1 minute. Take off the heat and slowly add the hot milk, whisk until smooth and cook for about 3-5 minutes on lowest heat until it's thick and creamy. Discard the bay leaf and season to taste.
For the crespelle
milk 160ml
organic eggs 2
plain flour 130g / 4.5 ounces
salt 1/4 teaspoon
fresh thyme leaves 1 tablespoon
butter for frying
Mix the ingredients well and let the dough rest for 5 minutes. Heat some butter in a large pan and fry 4 thin crespelle, one at a time, golden on both sides.
To assemble
Set the oven to 200°C / 400F (top/ bottom heat).
Lay a crespelle flat on a plate, spread with 1/4 of the radicchio and potatoes and sprinkle 2 tablespoons of the Béchamel sauce on top, roll into a wrap. Continue until all four are done and put them next to each other in a baking dish. Pour the remaining sauce on top and sprinkle with parmesan. Bake for 12 minutes or until golden brown. Switch on the grill for the last 1-2 minutes, this makes the crespelle a little bit crisp.


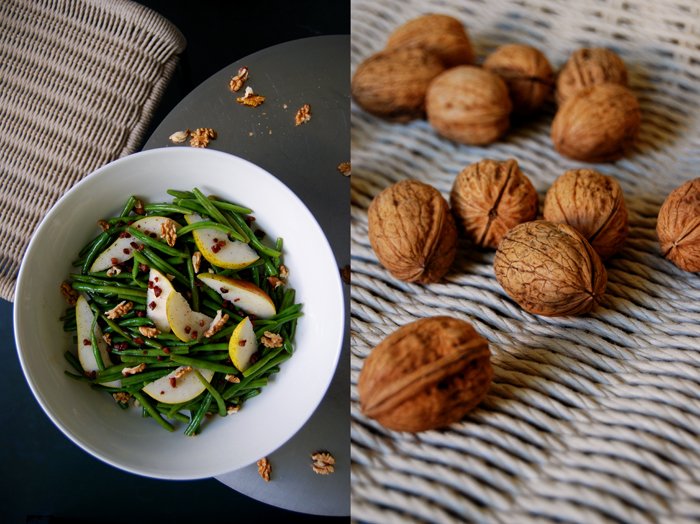
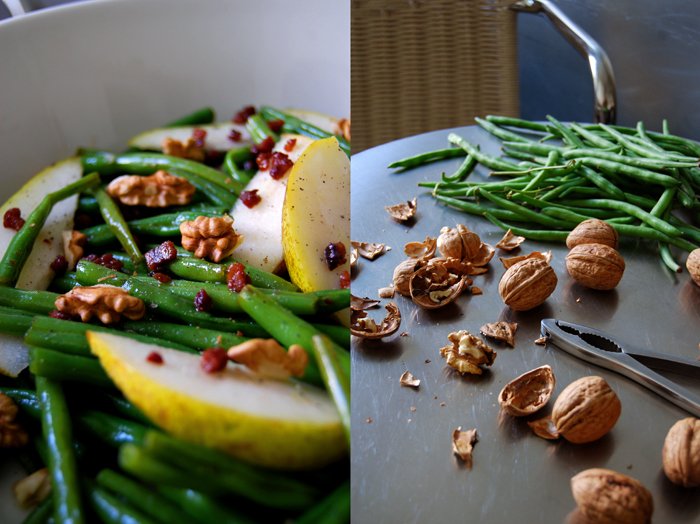
Green Beans, Pear and Walnut Salad with Bacon Bits
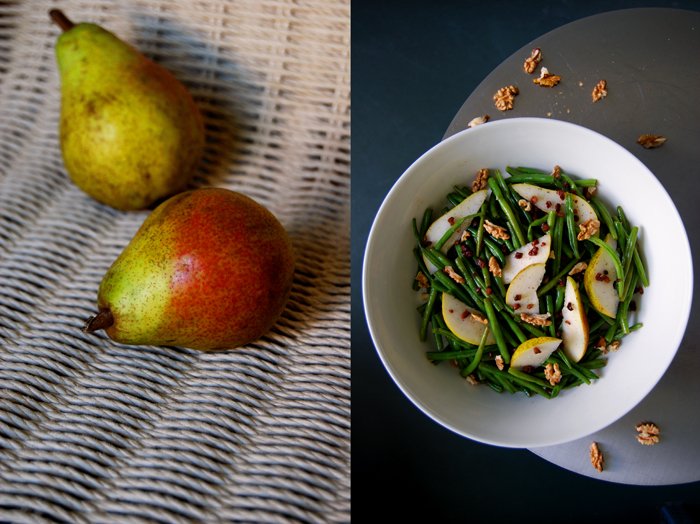
Pears and walnuts are not only visually a perfect match, be it mixed in a salad with chicory or on a sandwich with melted Stilton, this sweet and nutty combination is the start of many great dishes!
For today's salad I mixed in some local green beans before their season finishes. As much as I like them sautéed with some wine, thyme and summer savory, I almost prefer them in salads. I blanche the beans until they are al dente to keep their freshness and leave them quite crisp. The dressing for my salad comes from the juices of the crunchy bacon bits which I added as a topping. I fry the tiny cubes in their own fat until they turn into crumbly crisps and deglaze them with white Balsamico vinegar. The vinegar's smooth acidity combines perfectly with the oily juices and makes a hearty dressing, a bit salty but fruity!
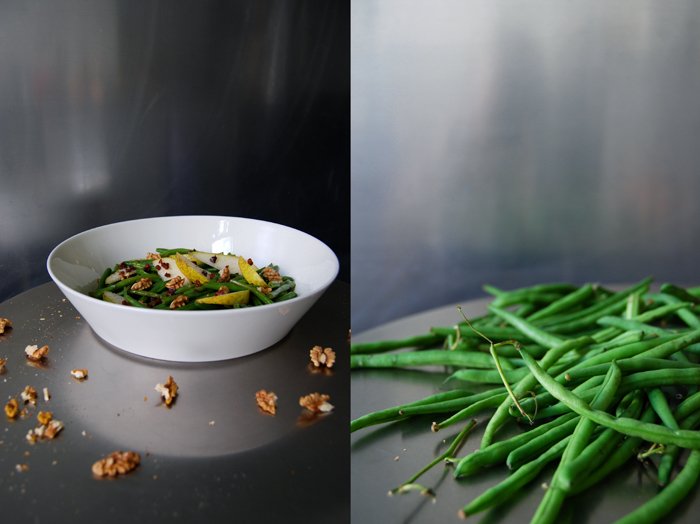
Green Beans, Pear and Walnut Salad with Bacon
For 4 people you need
green beans, ends cut off, 500g / 1 pound
crisp pear, cored and cut into slices, 1
bacon, cut into small cubes, 100g / 3.5 ounces
walnuts, broken into pieces, 10
balsamic vinegar 40ml / 1.5 ounces
olive oil 1 tablespoon
salt and pepper
Blanche the beans in lots of salted water for about 5 minutes until al dente, drain and rinse for 1-2 seconds with cold water.
In a large heavy pan, heat the olive oil and cook the bacon on medium-high temperature for a few minutes until golden brown and crunchy, stirring in between. Deglaze the bacon with vinegar, stir and take off the heat.
In a large bowl, mix the beans with the bacon and vinegar juices and season with salt and pepper to taste. Arrange the pear, bacon and walnuts on top.


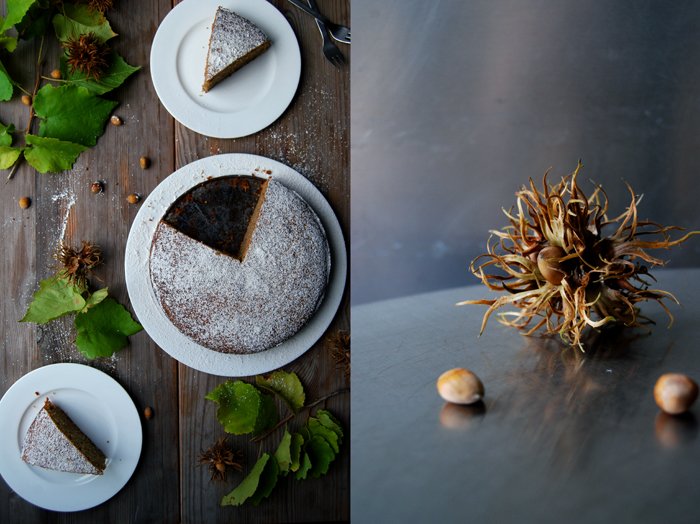
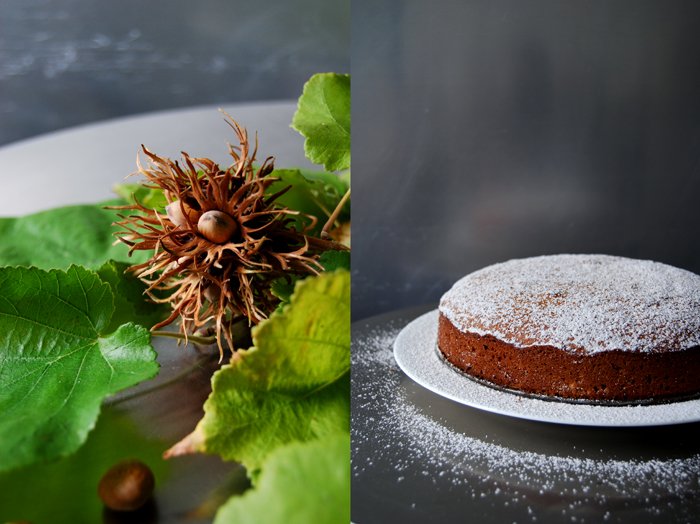
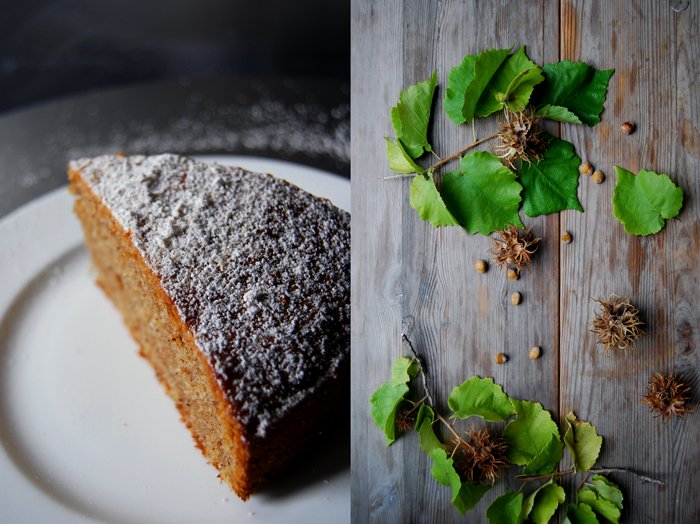
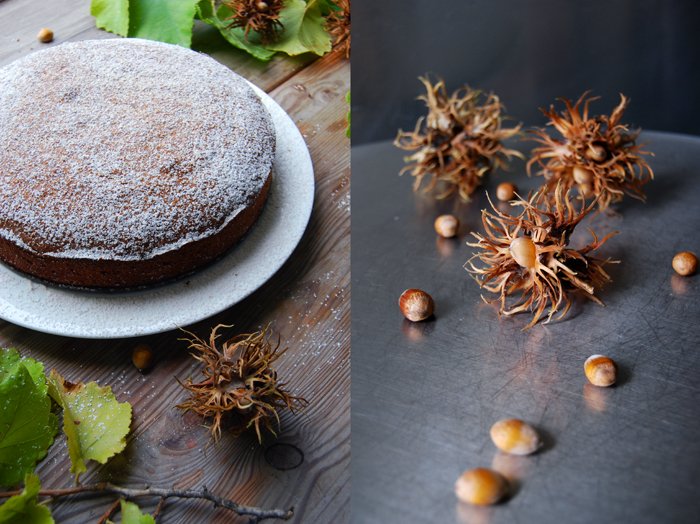
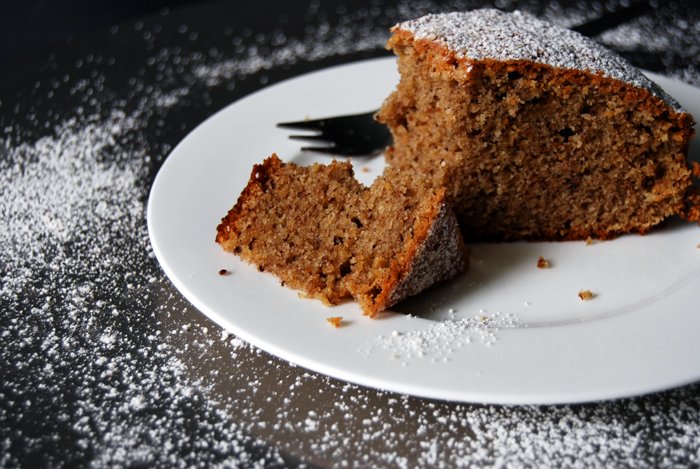
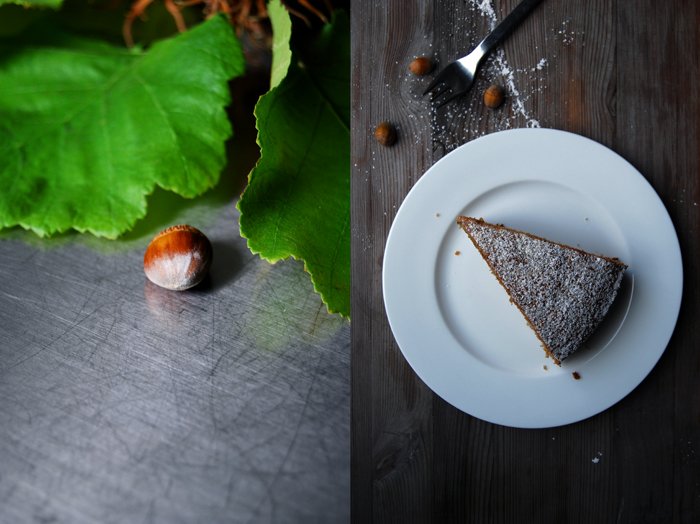
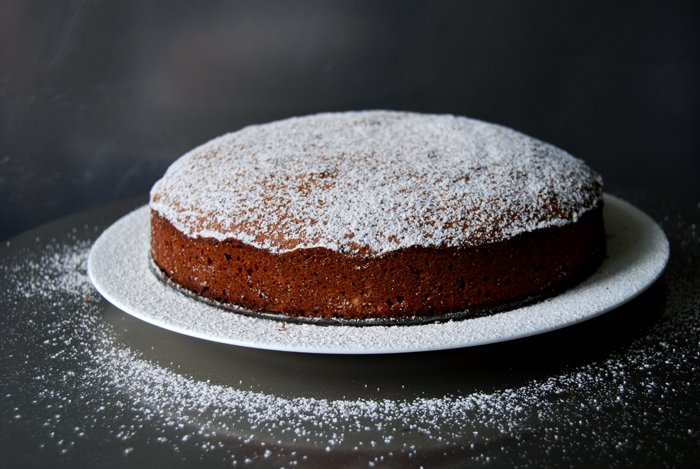
Hazelnut and Buckwheat Cake with Cinnamon Icing Sugar
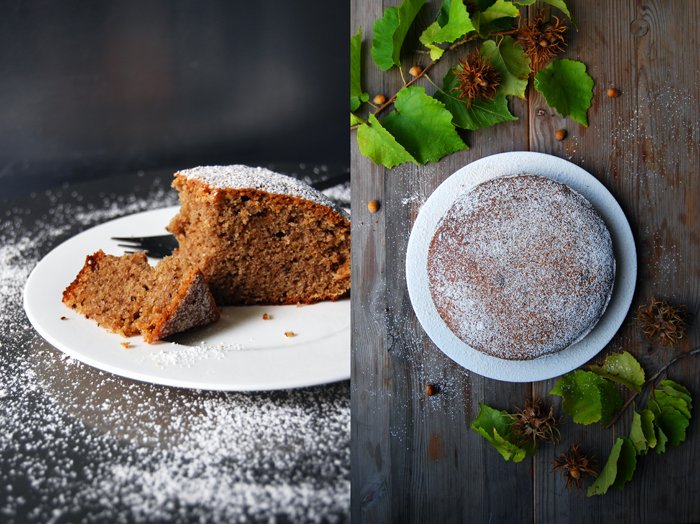
Family guests from LA! Our American grandfather Jim and his wife Gina came to visit us and - as always when guests stay with us - we let the feast begin from day one! When they arrived at noon, we sat down at our long wooden table and we only got up in the early evening, after hours of savoring. I carried one dish after the other to the table, so much so, that at one point my boyfriend stated I must have mistaken his grandparents for goats! There was so much to talk about, so many memories and stories to share, so much to show after years of not seeing each other, that a good amount of nice food seemed like the perfect company for a day like that. Also, it was a very successful way to fight their jet lag. 9 hours of time difference and my food kept them awake till 9!
One of my personal table highlights of that first day was my hazelnut and buckwheat cake. I love to welcome friends and family with a cake on the table. The sweet smell of freshly baked food in the house wakes you up even after the longest flight and makes you feel home right away! I had been in the mood for a cake like that for days, simple and spongy with the deep flavour of hazelnuts and I got what I asked for. I made the dough with ground nuts and buckwheat which adds a nuttiness to it that I wouldn't have achieved with wheat or spelt flour. It's a very popular combination in the Tyrolean mountains which always start to have a growing influence on my cooking and baking as soon as the temperatures drop. So it's a mountain cake, honest and rich in taste, refined with lots of cinnamon mixed in and sprinkled on top with some icing sugar.
I wanted to put even more food on the table, but at one point, they all stopped me. My plan was to finish the day off with my famous Swabian Cheese Spaetzle, hearty cheese and onions with homemade southern noodles, but they didn't let me go back to my kitchen! I saved it for another night and dinner and they loved it, like the Blue Cheese Crackers, Beluga Lentils with Pear, Tyrolean Plum Dumplings, Sicilian Chard, Radicchio Crespelle and all the other goodies I will write about in the coming days!
Hazelnut and Buckwheat Cake
For one 26cm / 10" springform pan or two 18cm / 7" pans you need
ground hazelnuts 225g / 8 ounces
buckwheat flour 225g / 8 ounces
granulated sugar 200g / 7 ounces
ground cinnamon 1 teaspoon plus more for dusting
baking powder 4 1/2 teaspoons
a pinch of salt
butter, at room temperature, 250g / 9 ounces
organic eggs 6
icing sugar for dusting
Set the oven to 180°C / 350°F (fan assisted oven).
Combine the dry ingredients.
Beat the egg whites and salt until stiff.
Beat the butter and sugar until fluffy. Add the egg yolks, one at a time and continue mixing for a few minutes until the mixture is thick and creamy.
Gently fold the dry mixture and the egg whites with a wooden spoon into the butter and sugar mixture, alternating, 1/3 at a time, combining well in between.
Bake for 35 minutes (or a bit shorter if you use smaller pans) or until golden brown on top. Check with a skewer, it should come out clean. Let it cool for a few minutes.
Combine 2-3 tablespoons of icing sugar with 1/4 teaspoon of cinnamon and sprinkle over the cake.


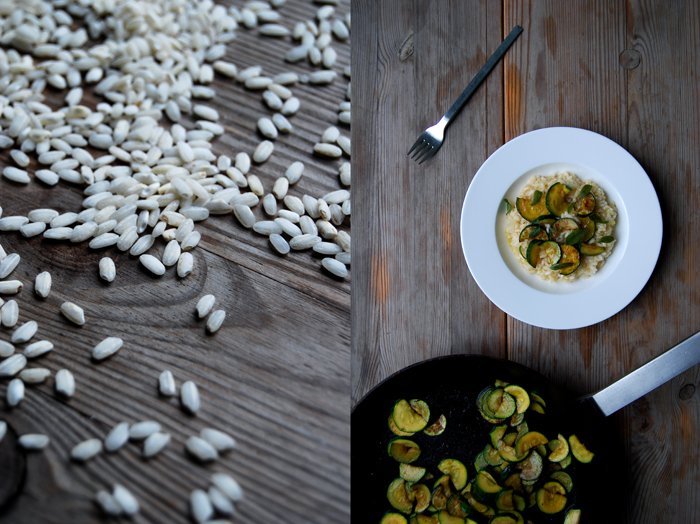
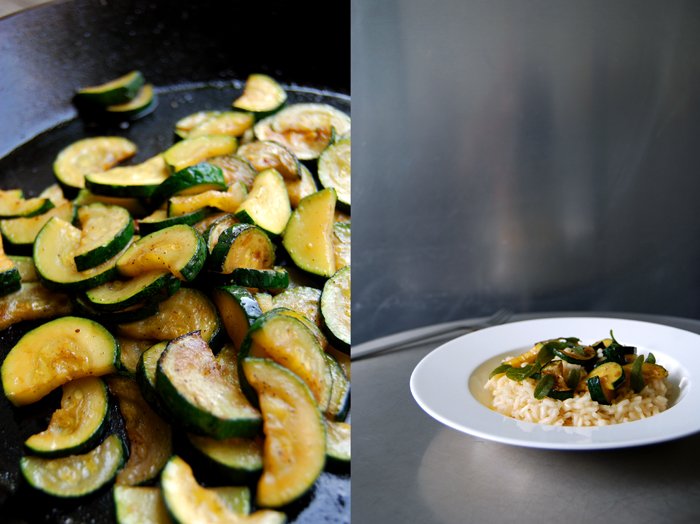
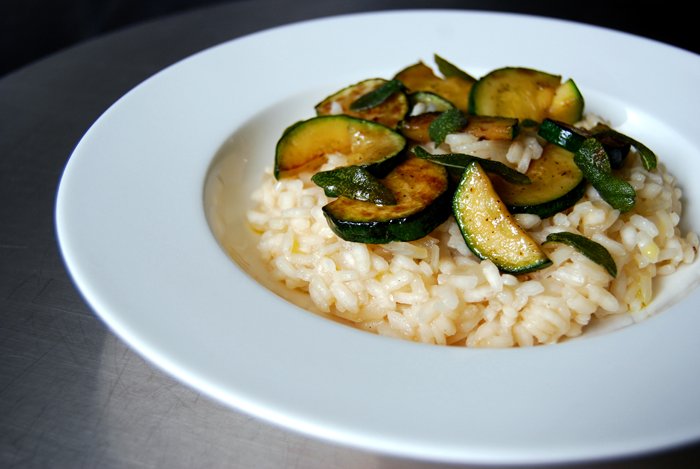
Zucchini Risotto with crisp Sage

There's something about fresh sage cooked in a little olive oil to the point of perfection! When the thick leaves become all glossy and golden, crisp and so full of flavour that they turn a simple dish into a fragrant composition with such ease - that's exactly what this bunch of herbal crunchiness did with my simple risotto!
Our dinner started innocent and pure, I just cooked my Arborio rice with some chopped onions in white wine and broth before I mixed in juicy slices of golden sautéed zucchini. The vegetable added a fruitiness which made the whole composition light and fresh, but the crisp sage leaves on top put it on another level. The rich oil they cooked in was an aromatic concentrate of the herbs best qualities, warm and strong! When I arranged the risotto on the plates, I poured this herbal essence over the rice to coat them with this golden syrup.
That's the secret to a great risotto (and not only for risotto), combining just a handful of ingredients that allow their individual qualities to spark!

Zucchini Risotto with crisp Sage
For 4 people you need
zucchini, cut in half and sliced, 350g / 12.5 ounces
sage leaves 30
Arborio rice 400g / 14 ounces
medium onion, finely chopped, 2
vegetable broth around 1800ml / 4 pints (depending on the kind of rice you will need more or less liquid)
white wine 120ml / 4 ounces
salt and black pepper
olive oil
butter 1 tablespoon
Sauté the zucchini in a little olive oil in a pan until golden on both sides and soft. Season with salt and pepper to taste and set aside.
In a small sauce pan, heat 6 tablespoons of olive oil and add the sage leaves. Let them fry until golden and crisp, for about 1 minute but mind that they don't turn dark, set the pan aside.
In a large pot, heat a splash of olive oil and the butter, add the onions and cook on medium heat for about 2-3 minutes until soft. Stir in the rice and cook on medium heat for about a minute. Add the wine and some of the broth, the rice should be covered, stir and turn the heat down to medium-low. When the liquid has been absorbed add more broth, a little at a time stirring in between. Depending on the rice, it will need more or less liquid. When the rice is al dente and the broth is more or less absorbed take it off the heat and season with salt and pepper to taste. Close with a lid and let the risotto sit for a minute.
Divide the risotto and zucchini between the plates, sprinkle with some of the sage oil and top with crisp sage leaves, serve immediately.


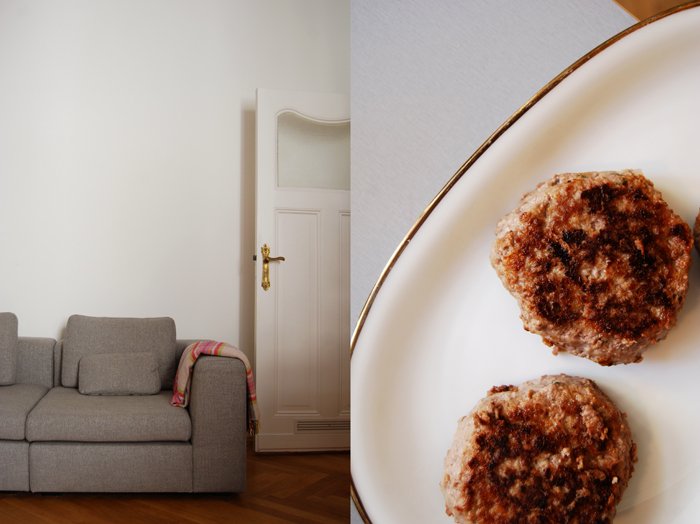
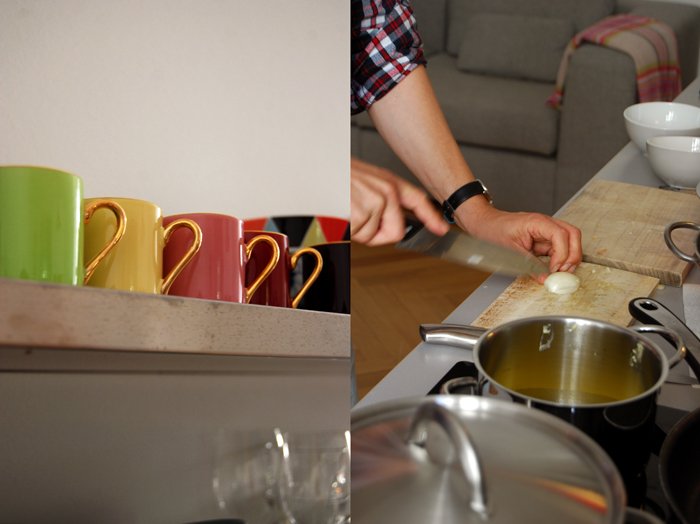
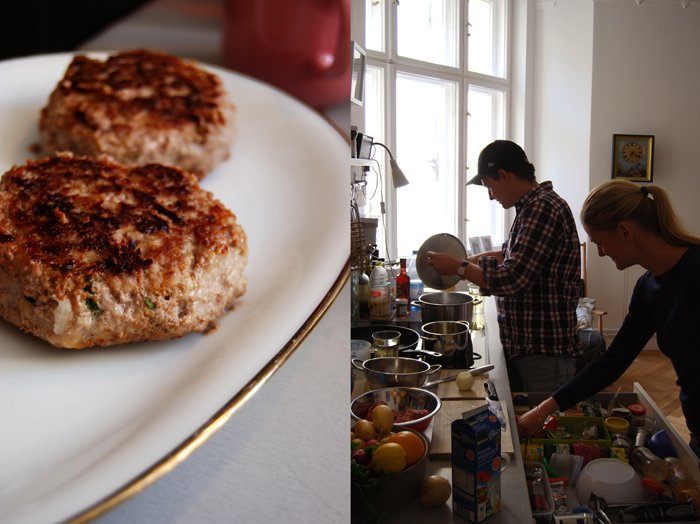
meet in your kitchen | The Deyerling's Venison Burger with Bavarian Potato Salad
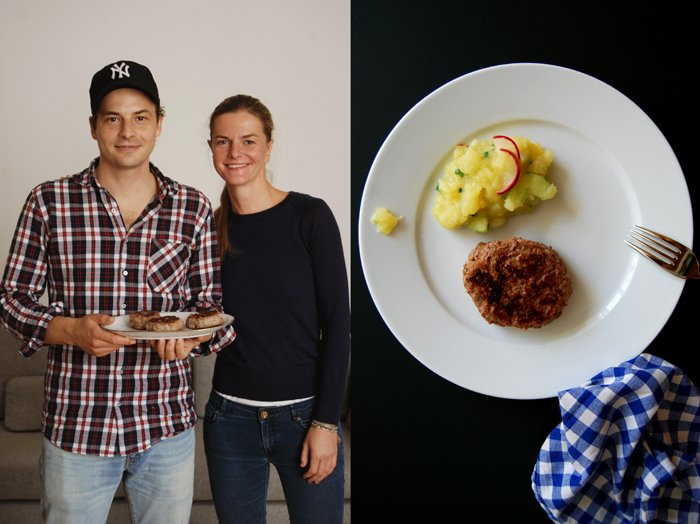
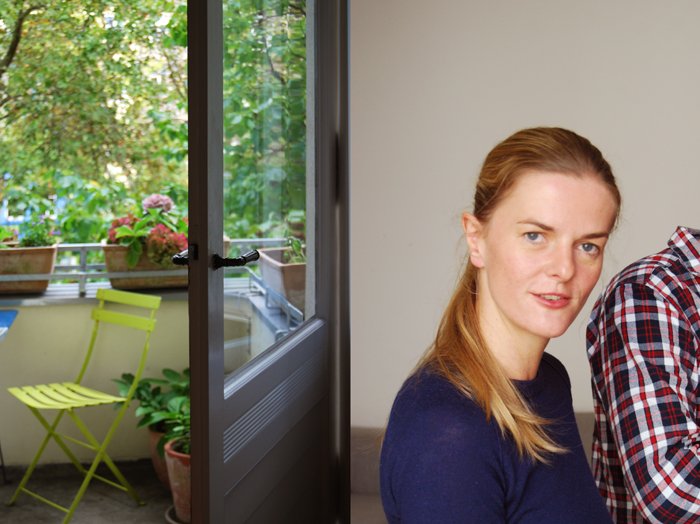
When I met Anna and Clemens Deyerling for the first time, I noticed the blind understanding and wordless communication between them that only close siblings can have. They know and respect each others roles, in their private life but also in business as they decided to start a company together with their partner Julius, an old friend of Clemens'. In 2010, Sitzfeldt was born, the beginning of an exciting journey and the start of a young online business for affordable design furniture. The Deyerlings come from a family background of furniture and design and they wanted to continue this family tradition, but in their own way. They sat together with designers who already were or became friends over the years and developed various sofa collections. One of them, the Set sofa system, already won the Interior Innovation Award and the renowned Red Dot Design Award.
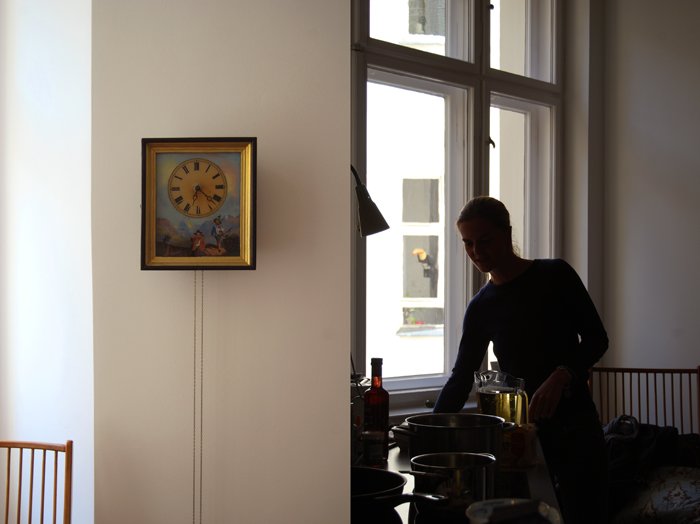
A few months ago, the young entrepreneurs presented a selection of their collections in one of Berlin's old manorial flats. One spacious room followed the other, separated with large double wing doors, high ceilings decorated with opulent stucco and beautiful timbering on the walls. The siblings chose an amazing location for the presentation but they also managed to create a beautiful evening with great people and food. One of the (not insignificant) reasons why I still remember that day so clearly are Clemens' skills in the kitchen, this man can cook! He treated us to a buffet of various soups and dips, fresh bread and wine and everybody loved it! On that day, Anna was the perfect host, she's not only responsible for the creative presentation of the design which led to a very comfortable atmosphere, but her soft and warm way makes you feel welcome right away. So while her brother was busy in the kitchen on his own (if you read the interview, you'll know why) we got lost in chatting. When I met the two siblings in Anna's gorgeous flat this week for our meet in your kitchen feature, the roles were more or less the same, us chatting while Clemens was cooking.
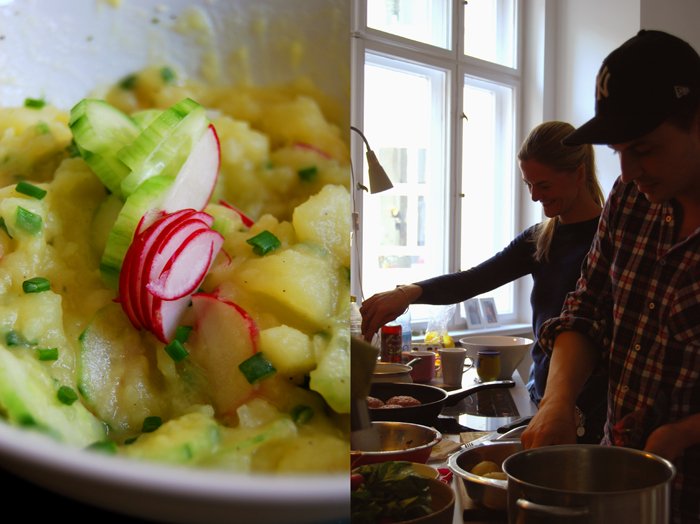
Clemens made a fantastic venison burger - called Fleischpflanzerl where he comes from - with the most amazing meat from a butcher in the Brandenburg area outside Berlin, accompanied by a light warm Bavarian potato salad inspired by the region where they grew up, the south of Germany.

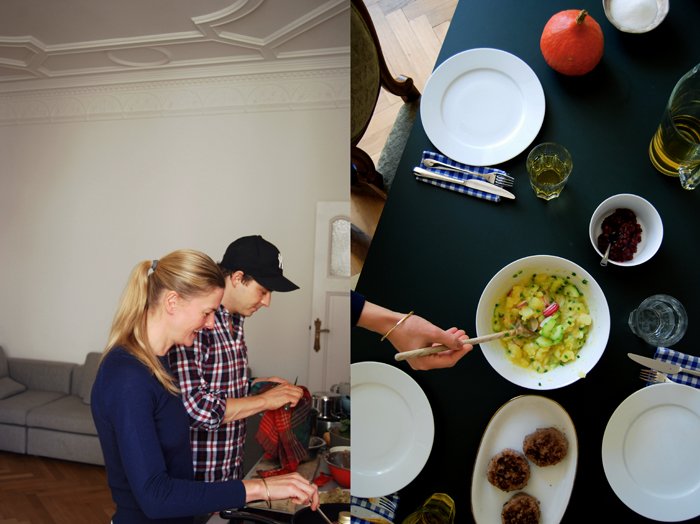
Venison Burger with warm Bavarian Potato Salad
For 4 people you need
For the burgers
minced venison 500g / 1 pound
white bread, rind cut off, 3 slices
milk 80ml / 3 ounces
medium onion, finely chopped, 1
eggs 2
orange zest 1/2 teaspoon
lemon zest 1/2 teaspoon
mustard 2 teaspoons
fresh parsley, chopped, a small bunch
dried or fresh marjoram, chopped, 1 teaspoon
freshly grated nutmeg
salt 1 - 1 1/2 teaspoons
pepper
olive oil
Soak the bread in the milk for a few minutes. Tear the bread into pieces and mix with your fingers.
Cook the onion in a little olive oil until soft. Whisk the eggs, mustard, orange and lemon zest and season with salt, pepper and nutmeg.
Mix the minced meat with the bread/ milk mixture, the onions, the egg mixture, marjoram and parsley and form the burgers.
In a large, heavy pan, heat a splash of oil and cook the burgers on medium heat until golden brown on both sides and cooked through.
For the potato salad
warm, waxy potatoes, cooked, peeled and sliced, 1kg / 2 1/4 pounds
medium onion, chopped, 1
garden radish, thinly sliced, 4
cucumber, peeled, cut in half and sliced, 1/2
chives, snipped, 1-2 tablespoons
olive oil
For the salad dressing
broth, hot, 400ml / 13.5 ounces
red wine vinegar 3-5 tablespoons
mustard 1 tablespoon
salt and sugar
Cook the onions in a little olive oil until soft.
Mix the hot broth with the vinegar and mustard and season with salt and sugar to taste.
Slowly mix the potatoes with the dressing (not all at once). Stir in the onions, cucumber, radish and chives.
Serve warm with the venison burgers.

Anna and Clemens, you grew up in the south of Germany, in Bavaria. Both of you studied in Germany and in London, when and why did you decide to move to Berlin?
Clemens: I fell in love with Berlin during my studies and tried to find my first job here. I was lucky. In the meantime our entire family - our sister and our parents - also moved to Berlin.
Anna: We grew up in quite a small town in Bavaria. I always dreamt of living in a big city. Berlin has always been on my list and after having spent a few months during my master's program here, I always wanted to come back. I just love the openness and the variety of Berlin. I finally moved here 10 years ago and since then Berlin became home more and more.
Do you miss the kitchen of the south?
Clemens: Oh, yes. I miss it badly. Especially the Schweinebraten (pork roast) our grandmother used to make every single Sunday. I still need it at least once a month, but do it myself now. And what else? Pretzels, Pretzels, Pretzels… I will never understand why no one outside of Bavaria can bake Pretzels as they should be.
Anna: I used to miss it, but fortunately the southern kitchen became quite popular in Berlin over the last few years. So there are good places all over Berlin. When it gets really bad again, I go to Meierei in Kollwitzstraße or I hope for a lunch invitation for Sunday by my brother.
What was the first dish you cooked on your own, what is your first cooking memory?
Clemens: I am not quite sure. I guess, I used to cook with our Mum when we were children. But the first real remembrances to consciously cook was my grandma making the Schweinebraten every Sunday.
Anna: I guess, it was only Clemens who cooked with our Mum... At least, I did not. Because I remember always calling my Mum to ask for help once I lived on my own. And this was for the very basic things, like cooking pasta…
What are your favourite places to buy and enjoy food in Berlin?
Anna: Soluna in Gneisenaustraße, Market at Südstern, Markthalle 9, Meierei, Nansen, Restaurant Obermaier, Massaniello, Txokoa Gastro Bar, Hoastaria del Monte Croce.
Clemens: Markthalle 9, Fräulein Dickes in Stargarder Straße
You started Sitzfeldt, an online company specialised in affordable designer sofas in 2010 together with Julius, an old school friend of Clemens'. What moved you to work in the field of designer furniture?
Due to our father’s business, we have always had a great affinity to furniture and design. At the end, it was this affinity combined with the business potential of selling furniture directly to the end customer via the internet. And of course the wish of building up our own company.
Your father established a successful furniture business and you continue this family tradition with your own company. How does this affect your work? Do you feel responsibility, is the family tradition a gift or a burden?
Anna: Once, someone called Sitzfeldt the 'Unternehmensnachfolge 2.0' (Business successors 2.0). That is pretty much how I feel. Without my father and his experience, we would not have been able to build up Sitzfeldt so quickly. But it makes me proud, that we have always done it our way. And: It makes me happy to see my father proud. Of course, he is happy that something he built up is continued somehow. So, it is a gift – for sure.
Clemens: It is easier to be an entrepreneur, if there are other entrepreneurs in the family. I feel supported and challenged by my family at the same time. And it helps that worries and doubts are understood and shared. The family tradition is a gift – no burden – because it really helps to build upon failures and successes.
Two of your collections have been nominated for the German Design Award 2015. Who are the designers you're working with at the moment and how do these collaborations start?
Anna: The designer we work with the most, is Steffen Kehrle. He actually is an old friend of Julius' who we all met in Milan in 2010. That was the year when the volcano in Iceland was active, so our flights were all cancelled. Steffen had a car and three free seats, so we drove together from Milan to Munich. During that ride we talked a lot about our plans, visions and ideas. When we arrived, it was clear that we would have to work together. That is when we first started to develop our sofa system Set which won the Interior Innovation Award 2013 and the Red Dot Design Award. Since then, we work together with Steffen a lot. We developed the new table GAME with him and are planning many more projects. Sebastian Herkner is a good friend of Steffen, that is how we met. HEIM is the first project we launched with Sebastian.
Clemens: In the end, we decide if a designer fits to Sitzfeldt. Our philosophy and their philosophy need to match. So it definitely helps that we are good friends with Steffen. It is fun to work on both of our ideas and plans and it is even more fun to see that people actually like what we do.
What are your plans and visions for Sitzfeldt?
Clemens: We want to work hard in order to strengthen our market position and our brand. Of course, the long term vision is that everyone who is looking for a sofa takes Sitzfeldt into account (laughs). No seriously, there are three basic elements Sitzfeldt is built upon: design, sustainability and fair prices. We work on all areas and think in small, realistic steps. In the end, we want to continue our journey of the last four years.
Anna: I cannot add anything to that, besides one thing: I hope that we will always enjoy what we are doing.
Anna and Clemens, what did you choose to share on eat in my kitchen and why?
Warm Bavarian Karfoffelsalat (potato salad) with cucumber. Why? This tastes like home and is so delicious with the right potatoes. Coming with a Boulette made of Dammwild (venison burger) from Brandenburg. There is no way of enjoying meat more sustainably and the Boulette is also well known in Berlin. This all comes with Preiselbeeren Salsa (lingonberry salsa).
If you could choose one person to cook a meal for you, who and what would it be?
Anna: Our grandmother is getting older and she is the only one who knows how to make Wuchter (Bohemian dumplings) as they should be. Clemens, we need to learn this! So, it is my grandmother.
Clemens: Angela Merkel, no matter what...
You're going to have ten friends over for a spontaneous dinner, what will be on the table?
Anna: Pasta. And to be honest, it is also pasta for not-so-spontaneous dinners.
Clemens: Pasta. The entire year, there is always something good to have with pasta. And if they really surprise me, I always have homemade pesto in the fridge.
What was your childhood's culinary favourite and what is it now?
Anna: Childhood: Wuchter – a special kind of the Bavarian Knödel (Bavarian dumplings). Today, I still die for Wuchter.
Clemens: Bayrischer Schweinebraten (Bavarian pork roast).
Do you prefer to cook on your own or together with others?
Anna: I prefer to cook on my own, but love being entertained by friends and wine while cooking.
Clemens: I love to cook for others, but I can’t stand any 'assistant' in my kitchen. You can ask my wife …
Which meals do you prefer, improvised or planned?
Anna: Planned.
Clemens: Planned and it really bothers me when I forget something at the grocery store.
Which meal would you never cook again?
Anna: Bayrischer Schweinebraten (Bavarian pork roast) – my brother’s is just better …
Clemens: Gluten-free pasta.
Thank you Anna and Clemens!


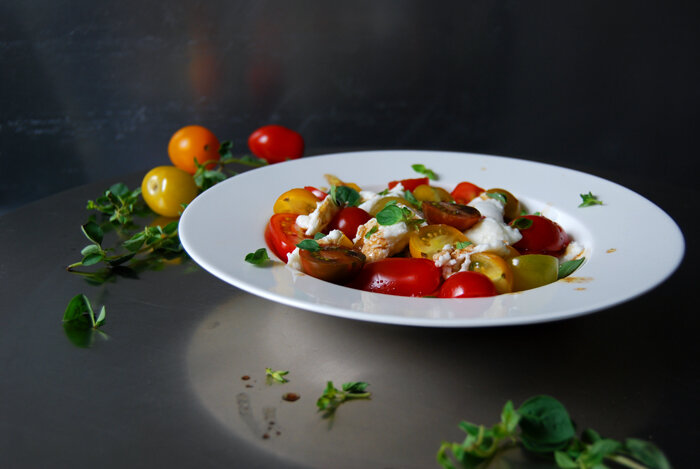
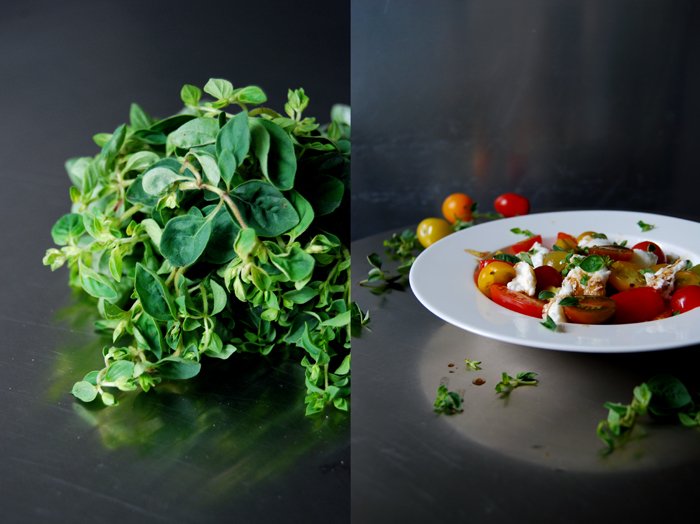
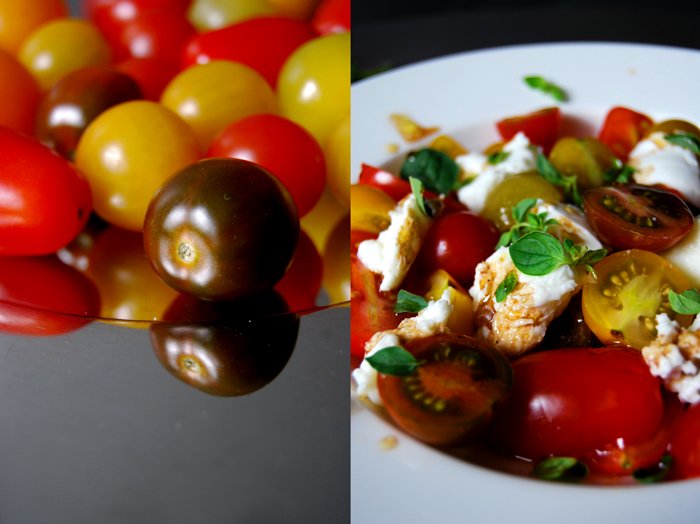
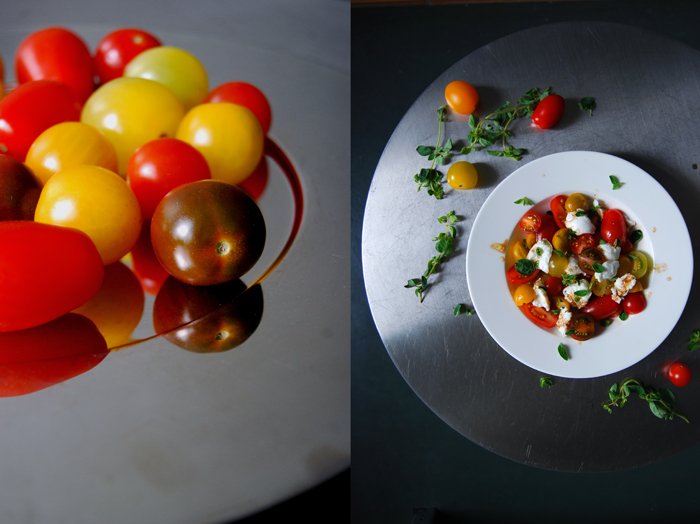
Heirloom Tomatoes with Mozzarella di Bufala, Oregano and Orange Vinaigrette
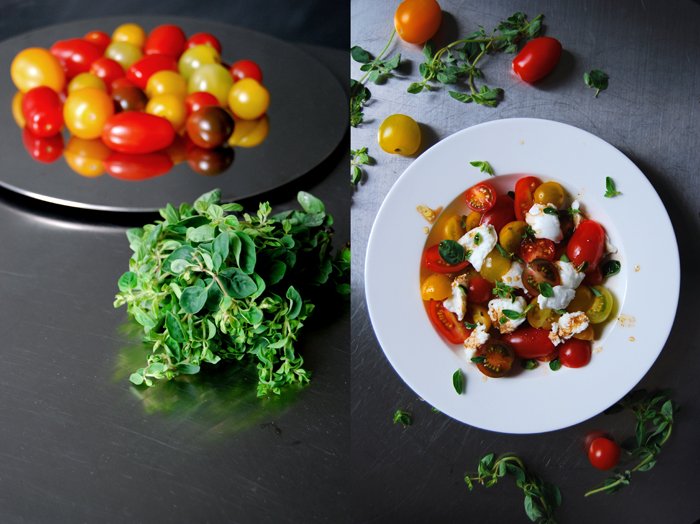
Just one more time, before I let go of one of my most beloved summer salads! I need one more Caprese salad, the last one, before I say goodbye to this easy yet so delicious combination of fresh tomatoes and Mozzarella di Bufala. As much as I look forward to and enjoy the new season with its culinary qualities, I do miss my summery dishes sometimes, especially when I look at our holiday pictures of Malta. The memories of my Mediterranean outdoor cooking pop into my head and pull me into a different mood of food. A mood that demands for Mediterranean flavours, colours and smells, no pumpkins, cabbages and pies.
So as long as I don't have to to compromise in taste, ripeness and sweetness, I enjoy my colourful small heirloom tomatoes and their late summer coloured prettiness on my plate. I don't have to worry about any season when it comes to Mozzarella di Bufala, the organic produce that I use is so creamy that it almost reminds of Burrata. I just have to tear it into pieces and it coats the red and yellow fruits in its silky milkyness. The whole composition is perfect, with a quick orange vinaigrette, smooth and fresh, but it needed something different to pay a little tribute to the month we're in now. No August, no sweet basil, this is over now. This is the beginning of a colder, stormy season, falling leaves and earthy smells. I didn't want to add more sweetness, I wanted something stronger almost harsh, so I brought in some fresh oregano. The little leaves taste flowery yet a bit bitter, this is late summer in the south to me!
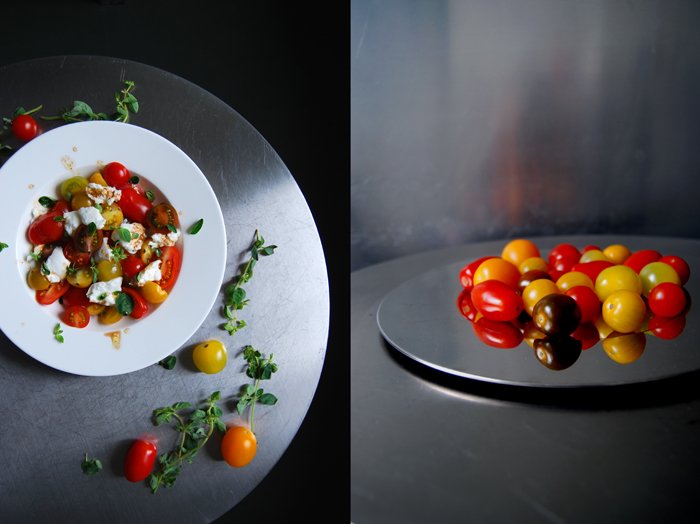
Heirloom Tomatoes with Mozzarella di Bufala, Oregano and Orange Vinaigrette
For lunch for 2 you need
small heirloom tomatoes, cut in half, 250g / 9 ounces
Mozzarella di Bufala or Burrata, torn into pieces, 125g / 4.5 ounces
fresh oregano leaves 1-2 tablespoons
For the dressing
olive oil 3 tablespoons
balsamic vinegar 1 tablespoon
freshly squeezed orange juice 1 tablespoon
salt and pepper
Whisk the ingredients for the dressing and season to taste.
Arrange the tomatoes and mozzarella on a big plate and sprinkle with the vinaigrette and oregano, serve immediately.

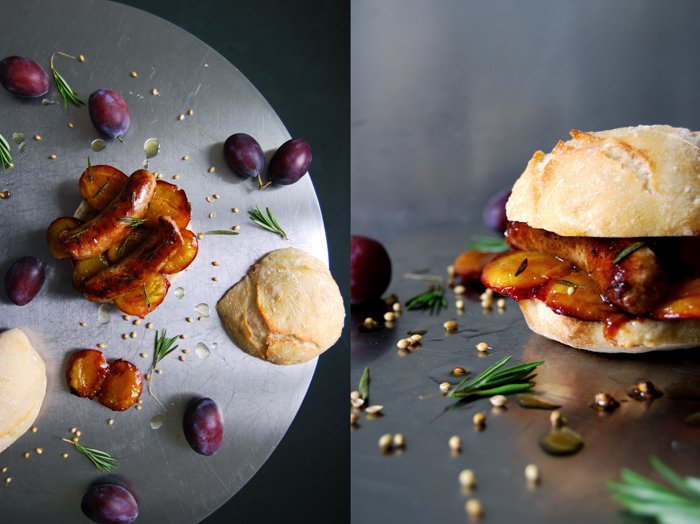
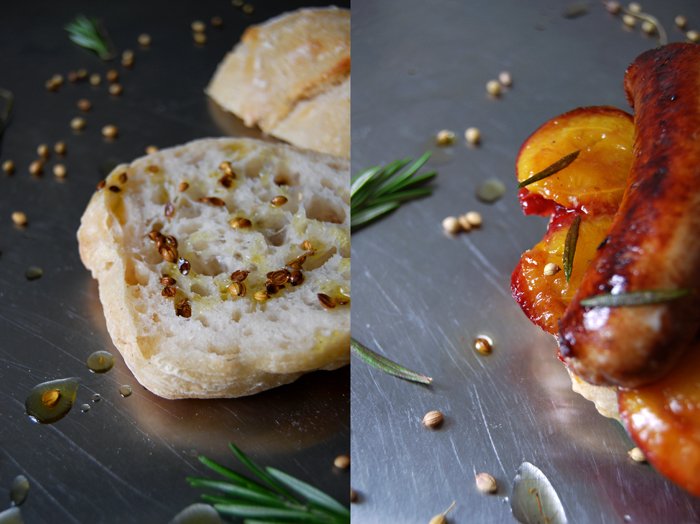
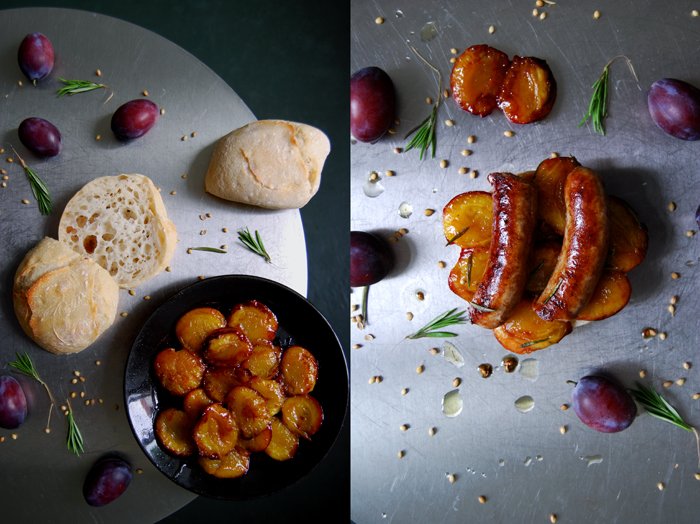
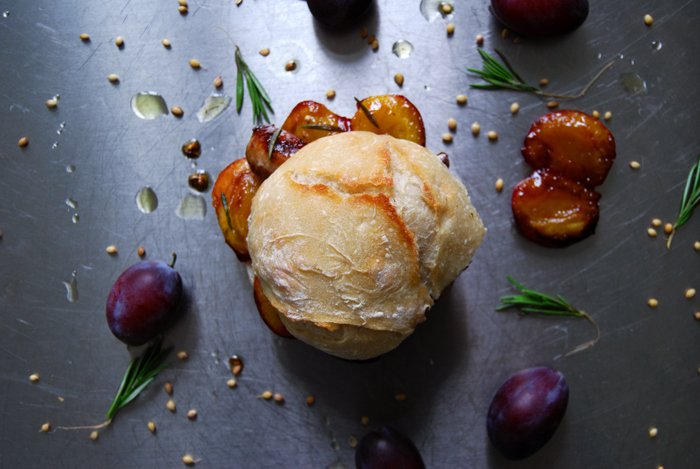
Caramelized Plum and Sausage Sandwich with Rosemary and Coriander Oil

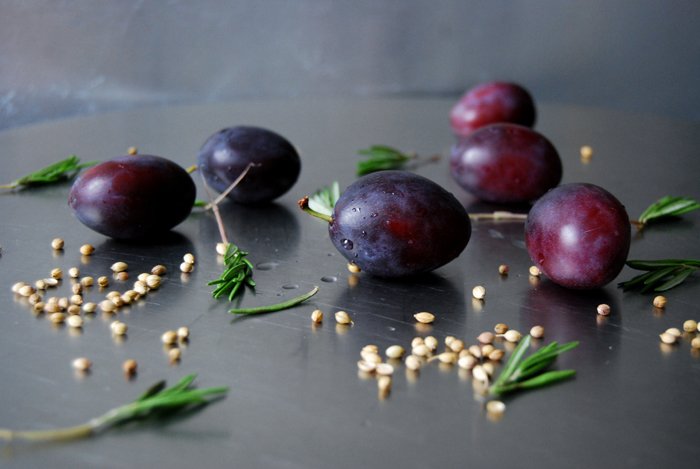
This sandwich has been on my mind for weeks and it might have something to do with the fact that my kitchen has become a store room for Damson plums. I buy these fruits in big baskets, lots of them, and it doesn't seem like it's going to end soon. As long as they are in season, I'm a loyal and dedicated fan! They give me endless inspiration for sweet and savory dishes and for new culinary experiments. I'm hooked on their strong taste, this subtle sweet and sour combination goes so well with all kinds of spices and flavours. The common round black plums are another kind that taste much sweeter but they're lacking in depth, so I strongly recommend Damsons for my sandwich!
And here it comes, a new sausage sandwich! The last time I made one was in Malta, my sausage sandwich with rucola and coriander oil. Today, I feature this spice oil again, coriander seed infused olive oil, as it goes so well with this kind of meat. The seeds are actually one of the main ingredients of Maltese sausage which is one of the best in the world to me (and that means a lot from a German!). I sprinkle the oil and the crunchy seeds on the buns and let them soak into the soft and juicy sponginess, that's my favourite way to start a sandwich!
I fried a couple thick, coarse sausages with fresh rosemary needles. The herb is great for the topping when it turns woody and crisp, but the needles also add their aroma to the frying juices which I pour on the buns before I put the meat on. And now, my fruit of the season comes in, I caramelized the plums for just a few minutes in sugary butter, I wanted them soft but not soggy. Their sour sweetness combined with the dark flavour of caramel is all a sausage sandwich could ask for! We loved it!
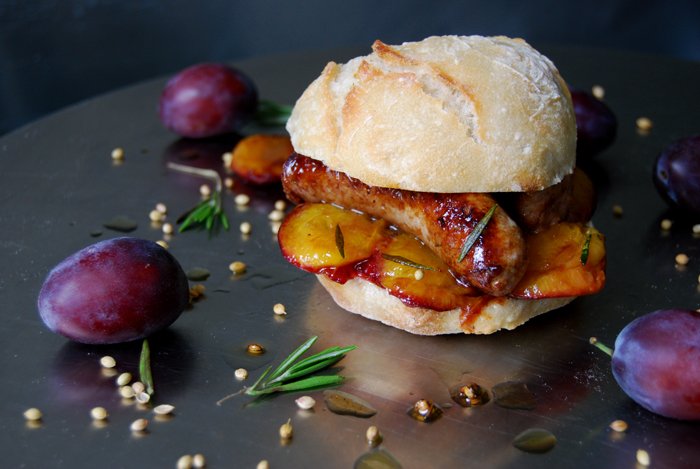

Caramelized Plum and Sausage Sandwich with Rosemary and Coriander Oil
For 2 sandwiches you need
juicy buns, cut in half, 2
coarse sausages (like Salsiccia) 2
fresh rosemary, the needles of a small sprig
plums (preferably Damsons), cut in half and pitted, 8
butter 1 tablespoon
granulated sugar 1 teaspoon
olive oil 3 tablespoons plus more for the sausages
coriander seeds, lightly crushed in a mortar, 1 teaspoon
In a sauce pan, heat 3 tablespoons of olive oil and the coriander seeds and let them infuse the oil on medium heat for 2 minutes.
In a heavy pan, heat a splash of olive oil and cook the sausages until golden brown on all sides. Add the rosemary needles for the last 2 minutes or until they are crisp, but not dark. Cut the sausages in half and set aside, keep the frying juices.
Melt the butter and sugar in a pan on a high temperature. When the sugar starts to turn brown, add the plums, cut side first. Cook for 2 minutes, gently turn the fruits and cook on the other side for 1 minute. Take the pan off the heat.
Brush the buns with the coriander oil, add some of the seeds and lay the plums on top. Brush the sausages with a little of the caramelized juices of the plums and put them on top of the fruits. Pour all the remaining juices of the sausages and plums over the sandwiches and sprinkle with a few of the crisp rosemary needles. Close, squeeze and enjoy!

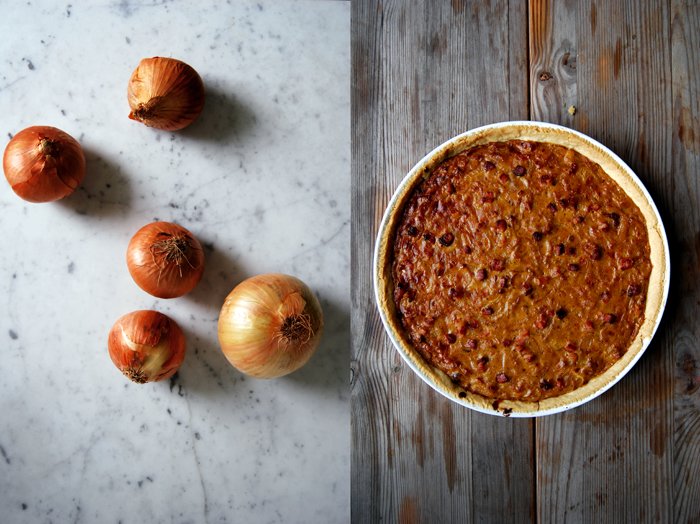
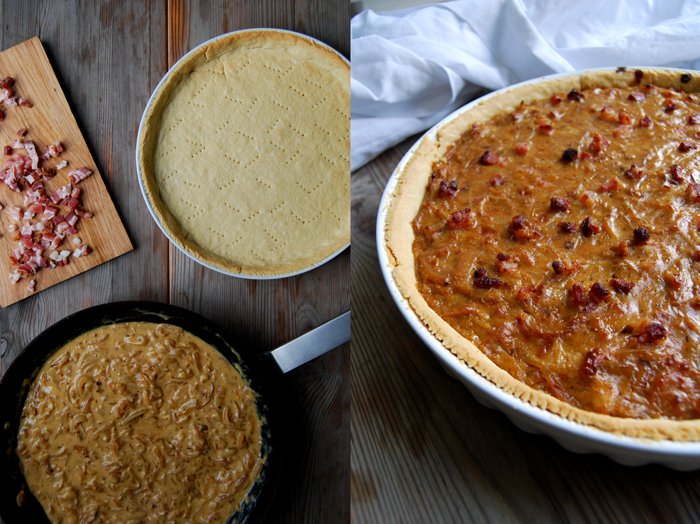
Zwiebelkuchen, the perfect Onion and Bacon Pie for September

Zwiebelkuchen, young wines and the warming sun of late September! I used to live quite close to the French border, not too far away from the Alsace region. On Sundays, in late September and October, when the leaves start changing colour and the grapes are ripe and plump, I loved visiting the winegrowers in the vineyards on both sides of the border. They were busy bringing their harvest in and producing the first young wines, like the Alsatian Nouveau Vin (like Neier Siasser) or the Federweisser in the Pfalz area in south-west Germany. Many villages celebrate the harvest season with a traditional wine feast, with lots of wine and Zwiebelkuchen, a hearty pie with a sweet and juicy onion filling on top of a flaky buttery short crust. It's divine, the ultimate autumn food!
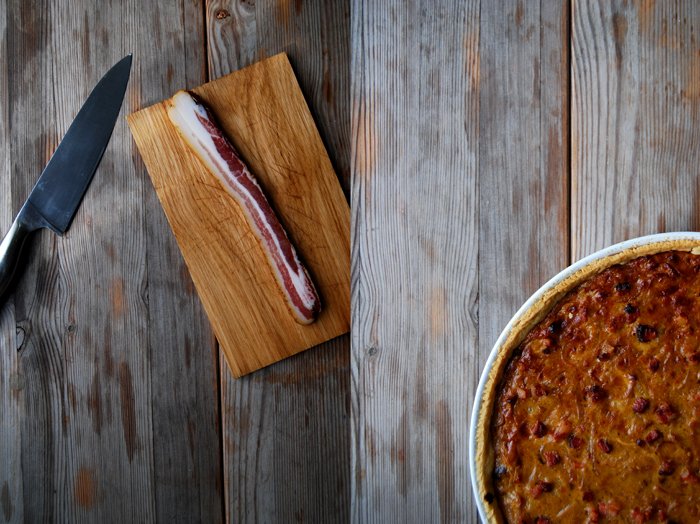
Sometimes, Zwiebelkuchen is made with bacon which adds a nice smoky flavour to it and a bit of saltiness to balance out the sweetness of the onions. However, one thing used to bother me with many pies I ate in those days, soft uncooked bacon. To me, bacon should be crisp and crunchy, I can't stand chewing on soft pieces of fat. When the bacon is mixed with the onion and eggs for the filling, there's no chance to get the right result, it will stay rubbery and soggy. The solution is very simple, just put the bacon on top of the filling while it's in the oven and let it release its juices and flavours. This way you get the best crunchy bacon bits you can imagine!
Zwiebelkuchen
For one pie you need a round (27cm / 10.5″) baking dish or tart pan.
For the short crust base
plain flour 200g / 7 ounces (I use spelt flour type 630 but you can use any other plain flour)
salt 1/4 teaspoon
butter, cold, 100g / 3.5 ounces
water, cold, 2 tablespoons
Combine the flour with the salt. Cut the butter with a knife into the flour until there are just little pieces of butter left. Continue with your fingers and rub the butter into the flour until combined. Add the water and continue mixing with the hooks of your mixer until you have a crumbly mixture. Form a disc, wrap in cling film and put in the freezer for 10 minutes.
For the filling
onions, cut in half and thinly sliced, 650g / 1.5 pounds
heavy cream 200ml / 7 ounces
milk 150ml / 5 ounces
organic eggs, mixed with a fork, 3
bacon, cut into little cubes, 40g / 1.5 ounces
butter 1 tablespoon
olive oil
nutmeg, freshly grated, to taste
salt and pepper
plain flour 1 heaping tablespoon
In a large heavy pan, heat the olive oil and butter and cook the onions on medium heat for about 15 minutes until golden brown and soft, stirring them once in while. Season with salt, pepper and nutmeg to taste, add the flour and brown on high temperature for 1-2 minutes, stirring constantly. Add the milk mixed with cream, bring to the boil and cook for 3 minutes on medium-high temperature, continue stirring. Take off the heat, season to taste and mix in the eggs.
Set the oven to 200°C / 390°F top/ bottom heat.
Roll out the dough between cling film and line your baking dish with the flat pastry. Prick with a fork and blind bake for 5 minutes.
Put the onion filling on top of the blind baked pastry, sprinkle with the bacon and bake for 10 minutes. Turn down the heat to 175°C / 350°C and bake for another 30 minutes or until the pie is golden brown on top and set.
Let the pie cool for a few minutes and serve warm or cold, preferably with Nouveau Vin!


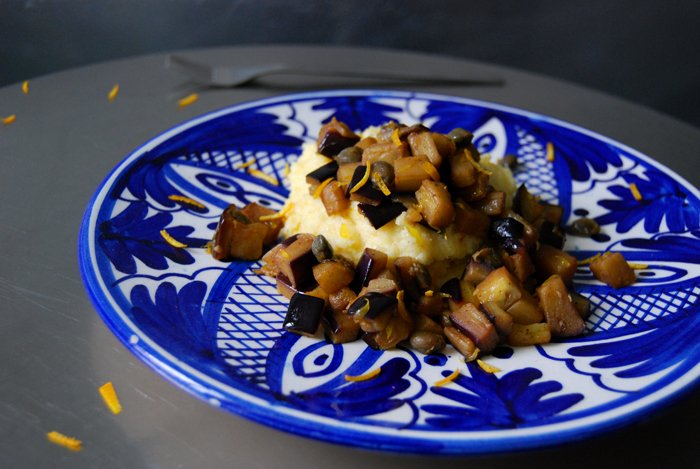
Cumin Cinnamon Aubergine with Capers and Orange Polenta
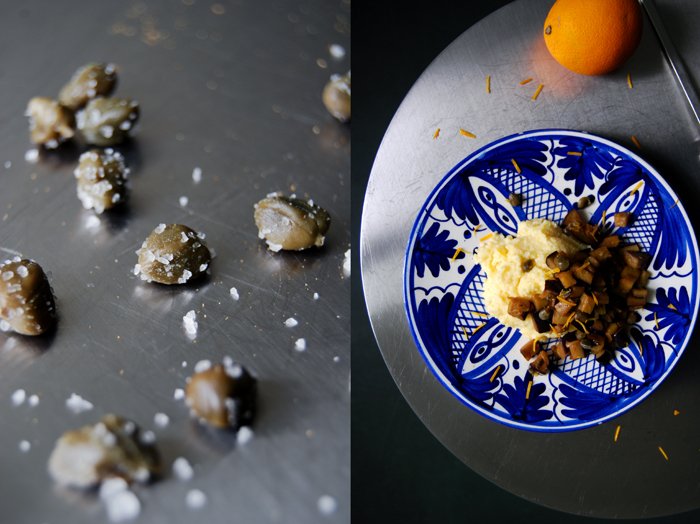
Today, all the warm colours of autumn are combined on my plate, brown cumin, golden cinnamon, green capers, purple aubergine and bright oranges! The transition from summer to the next season brings the spices back into my cooking, my big spice box is out almost every day! In June, July and August, I follow my love for fresh, woody herbs, rosemary, thyme, oregano or fleshy sage, mint or basil leaves, but now it's time for some exotic mixtures again. Salty and citrus flavours mixed with earthy cumin and sweet cinnamon. It works great, and the juicy aubergine, with its unobtrusive taste stands up surprisingly well and holds it all together.
I got all excited surrounded by these deep aromas in my kitchen, so I decided to try out something new when I mixed the cornmeal into the milk for my polenta. I cooked it with a few strips of orange zest, I didn't want it to be pure and naked next to the rich composition I prepared for the aubergines. It was a wonderfully warming dish, in colour and taste, a little bit surprising in flavours, but really, really good! So good, that I already bought a couple more aubergines for the next batch!

Cumin Cinnamon Aubergine with Capers and Orange Polenta
For the aubergine
aubergine, cut into small cubes (1/2cm / 1/4"), about 200g / 7 ounces
garlic, crushed, 2 cloves
cumin 1/4 teaspoon
cinnamon 1/4 teaspoon
capers, rinsed and drained, 1 tablespoon
freshly squeezed orange juice 50ml / 2 ounces
orange zest 1/2 - 1 teaspoon
balsamic vinegar 1 teaspoon
olive oil
salt
In a large pan, heat a splash of olive oil, the garlic, cumin, cinnamon and capers for 1 minute, stirring constantly. Add a little more oil and the aubergine and cook for 5 minutes on medium heat or until the aubergine is golden and soft. Deglaze with the juice and season with vinegar and salt to taste. Sprinkle with orange zest and serve with the warm polenta.
For the polenta
polenta 120g / 4 ounces
water 250ml / 8.5 ounces (plus around 100ml / 3.5 ounces for cooking)
milk 250ml / 8.5 ounces
salt 1 teaspoon
olive oil 2 tablespoons
orange peel 3 long strips
In a sauce pan, heat the water and milk, add the salt and bring to the boil. Take the pan off the heat, add the olive oil and polenta and whisk. Add the orange peel, turn down the heat to the lowest temperature and put the pan back on. Cook the polenta for 10 minutes mixing and adding more water once in a while.


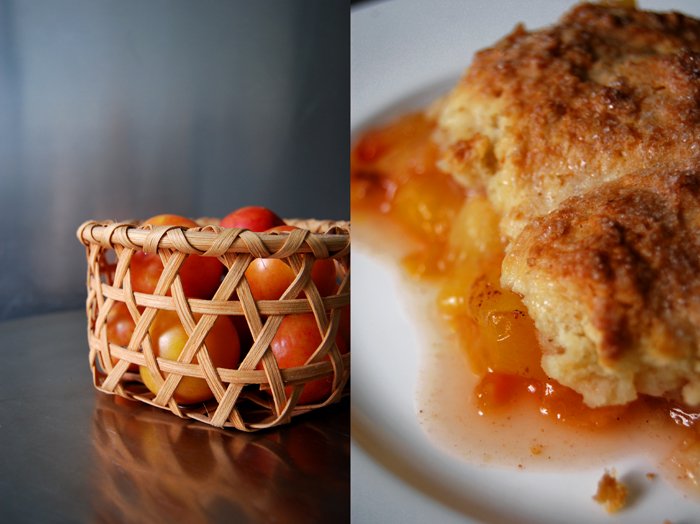
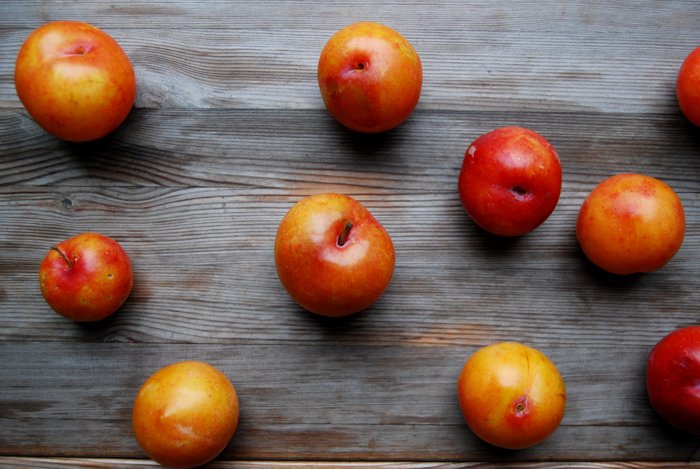
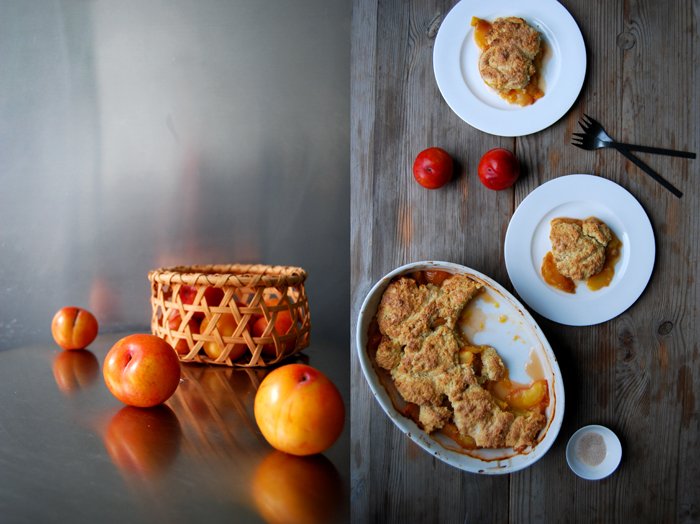
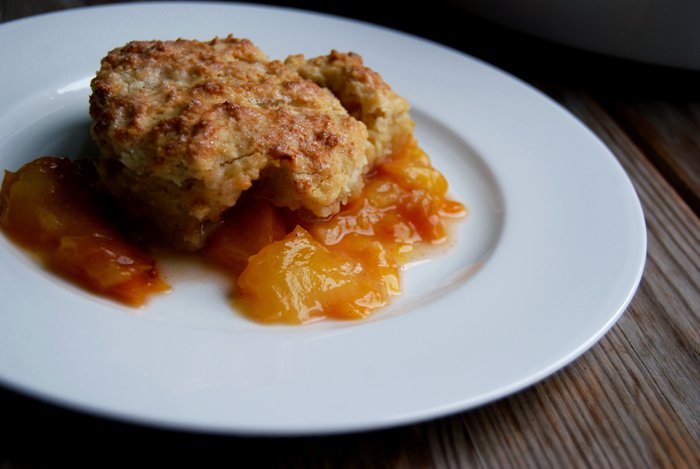
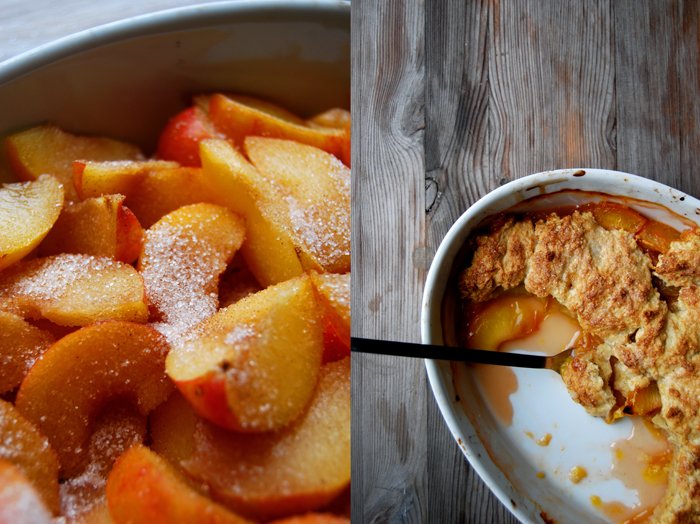
Yellow Plum Cobbler

A fruity cobbler is one of the quickest, most comfortable and delicious morning sweets you can put on your breakfast table, with short preparation (unlike my Friday's brioche) and a satisfying result! The pastry is a smooth scone dough with sour cream, thrown together in just a few minutes. It turns into a light golden crust lying on top of the fruity filling like fluffy clouds.
Plums are my favourite addition to this dish and yellow plums are my latest discovery for desserts. It's not only the warm glowing colour that's so striking, it's their honey sweet taste. Uncooked, they aren't too far away from blue plums, just a bit sweeter, but when they are cooked, seasoned with a little cinnamon, they develop a very deep flowery taste, almost like rosewater. Their fragrant sweetness made me choose them for this easy pie. My cobbler is made with just a little sugar, you could also use the pastry for a savory pie, but when the yellow fruit kicks in, the sweet richness takes over. Warm and fragrant, I couldn't stop shoveling one portion after the other onto my plate!

Yellow Plum Cobbler
You could replace the yellow plums with red plums and add a few drops of rosewater.
For 4 people you need
yellow plums, sliced, 600g / 1.5 pounds
granulated sugar 4 tablespoons
ground cinnamon 1/2 teaspoon
For the pastry
plain flour 200g / 7 ounces
granulated sugar 2 tablespoons plus 1 tablespoon for the topping
ground cinnamon 1/4 teaspoon
baking powder 1 1/2 teaspoons
a pinch of salt
butter, cold, 100g / 3.5 ounces
sour cream 160ml / 5.5 ounces
Set the oven to 190°C / 375°F (fan assisted oven).
Spread the plums in a baking dish and coat with the sugar mixed with cinnamon.
For the pastry, combine the dry ingredients. Cut the butter with a knife into the flour until there are just crumbly pieces left. Continue with your fingers, rub the buttery pieces into the flour until combined. Mix in the sour cream with a spoon until combined. Break the soft dough into pieces, gently flatten them and put them on top of the plums, they should be almost covered. Sprinkle with a tablespoon of sugar and some more cinnamon if you like and bake in the oven for 35 minutes or until golden brown on top. Serve warm.

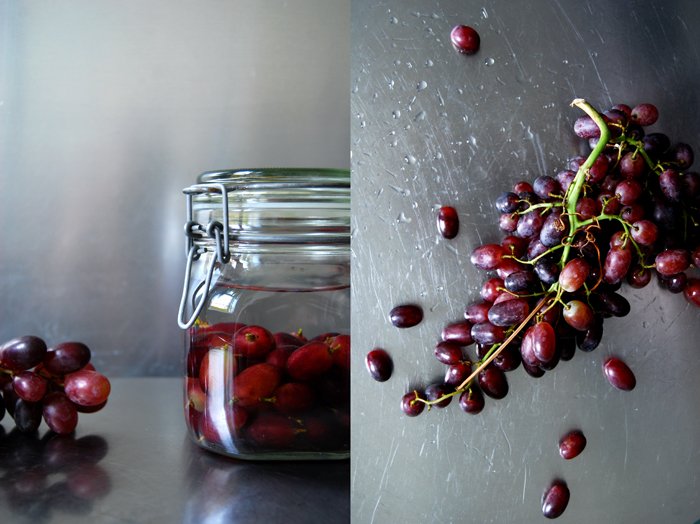
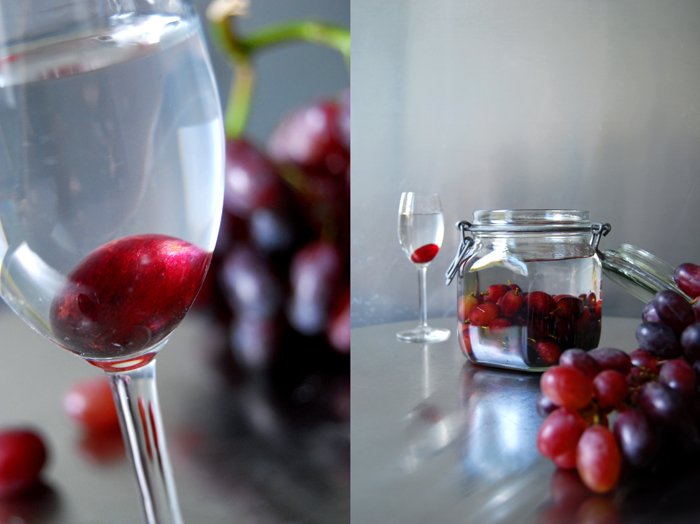
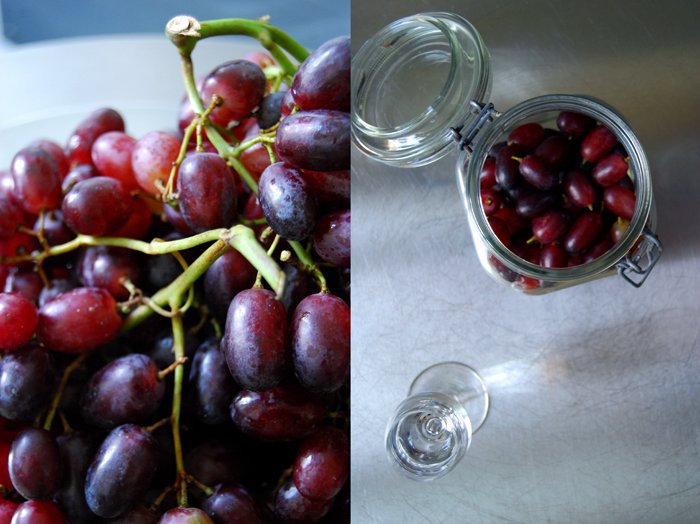
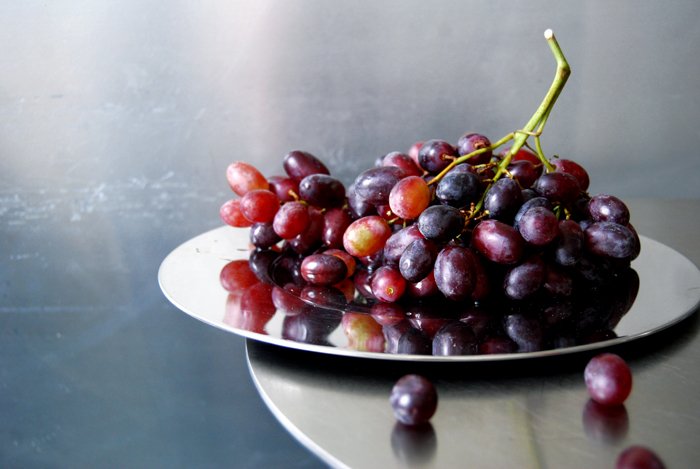
Mary's fantastic Drunken Grapes in Anisette

After I visited Mary Licari in her old watch tower in Malta for one of my meet in your kitchen features, I came home with lots of inspiration and a long list of recipes which I couldn't wait to try in my kitchen! On that hot afternoon in August, she treated me to so many delicacies and one of them was red grapes in anisette which she made in 1985! She topped her homemade banana ice cream (which was also to die for!) with these amazing grapes that have been in the bottle for almost 30 years! I almost felt too shy to eat them, that's such a treasure, fruit soaked in three decades of aroma!
It was my second visit to her house, just a day before I left the island to go back to Berlin. As always when meeting Mary, you have to be prepared for food, lots of good food! We wanted to stop at her house to say a quick good bye but as soon as we got into the house, Mary got out the plates and treated us to an amazing three course meal, finished with these fantastic drunken fruits. They were sweet and strong, a bit wrinkled, enhanced with the strong flavour of anise. The texture was a bit like jelly, but not as soft, they still had some crunch. It was a special culinary experience that I will never forget!
I've been back home for more than a month and I still can't get Mary's amazing grapes out of my head. There's no reason to wait any longer! The Italian grapes taste amazing at the moment and there's a bottle of Ouzo waiting to be emptied. I won't wait for 30 years to eat them (I'm too impatient!) but maybe I will keep some of them for a year or two.
Mary taught me to keep a little stalk on the grapes, that prevents the fruit from soaking up too much of the liquid!

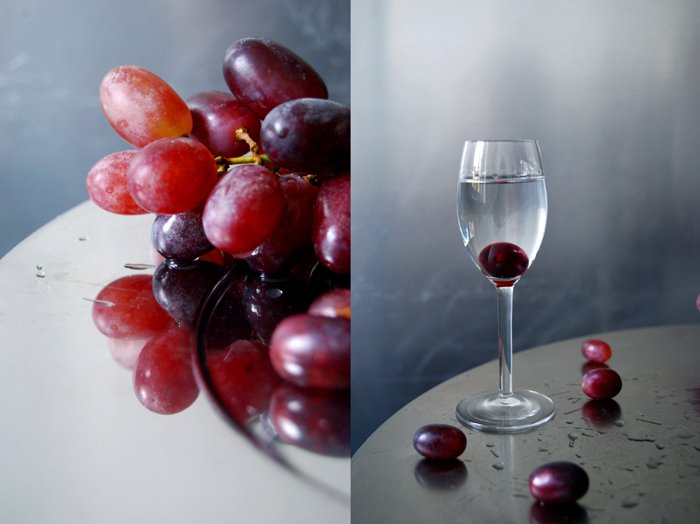
Drunken Grapes in Anisette
For 1 large jar of grapes you need
Ouzo (or any other anisette) 600ml / 1.5 pints
red grapes 200g / 7 ounces
Cut the single grapes off the bunch. Don't pull them off, keep a short piece of stalk of about 1/2 cm / 1/4 " on each of them.
Put the grapes in a clean jar and fill with anisette until the fruits are covered. Let it sit for at least a month, or for years, like Mary. Serve with ice cream or cheese.

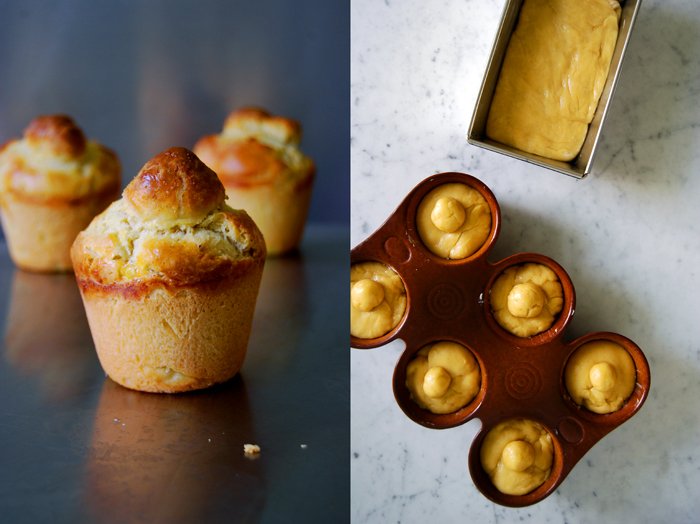
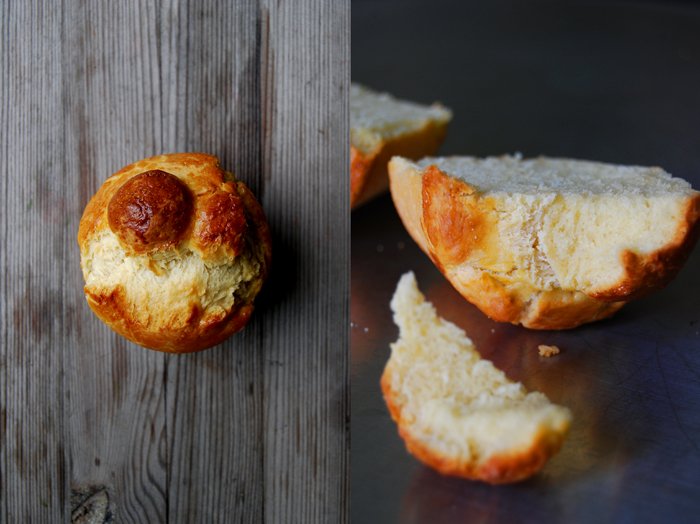
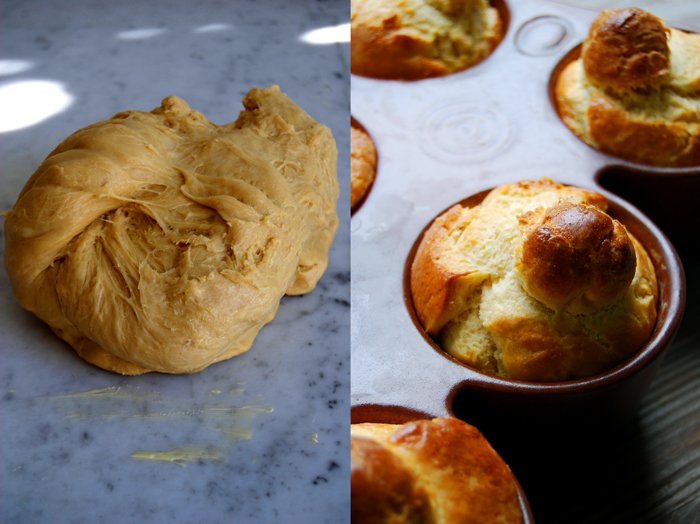
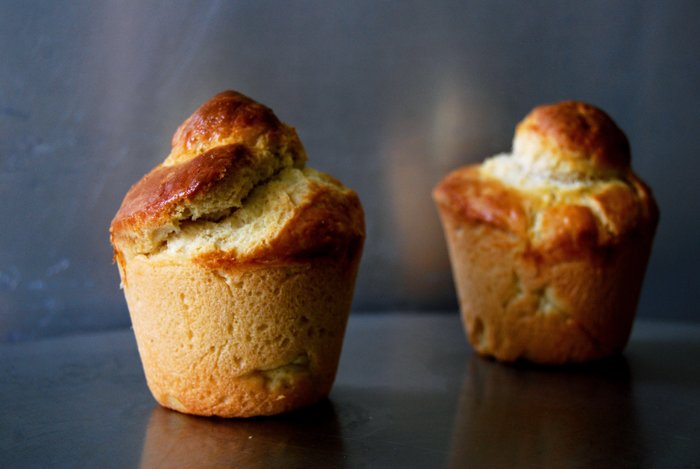
Weekend Brioche
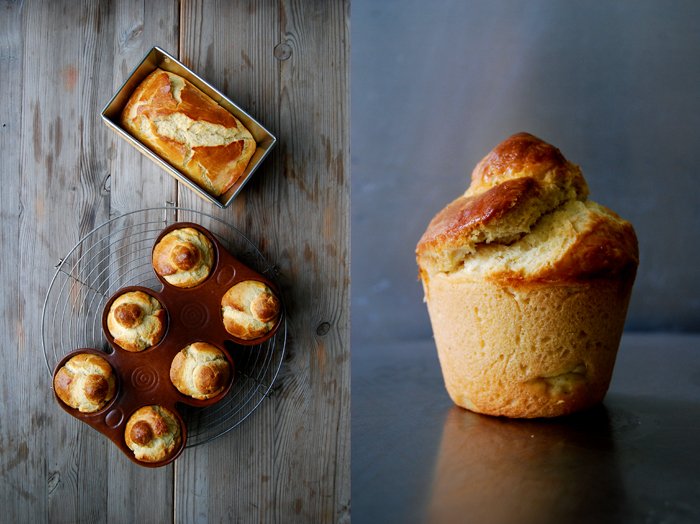
Lots of butter and many eggs - that’s the secret to a great brioche! I enjoy this rich, sweet, fluffy bread when it’s still warm, right out of the oven, and the next day, toasted for breakfast or lunch. So, when I bake brioche, I bake a big batch of it.
The dough has to rise three times, but that shouldn't put you off. If you time it well and let it rise overnight the second time, you can be rewarded with the best French breakfast treat ever - apart from croissants maybe but their preparation put me off! I never managed to move myself to give them a try but one day their time will come even in my kitchen. Back to the brioche, this recipe makes a wonderful buttery bread, rich but tender. I like to tear it into pieces and spread even more butter on top and some of my homemade strawberry or Tyrolean plum jam, a hot latte macchiato on the side and I'm happy!
I always bake one loaf and a few little round brioches. The bread stays fresh for days wrapped in parchment paper and it's great for teatime, sliced, toasted and - again - with some butter melted on top. It also makes a delicious dessert, in a trifle or bread pudding, or thick fresh slices topped with warm berry compote and some whipped cream!
Brioche
For 2 loaves you need
butter, at room temperature, 250g / 1 cup
whole milk, lukewarm, 60ml / 1/4 cup
plain flour 700g / 5 1/3 cups
granulated sugar 60g / 2 ounces
fast-acting yeast 1 (7-g / 1/4-ounce) envelope
salt 1 1/2 teaspoons
large eggs, whisked with a fork, 5, plus 1 beaten egg mixed with a pinch of salt for the glaze
Melt 50 g / 3 tablespoons of the butter, let it cool then mix with the milk.
In the bowl of a stand mixer, fitted with the dough hook attachment, combine the flour, sugar, yeast and salt. Add the lukewarm milk-butter mixture and the 5 eggs and mix with the hook for about 5 minutes or until well combined. Add the remaining butter cut into 5 portions, 1 portion at a time, mixing well before adding the next portion to the dough; keep mixing for about 10 minutes or until you have a smooth and shiny ball, soft and sticky.
Cover the bowl with a kitchen towel and let rise in a warm place for about 1 to 1 1/2 hours or until doubled in size.
Take the dough out of the bowl, knead for 30 seconds then form into a smooth ball. Return the dough to the bowl, cover with plastic wrap and keep in the fridge overnight.
The next morning, take the dough out of the fridge and let it sit for 10 minutes. Knead the dough with your hands for 1 minute then divide it into 2 portions (or more depending on the loaf or cake pans you use to bake the brioche). Butter the baking tins generously then push the dough into the tins; the tins should be filled about 1/2 to 2/3, not more. If you bake a round brioche you can shape little (or big) balls and place them on top: form a little hole with your finger in the middle of the dough and gently push the ball in to prevent it from falling off. Cover the baking tins with a kitchen towel and let the brioche rise in a warm place for about 1 hour and 15 minutes.
Preheat the oven to 175°C / 350°F (conventional setting).
Brush the top of the brioche with the egg wash then bake the brioche for 35 minutes or until golden brown on top and baked through, depending on the tins' shape and size the baking time can be shorter or longer. If you’re not sure if the brioche is done turn the brioche around and knock on its underside, it should sound hollow; or prick with a skewer, it should come out clean. Enjoy warm!


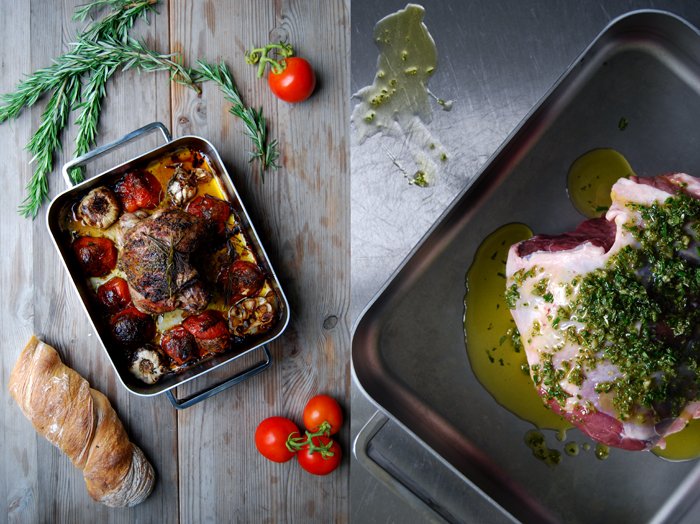
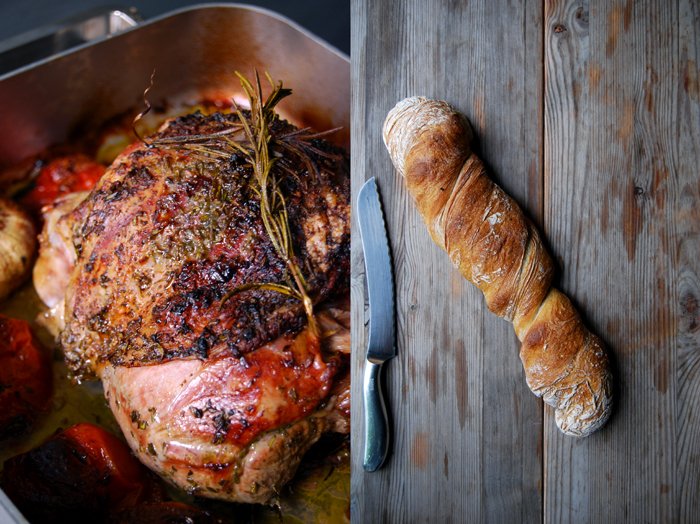
Roast Rosemary Lamb with Garlic and Tomatoes
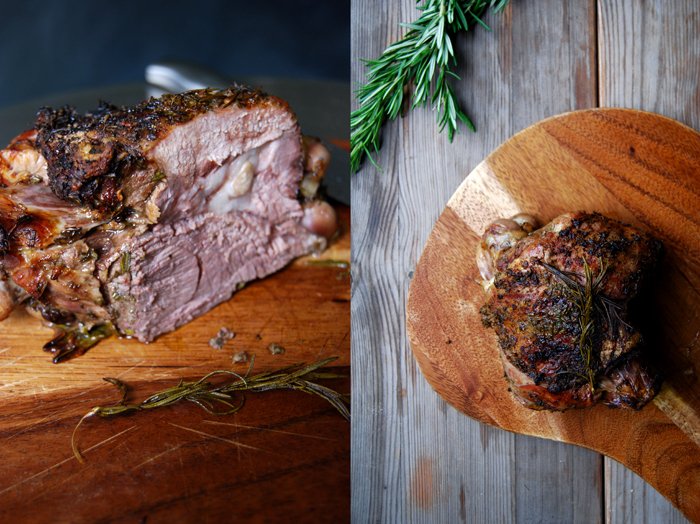
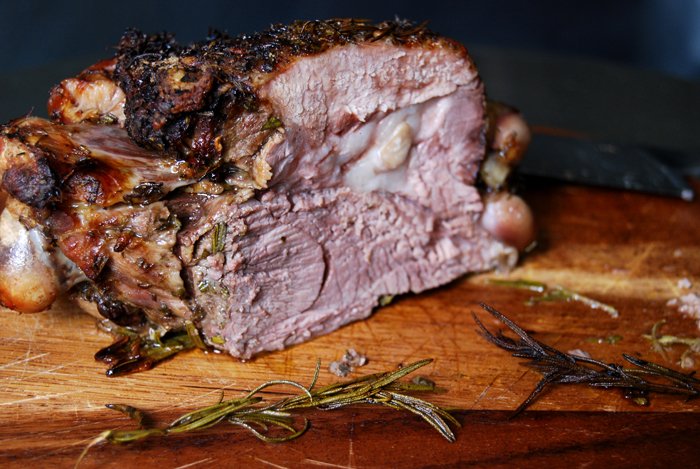
A piece of meat slowly roasted to perfection, with fresh herbs, garlic and vegetables is the essence of my mother's cuisine. The fragrant smell teases me for hours while the roast is cooking, the depth of the meat's taste, the rich sauce of juices mixed with seasonings is the most comfortable cooking that can happen in a kitchen!
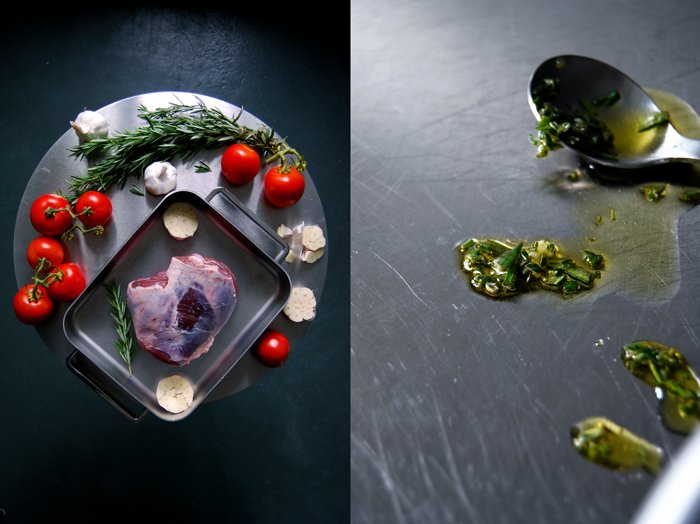
When I saw this leg of lamb I made a quick decision, roast lamb for dinner! Thinking of my mother's famous Sunday lunches, I also packed lots of garlic and tomatoes in my shopping basket as I had a Mediterranean style roast in mind. I also bought a bunch of rosemary as my plant looks rather sad at the moment. I planted it in a pot together with mint and that wasn't a good idea. The roots of peppermint plants spread into every corner of the pot, there's no soil left for my poor rosemary. If you ever decide to plant rosemary and mint together, leave the mint plant in a plastic pot before you put it in soil, this stops the roots from spreading (I got this tip from a lady with a green thumb at the market). My big thyme plant is the complete opposite, it looks as fresh and green as it should (in its own pot). That's the second herb in this recipe to add flavour to the meat.
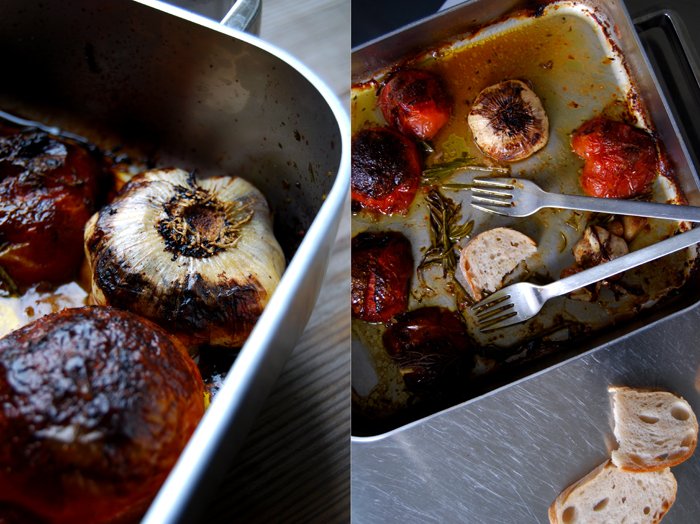
Back home, I made a thick marinade with 2 tablespoons of each of the herbs and a little crushed garlic. I mixed it with lots of olive oil and rubbed it into the leg of lamb. You could keep it in the fridge like that for a day or two, but we were hungry, so I added two whole garlic bulbs and 5 large tomatoes, all cut in half and cooked the meat in the oven for a bit more than an hour. The meat was perfect, juicy and soft, and the tomatoes and garlic were almost caramelized. They were dark on the outside but sweet inside and thickened the juices which was simply divine! Fruity, oily and fragrant!

Roast Rosemary Lamb with Garlic and Tomatoes
For 3-4 people you need
leg of lamb, with the bone, 1.5kg / 3.5 pounds
olive oil 70ml / 2.5 ounces
fresh rosemary, chopped, 2 tablespoons plus 5 small sprigs
thyme, chopped, 2 tablespoons
garlic bulbs, cut in half, 2 plus 1 big clove, crushed, for the marinade
large tomatoes, cut in half, 5
salt and pepper
Set the oven to 180°C / 355°F (I used the Rotitherm setting).
Put the leg of lamb into a roasting tin. Arrange the tomatoes (cut side down) and garlic (cut side up) next to the meat. Mix the oil, crushed garlic clove and herbs, rub into the meat and sprinkle a bit over the tomatoes and garlic bulbs. Put the rosemary sprigs under and next to the meat. Season everything with salt and pepper and cook in the oven for 75 minutes, turn the garlic around after 45 minutes, pour the juices over the meat once or twice while it's cooking.
When the meat is done, wrap the roast leg in aluminum foil for 5 minutes.
Cut up the meat and serve with the roast tomatoes and garlic. You could have some potatoes on the side but we enjoyed it with a fresh white French loaf which was perfect to scrape the tasty juices out of the pan.

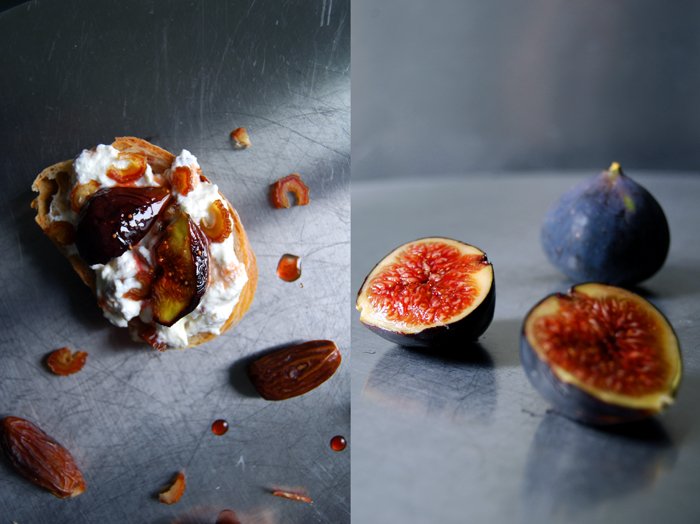
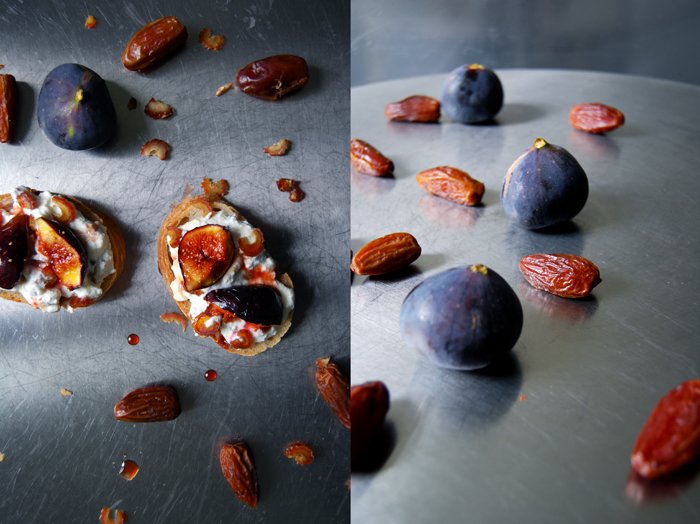
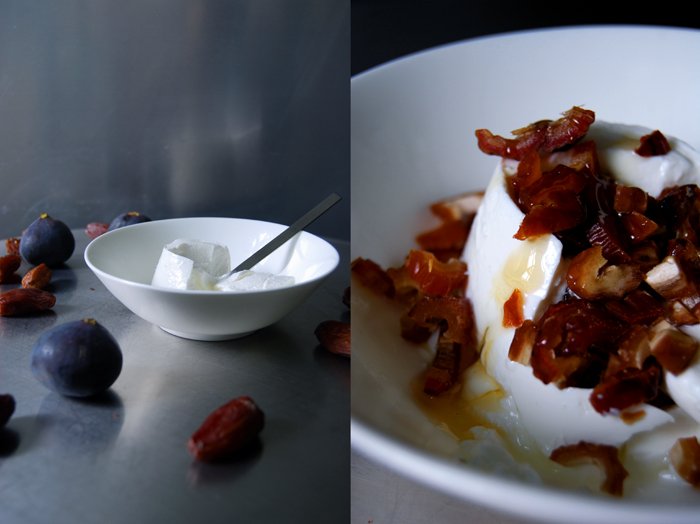
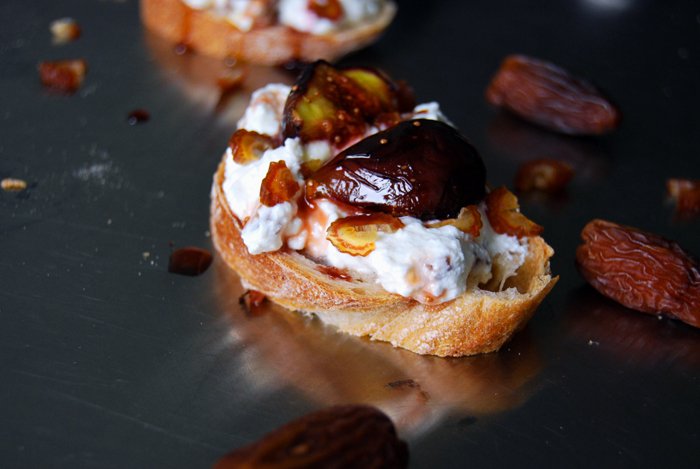
300 Days and 300 Recipes later, a Date Goat Cheese and Balsamic Fig Tartine
300 days ago, on the 23rd November 2013, I started eat in my kitchen! Today, almost 10 months and 300 recipes later, it feels like this journey has just begun. I've met so many amazing people through the blog, people who follow eat in my kitchen worldwide since the early days or who just found it recently. Be it in Europe, the USA, South America, Australia, Africa or Asia, we all share our passion for cooking, baking, eating and treating and that's been such a great experience for me. Here, I can write about my latest discoveries at the market, new ideas for recipes or old family dishes which have been with me since my childhood. Or the meet in your kitchen features and my wonderful guests who taught me so much about beekeeping, producing olive oil and wine, harvesting salt at the sea, or traditional Maltese recipes which were handed down from one generation to the next. All this would have never happened without eat in my kitchen and without you who follow me so enthusiastically!
Today, it's my Sandwich Wednesday, one of my blog's early traditions which I started on the 4th December 2013. It was a spontaneous mood on a busy day that made me come up with a sandwich and I decided to make a weekly series out of it. That's what I love about this online space, this white canvas where I can not only share the culinary adventures of my kitchen but also try out new ideas that I would have never had without it. One thing is for sure, we wouldn't have eaten so many sandwiches in the past months without this blog!
I just want to thank you for your trust in my cooking, in my recipes and your ongoing following of what's happening in my kitchen and what we eat in my kitchen!
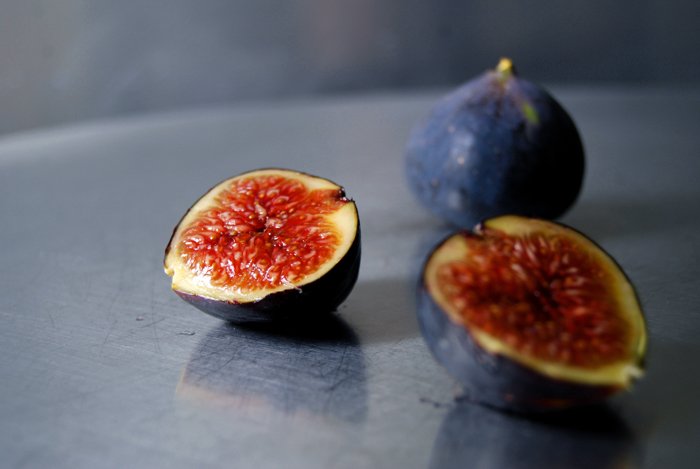
This week's sandwich is a sensual late summer tartine. The sweetest dried dates stirred into smooth goat cream cheese, a couple figs cooked in honey and Balsamico vinegar and Arnold's Maltese Wild Thyme Honey dripping from the top. It's sweet, sticky and luscious, like sugary ripe figs almost falling off the branches.

Honey Date Goat Cheese and Balsamic Fig Tartine
For 4 small tartines you need
goat milk cream cheese 125g / 4.5 ounces
juicy dried dates, chopped, 4
ripe figs, quartered, 2
aromatic liquid honey 2 teaspoon plus more for the topping
balsamic vinegar 1 teaspoon
white bread (like baguette or ciabatta) 4 slices
In a sauce pan, heat 1 teaspoon of honey, add the figs and cook for 1 minute, turning them once. Deglaze with the Balsamico vinegar, close with a lid and take off the heat.
Whip the goat cream cheese with 1 teaspoon of honey and stir in the dried dates.
Spread the bread generously with the date goat cheese, put the figs and their juices on top and sprinkle with a little more honey.

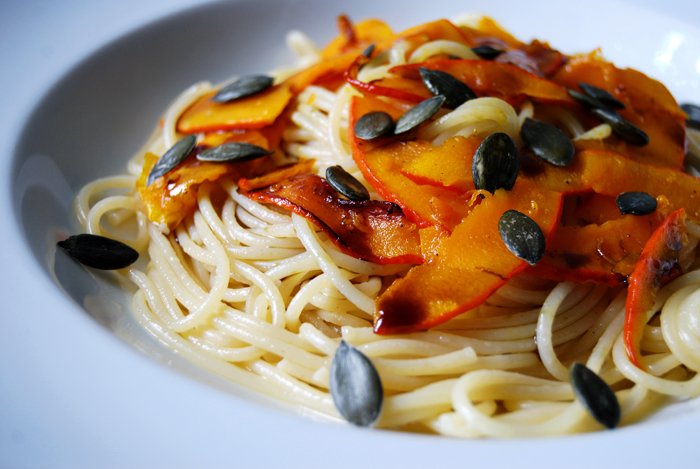
Golden Hokkaido Pumpkin Spaghetti
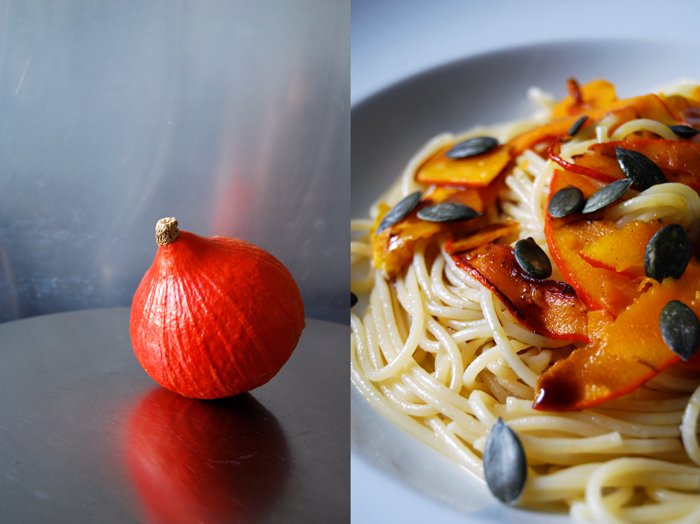
The glowing Hokkaido pumpkin is back in my kitchen! Although I've spotted the bright orange fruit at the markets for quite a while, I wanted to wait a little before it became a permanent part of my weekly purchases again. I know that as soon as it's on my kitchen tops, nothing can stop me and I use it for everything, quite excessively, soups, risottos, pasta and breads, spreads, salads, cakes, the whole range from sweet to savory. One of my favourite pumpkin meals is oven roasted wedges coated in spiced olive oil and herbs. I could eat that every week!
For now, I will start with a pasta dish and for this recipe I use all a pumpkin offers, the flesh and skin, its seeds and fragrant oil. I mix my shiny spaghetti with a little bit of the water I used to cook the pasta in before I stir in very thin pumpkin slices pan roasted for just a few minutes to soften them and sweeten their taste. I sprinkle the pasta on each plate with a bit more than a tablespoon of pumpkin seed oil and a teaspoon of the fruit's crunchy roasted seeds. This dish is an ode to the most delicate of all pumpkins, a true Hokkaido feast! It makes the pasta so smooth, almost velvety in texture and sweet and nutty in taste. Each plate looks like the late afternoon sunlight that lights up my kitchen between late summer and early autumn, golden and warm!
This recipe has been featured on Food52 Halfway To Dinner!
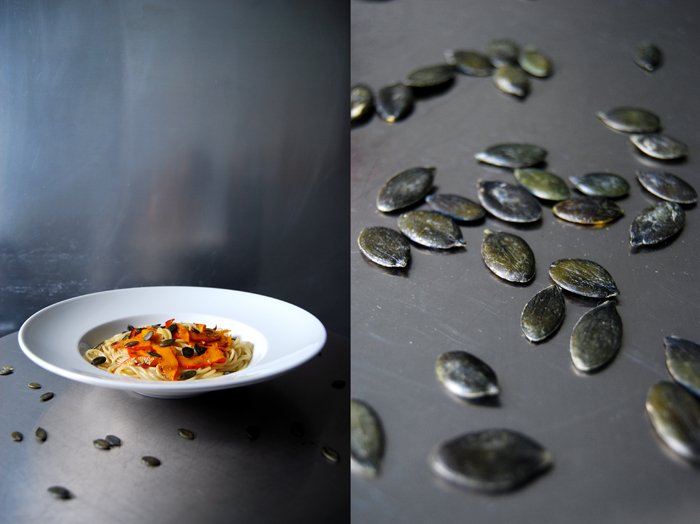
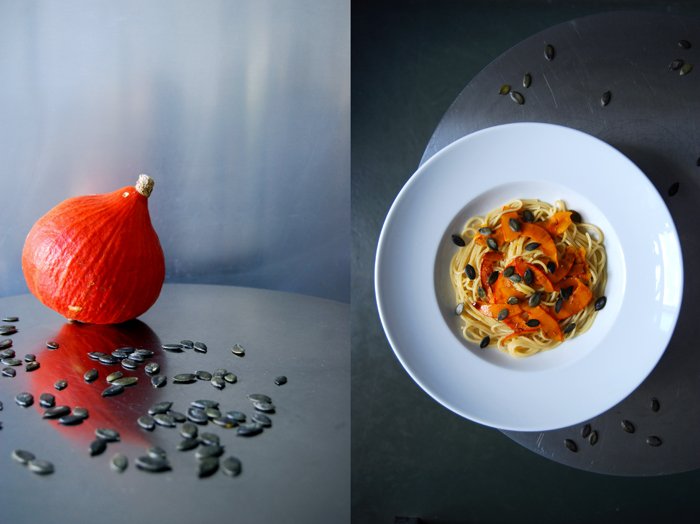
Hokkaido Pumpkin Spaghetti
For 3-4 people you need
spaghetti 300-400g / 10.5 - 14 ounces
Hokkaido pumpkin (squash), with skin but without the fibres and seeds, about 200g / 7 ounces (you can also use peeled butternut or Musquée de Provence pumpkin)
butter 1 tablespoon
olive oil
sugar 1/2 teaspoon
salt and pepper
pumpkin seed oil, 4 1/2 - 6 tablespoons plus more to taste, for the topping
toasted pumpkin seeds, for the topping
Keep the plates for the pasta in a warm place for a few minutes (80°C / 175°F in the oven) before serving.
Cook the pasta in lots of salted water al dente. Keep some of the water used to cook the pasta. Drain the spaghetti and mix with a splash of the water they cooked in.
Cut the pumpkin with a cheese or vegetable slicer into very thin slices. In a large heavy pan, heat the butter and a splash of olive oil, add the sugar and pumpkin and roast for a few minutes on medium heat, stirring constantly, until the slices are golden brown on both sides and soft enough to break with a fork. Season with salt and pepper.
Divide the pasta and pumpkin slices between the plates, sprinkle each plate with 1 1/2 tablespoons of pumpkin seed oil, a teaspoon of pumpkin seeds and season with salt and pepper to taste.