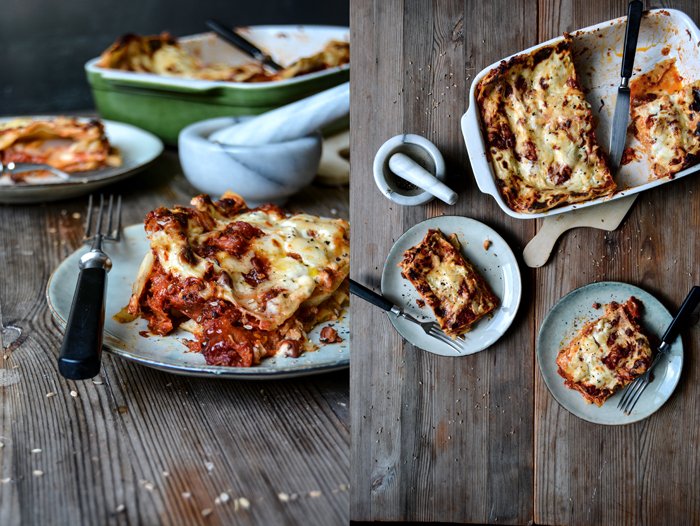
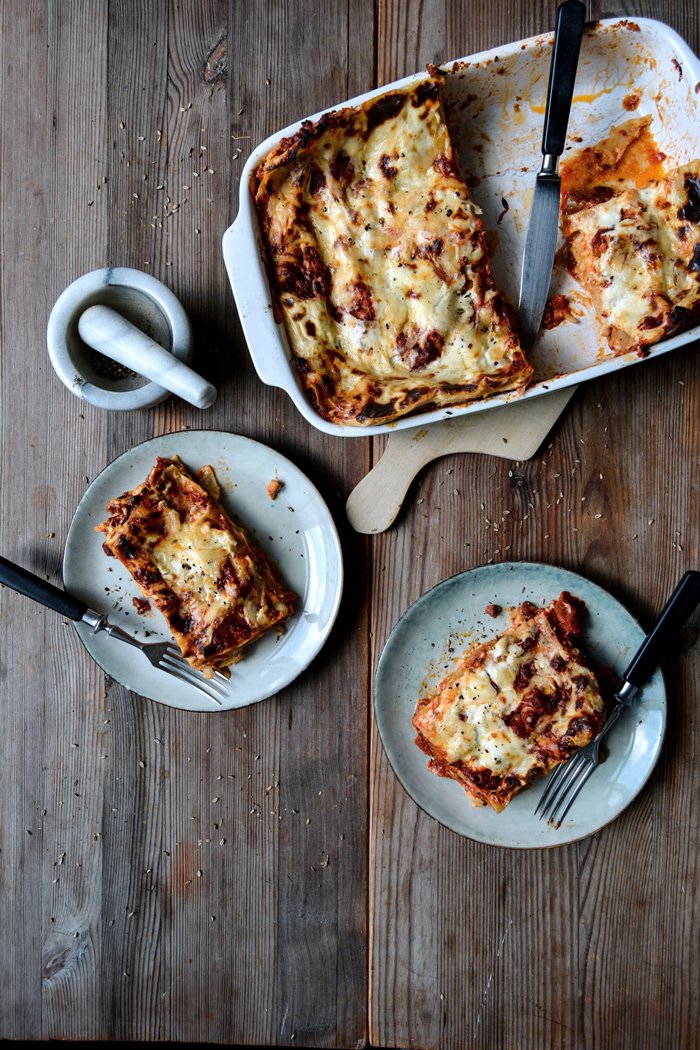
Fennel Tomato Lasagna with Crunchy Bacon
A couple days ago, I went to a meeting that finished much earlier than expected. I stepped out into the street on that cold and grey morning and decided to squeeze in a quick coffee. Just a creamy cappuccino, a flaky chocolate croissant, and a peaceful moment to myself. I went to my favorite Italian deli for a bit of dolce vita - sipping a fantastic coffee while listening to the patron chatting with his customers in Italian, accompanied by a medley of Italian operas. A toddler giggled, two dogs observed the busy scene. The shelves around me presented a tempting selection of chiantis, pasta, polenta, capers, and bottarga. The counter right in front of me filled with various prosciuttos, salami, ciabatta sandwiches, and homemade pasta treats. And right next to it, bowls of every antipasti one can possibly think of. Just the thought of it makes me hungry again.
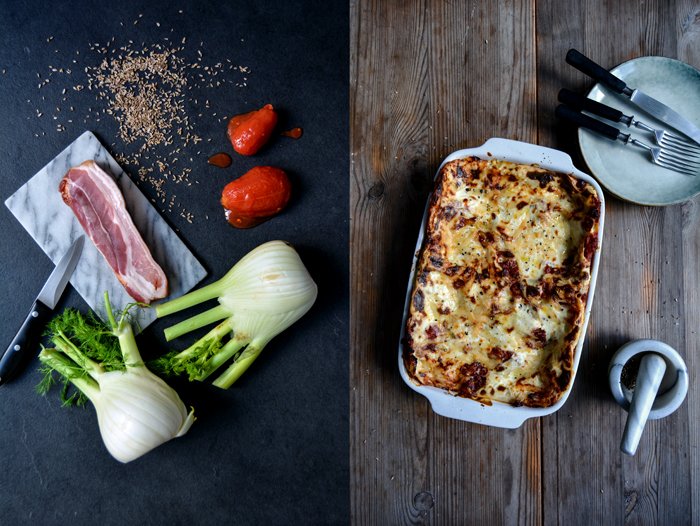
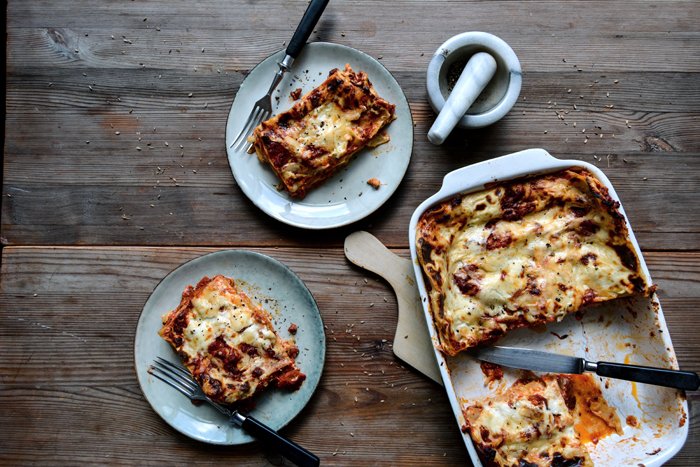
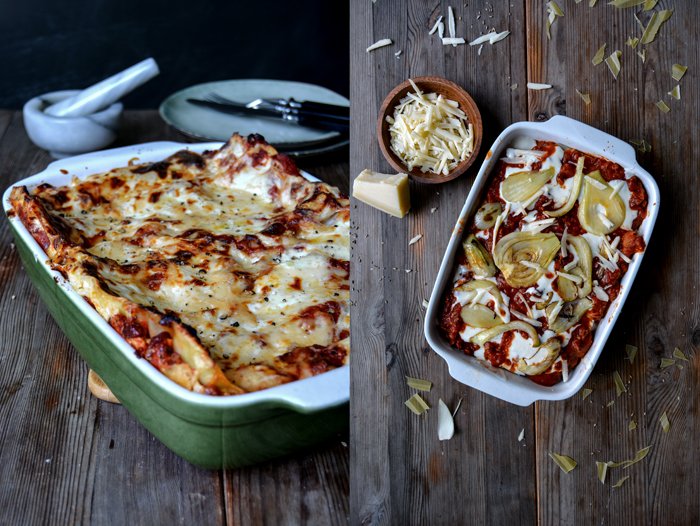
This is the kind of scene that makes you want to go straight to your kitchen, open a bottle of wine, and start cooking. Italian of course. The weather doesn't leave the slightest doubt that spring isn't near yet, so a hearty lasagna is the best thing to have on your plate. Mine is filled with lots of juicy tomatoes, roasted fennel seeds, and fennel bulb thinly sliced and sautéed, plus crunchy bacon bites, dried chili peppers, a bit of Parmesan, and a creamy béchamel sauce. At first, I wanted to combine the fennel with a meaty bolognese but then I remembered a pasta dish that I shared on the blog almost two years ago and that changed my mind. You could leave out the bacon, but I recommend leaving it in: the fennel seeds roast in the meat's salty juices and merge with the tinned tomatoes - and become a heavenly sauce. Layered with pasta sheets and the crisp fennel bulb, it's just what I want on a cold day in February.

Fennel Tomato Lasagna with Crunchy Bacon
Serves 4 to 6
For the béchamel sauce
milk 700 ml / 3 cups
a pinch of nutmeg, preferably freshly grated
fine sea salt
ground pepper
unsalted butter 30g / 2 tablespoons
plain flour 30g / 4 tablespoons
large bay leaf 1
For the lasagna
butter, for the baking dish
olive oil
cored fennel bulb, thinly sliced lengthwise, 340g / 12 ounces
fine sea salt
black peppercorns, crushed in a mortar
thick-cut bacon, cut into very small cubes, 200g / 7 ounces
fennel seeds 2 tablespoons
garlic, crushed, 3 cloves
small dried chili peppers, 2
peeled whole tinned tomatoes, chopped, 1.2kg / 2 2/3 pounds
no-boil lasagna noodles, about 250g / 9 ounces
freshly grated Parmesan 100g / 3 1/2 ounces
For the béchamel sauce, combine the milk, nutmeg, and pinches of salt and pepper in a medium saucepan and bring to a boil. Immediately take the pan off the heat and set aside.
To make the roux for the béchamel, melt the butter in a clean medium saucepan over medium-high heat and as soon as it’s sizzling hot, whisk in the flour. Slowly pour the hot milk mixture into the roux and whisk until smooth. Add the bay leaf and simmer on low, whisking occasionally, for 2 to 3 minutes or until the texture starts to thicken. Remove and discard the bay leaf. Season to taste with nutmeg, salt, and pepper then cover, and set aside.
Preheat the oven to 180°C / 350°F (conventional setting) and butter a 26 x 20 cm / 10 x 8" baking dish (or a dish of roughly this size).
In a large, heavy pan, heat a generous splash of olive oil over medium-high heat and sauté the fennel slices in batches for about 1 minute per side or until golden and al dente. Spread out the fennel slices next to each other in the pan so that they cook evenly. Season with salt and pepper and transfer to a plate.
Put the pan back on the heat and cook the bacon over medium-high heat for about 7-10 minutes or until golden brown and crunchy. Add a little oil if necessary and stir once in a while. Scrape the bacon to the sides of the pan, add a little olive oil (if the pan is too dry) and the fennel seeds, garlic, and chili. Turn the heat down to medium and cook for 2 minutes, mind that the seeds don't turn too dark. Add the tomatoes, season with salt and pepper, and, stirring occasionally, cook for about 10 minutes over medium-high heat or until thickened. Season with salt and pepper to taste. Take the pan off the heat and set aside 3 tablespoons of the sauce (for the final layer of the lasagna).
Arrange a layer of pasta on the bottom of the buttered baking dish and spread with 1/3 of the tomato-bacon sauce and sprinkle with 1/4 of the béchamel. Top with 1/3 of the sautéed fennel and 1/4 of the Parmesan. Repeat to make 3 more layers, top the last layer with pasta. Sprinkle with the reserved 3 tablespoons of the tomato-bacon sauce and the remaining béchamel and Parmesan. Bake for 35-45 minutes (depending on the lasagna package instructions) or until the pasta is al dente. To brown the cheese a little, you can switch on the broiler for the last 1 to 2 minutes. Let the lasagna sit for 5 to 10 minutes before serving and sprinkle with some crushed peppercorns. Enjoy!


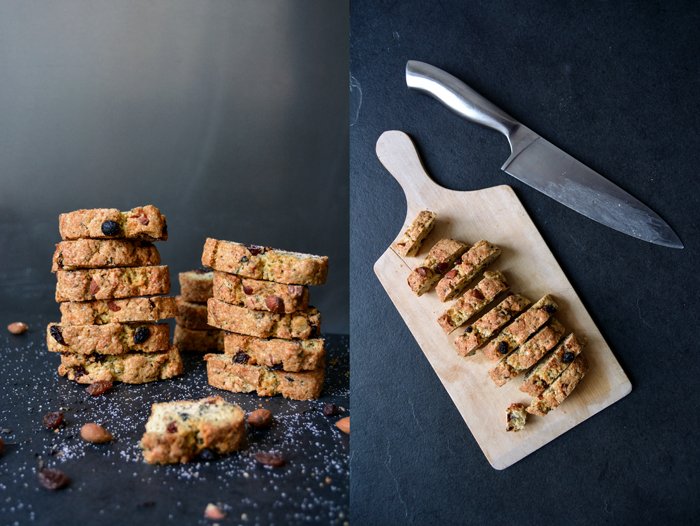
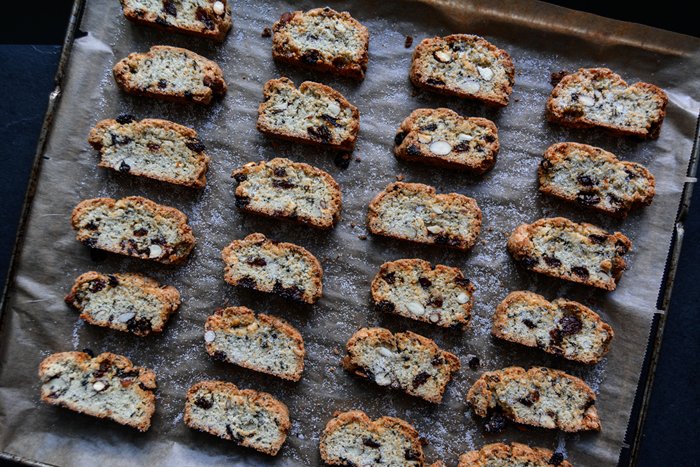
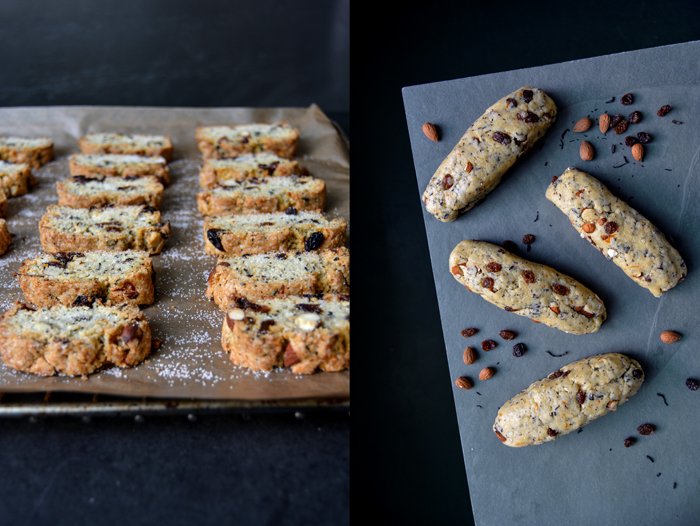
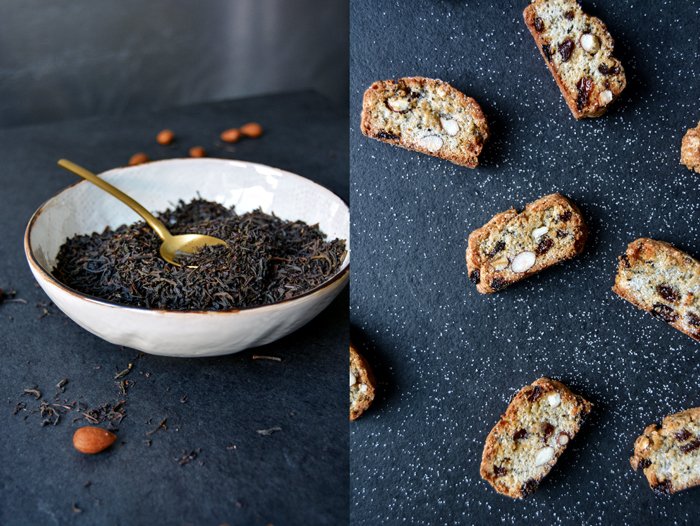
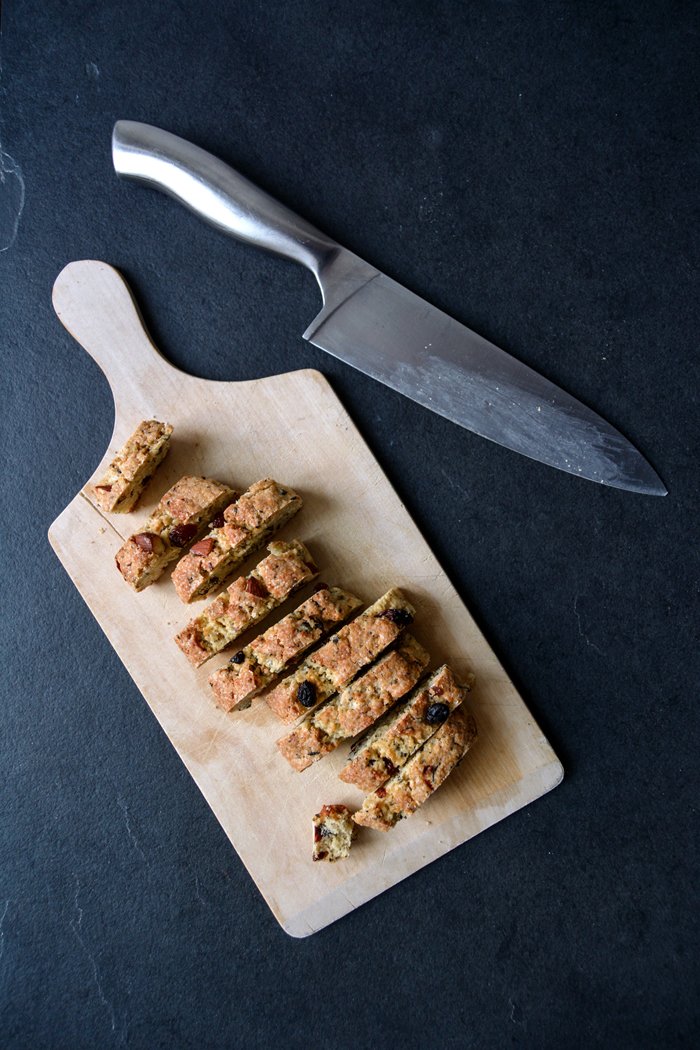
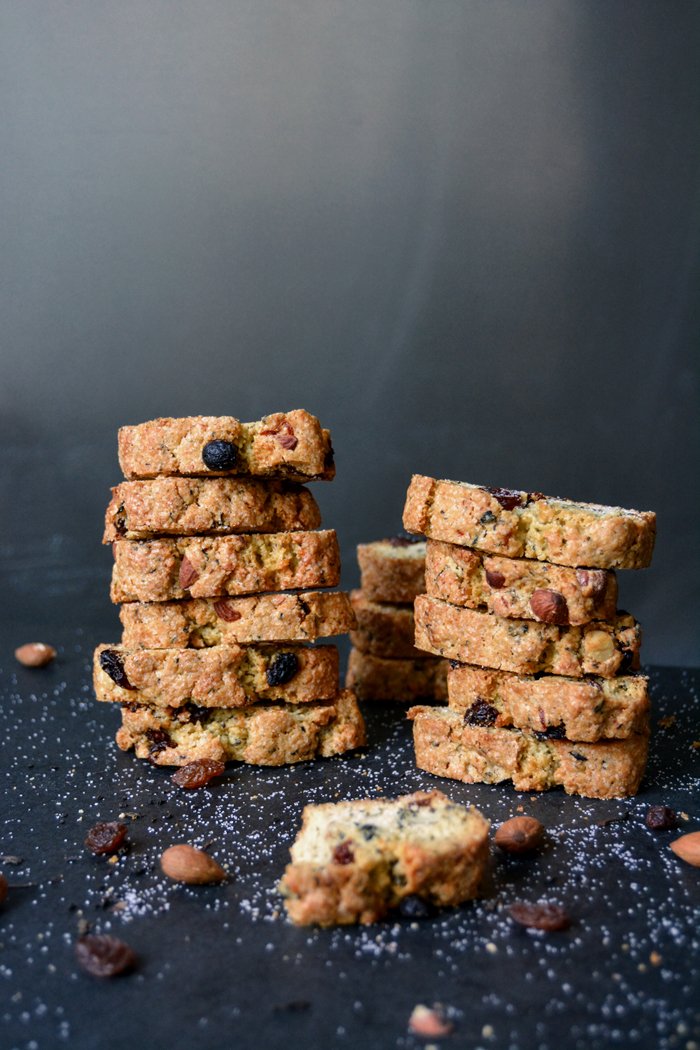
Earl Grey Biscotti with Almonds and Raisins
My perfect weekend includes a relaxed stroll through the market on Saturday morning (not too early though), a vast breakfast with bacon, eggs, and sandwiches, followed by some minor flat projects, such as rearranging a shelf in my kitchen. Not more than one shelf, it's the weekend after all. The afternoon can be filled with a walk at one of Berlin's lakes, or exploring an undiscovered neighbourhood and a hot chocolate at a cosy café. A visit to a couple exhibitions at some of my favourite museums in the city is also an option. There are always so many amazing art shows and at the moment, I'm far from keeping up. This week, it's Jackson Pollock at the KunstHalle showing his grand work Mural from 1943 and we managed to see it - it's breathtaking! In the evening, we may have some friends over for dinner, or maybe it's just the two of us enjoying a bottle of wine and an extensive meal. And if I'm lucky, we've got an invitation to a friend's house. This week it was my aunt Ursula and my uncle Uwe, their cooking is divine, the wine as well, and the company is always the best. I love to cook, especially in the evening, to calm down and relax after a busy day, but once in a while it feels so good when someone else takes care of you and invites you to join their scrumptious culinary adventures.
Sunday's next: Sleeping in is given, breakfast is a little more luscious than the day before and can easily extend into the early afternoon. I can't sit at the table and eat all day, I need a little activity even on a lazy Sunday, and some time on my own. So I bake, just me and my mixer, bowls, and sweets in the kitchen, some music from the vinyl player and I'm happy. I can't start my baking projects too late as at 6, the preparation of our weekly Sunday-pizza ritual begins.
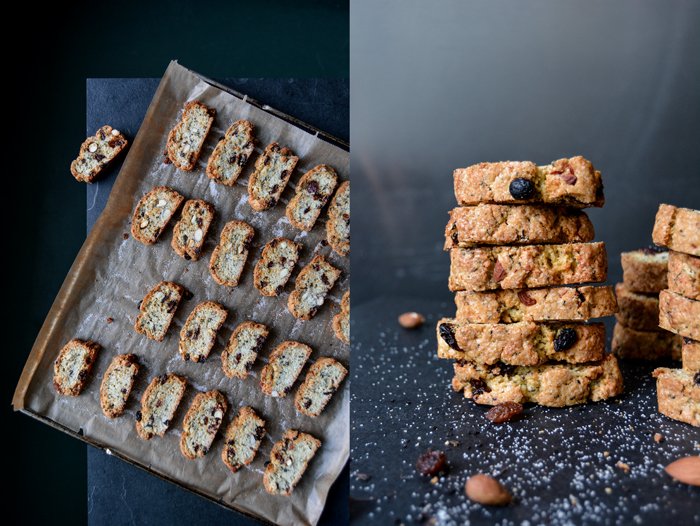
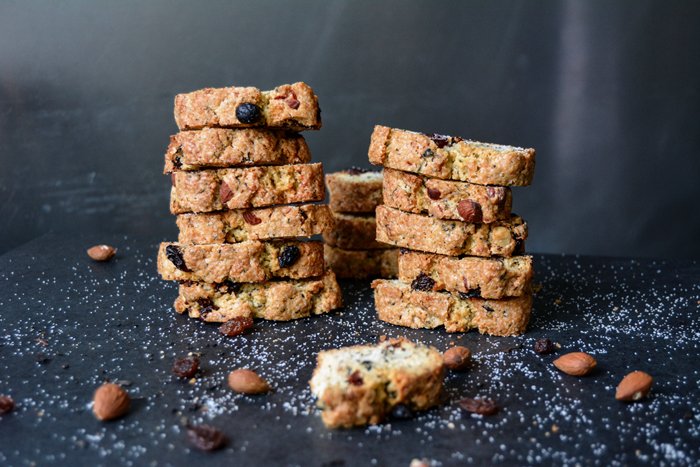
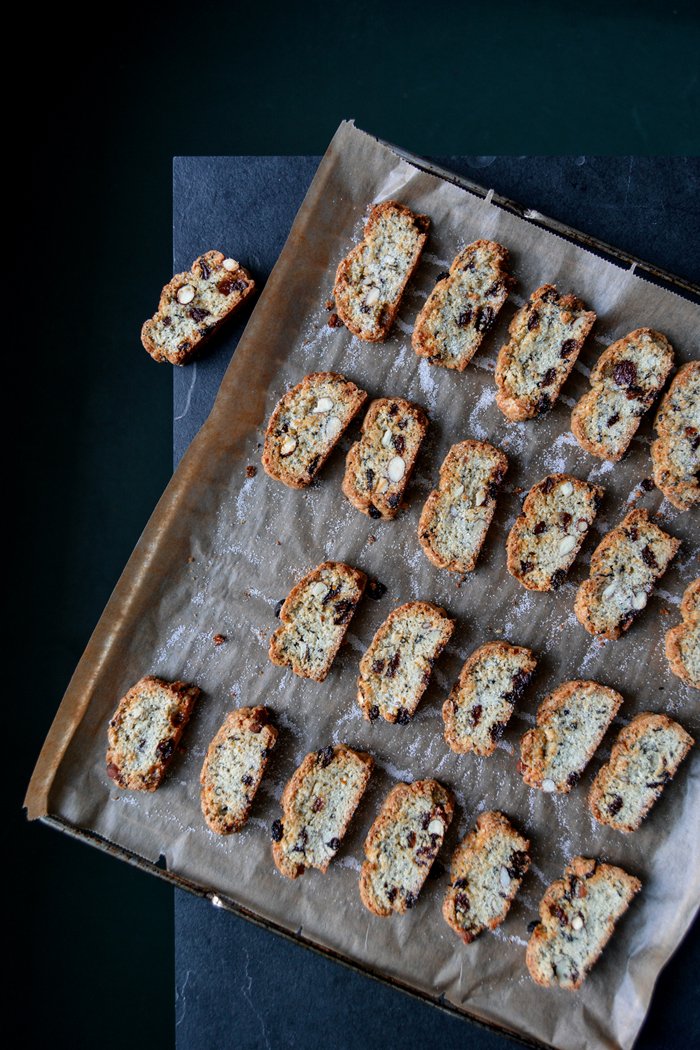
In between, I also manage to squeeze in our obligatory tea time: A cup of English tea and some cookies. I made these Earl Grey biscotti with almonds and raisins a couple days ago and they taste so good that we enjoy them for breakfast, lunch, dessert, and tea time. The flowery aroma of the fragile tea leaves is present, I didn't aim for a subtle hint that makes you guess what this distinct taste might be. It's Earl Grey, presenting itself with confidence. I balance it out with the sweetness of the raisins, fruity orange zest, and the nutty almonds. They are nice and crunchy, perfect to dip into your tea or dark espresso, if that's your kind of thing.
If you feel like biscotti but you're not a big fan of Earl Grey, you can try these recipes here:
Biscotti with a shot of Ouzo (inspired by my aunt Ursula)
Earl Grey Biscotti with Almonds and Raisins
For about 42 biscotti you need
butter, melted, 100g / 1/3 cup plus 1 tablespoon
Earl Grey tea leaves (loose leaf tea, not from tea bags) 3 1/2 tablespoons
plain flour 400g / 3 cups
baking powder 2 teaspoons
granulated sugar 200g / 1 cup, plus more for sprinkling the biscotti
freshly grated orange zest 2 teaspoons
fine sea salt 1/4 teaspoon
organic eggs 3raisins 100g / 3 1/2 ounces
almonds, roughly chopped, 50g / 1 3/4 ounces
Preheat the oven to 180°C / 350°F (preferably convection setting) and line a baking sheet with parchment paper.
Whisk the tea leaves into the warm, melted butter and let it cool for a few minutes.
Combine the flour, baking powder, sugar, orange zest, and salt.
In a large bowl, using an electric mixer, beat the eggs until creamy, stir in the Earl Grey-butter mixture and mix until combined. Add the flour mixture and mix with the dough hooks of an electric mixer until just combined. Stir in the raisins and almonds, form a ball and divide it into 4 parts. Form each part into a long loaf shape (around 5cm / 2″ wide) and place them on the lined baking sheet. Bake for 25-28 minutes (slightly longer if using a conventional oven) or until golden. Take the loaves out of the oven and let them cool for 20 minutes.
Line a second baking sheet with parchment paper.
Carefully cut each loaf into 1 1/2cm / 1/2″ slices and transfer the biscotti to the lined baking sheets, sprinkle each one with a little sugar. Bake for 6 minutes, turn the biscotti over and sprinkle the other side with sugar. Bake for another 6 minutes or until golden brown. Transfer the biscotti to a wire rack and let them cool. Once completely cool, you can keep the biscotti in an airtight container for up to 10 days.


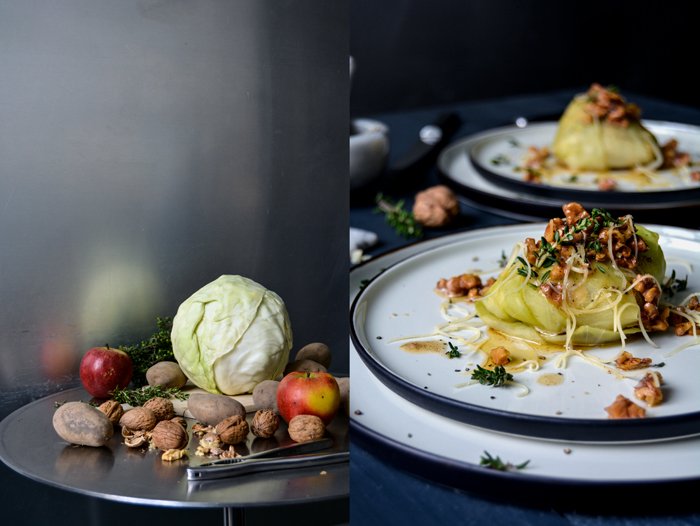
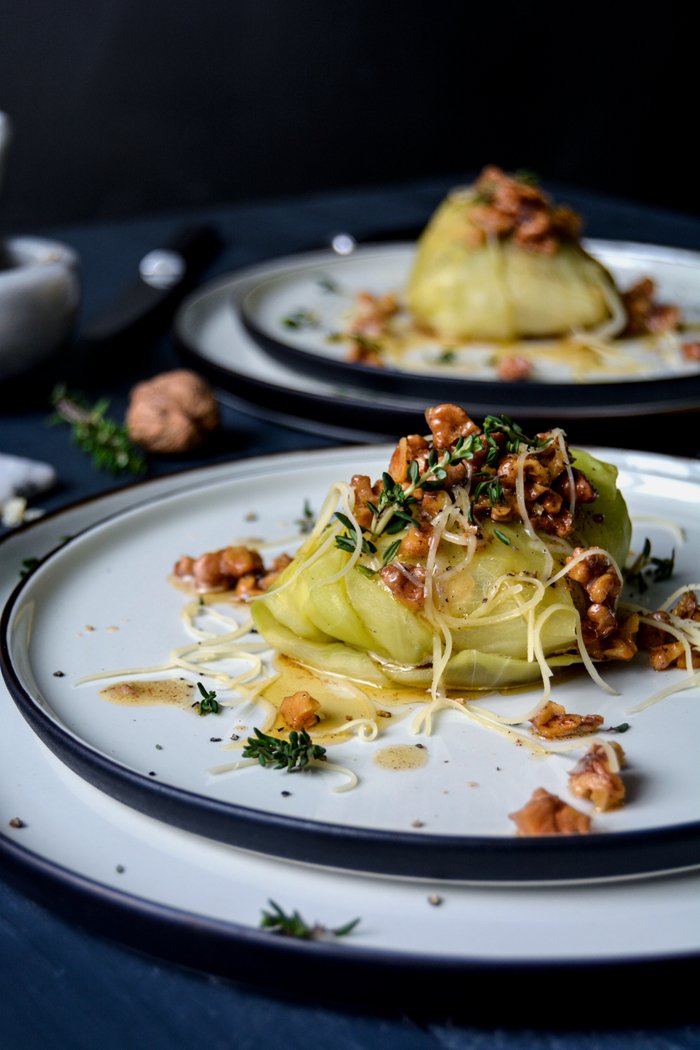
Potato and Apple Stuffed Cabbage Rolls with Walnut Butter and Gruyère

Here we are again: I've reached that critical time of the year - as always in February - when it's still all about cabbage and roots at the market, but I start dreaming of juicy tomatoes and cucumbers, sweet berries and peaches, and seafood dinners at the sea - my mind, impatient and hungry, is already settled in summer.
Luckily, February is quite a short month, then we have March, which at least offers ramps towards its end. In April I can feel the sun getting warmer, the sky becomes brighter, and the produce on my counter tops slowly starts to look more colorful. But for now, I must wait and enjoy what I've got - a beautiful crisp head of cabbage.
I blanched the large outer cabbage leaves and stuffed them with boiled potatoes, sour apple, fresh thyme, and a few spoonfuls of mascarpone, instead of sour cream, to bind the mixture. My personal highlight was the topping of crunchy walnut butter and freshly grated Gruyère. Any aromatic hard cheese would work here, but there's something about this combination of the roasted nuts and this slightly sweet Swiss cheese that fits perfectly to these little wintery cabbage packages.

Potato and Apple Stuffed Cabbage Rolls with Walnut Butter and Gruyère
For the cabbage rolls
large white or green cabbage leaves 8
peeled potatoes, boiled and chopped, about 250g / 9 ounces
small apple, peeled, cored and chopped, 1
fresh thyme leaves 1 tablespoon
mascarpone (or sour cream or ricotta) 3 tablespoons
organic egg 1
nutmeg, preferably freshly grated
fine sea salt
ground pepper
white wine
For the walnut butter
butter 60g / 1/4 cup
walnuts, roughly chopped, 25g / 1 ounce
For the topping
Gruyère, or any aromatic hard cheese, finely grated, about 2 tablespoons
a few fresh thyme leaves
black peppercorns, crushed in a mortar
For the cabbage leaves, take a large cabbage head and trim the bottom. Carefully peel off 8 large outer leaves. If they tear a little, it's fine. You'll only need 4-5 blanched leaves, blanch the remaining leaves to cover torn patches in the leaves that you use for the rolls.
Preheat the oven to 200°C / 400°F.
In a large pot, bring salted water to the boil and blanch the cabbage leaves for about 4-6 minutes or until tender. Rinse quickly under cold water, drain and cut out the hard stalk (in a slim triangle-shape).
For the filling, in a large bowl, combine the boiled potatoes, apple, and thyme. Whisk together the mascarpone and egg and season with salt, pepper and nutmeg. Add to the potato-apple mixture, stir to combine, and season with salt and pepper to taste.
Lay 4-5 cabbage leaves flat on the kitchen counter and cover torn parts with soft pieces of the remaining leaves. Put a generous tablespoon of the filling in the middle of each cabbage leaf, fold up the sides and roll it up, starting from the side of the stalk. Don't worry if they don't look perfect, mine didn't either. They can all have their individual shape.
Transfer the cabbage rolls to a baking dish and cover the bottom with a splash of white wine and some water. Bake in the oven for about 30-35 minutes or until golden and firm.
While the cabbage rolls are baking in the oven, prepare the walnut butter: In a small saucepan, melt the butter on high heat. When it's sizzling hot, add the walnuts and turn the heat down to medium. Roast for 10-20 seconds or until golden but not dark. Take the saucepan off the heat.
Divide the cabbage rolls between plates and drizzle with a little butter. Sprinkle with the roasted walnuts, fresh thyme, Gruyère, and crushed pepper.


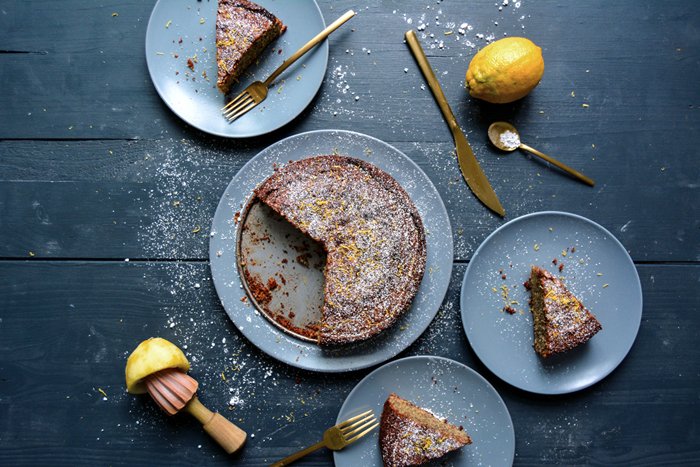
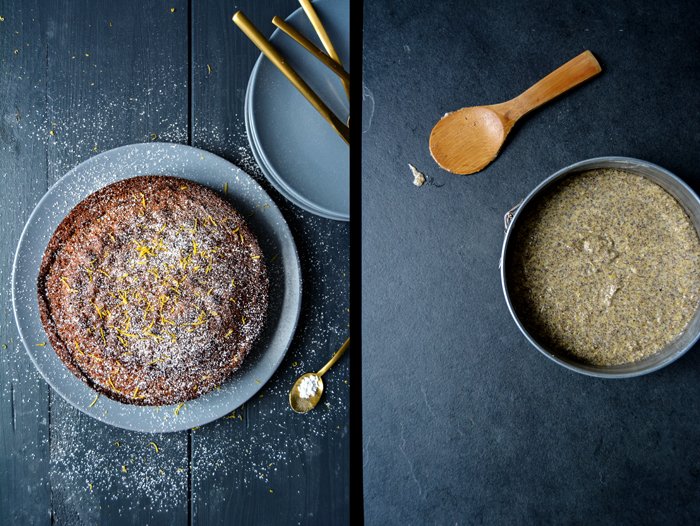
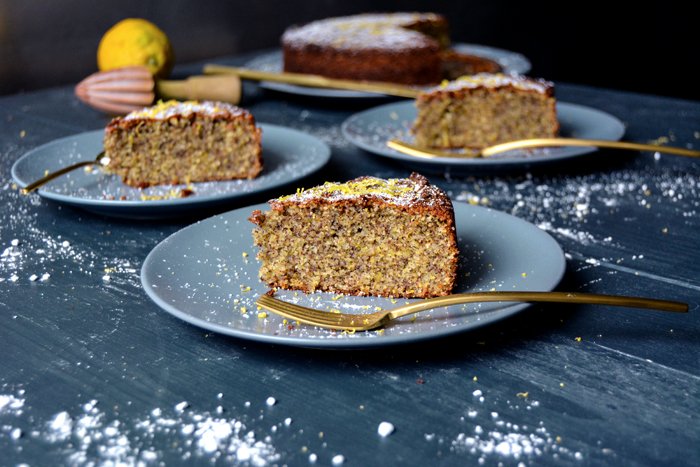
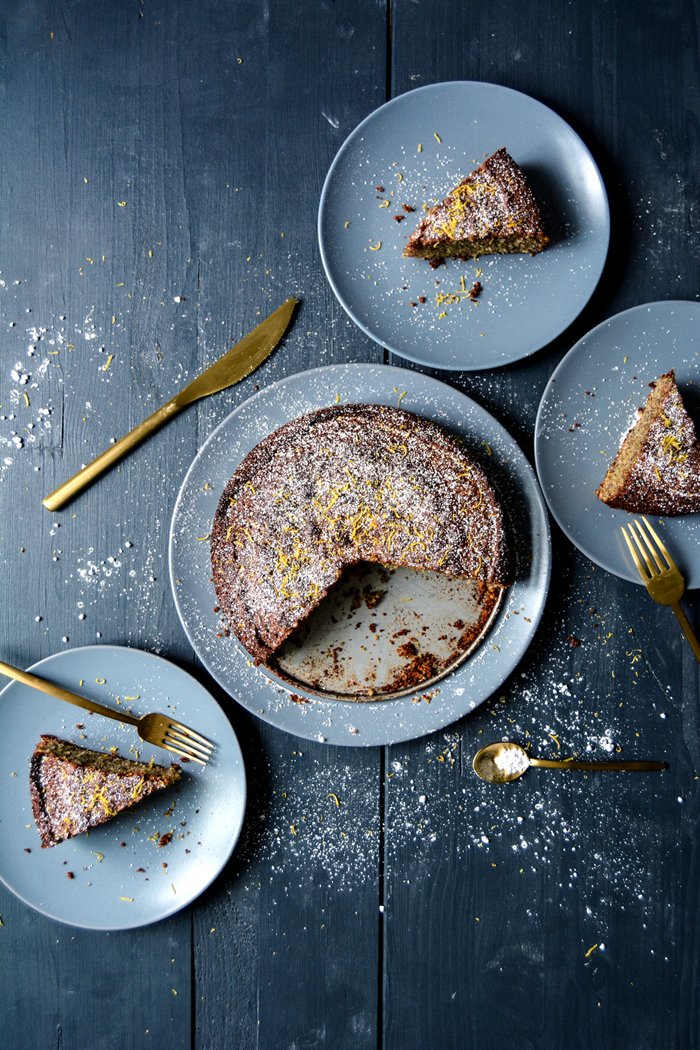
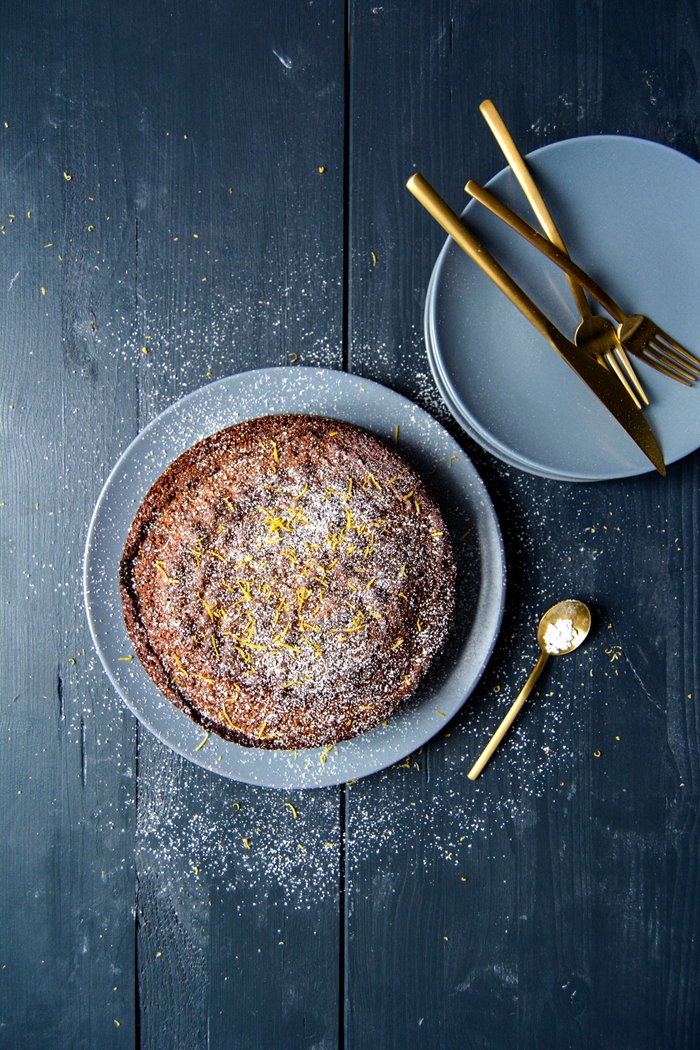
Ricotta Polenta Almond Cake with Poppy Seeds and Lemon
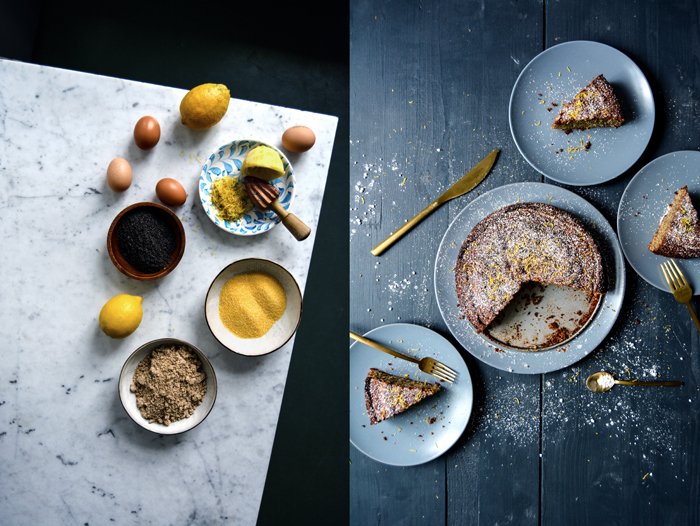
No flour again! After my Spanish Almond Tart with Blood Orange, I got a little hooked on no-flour cakes. I don't follow a gluten-free diet - luckily, my diet is far from this - it's just for the fun of it. The texture is different when you work with ground nuts instead of wheat or spelt, it's more juicy, and here, the polenta adds some crunchiness. I've already experimented with a few polenta-almond combinations and enjoyed this one a lot: poppy seeds, ricotta, and lemon. I use ground poppy seeds, they don't look as pretty in the cake but they have a richer aroma than the whole seeds. The juice and zest from the citrus fruit makes it nice and fresh and helps me to forget that the variety of fruits that I can use for my baking projects is still quite limited. It's mainly citrus, apple, and pear but I'm coping. Only a few more months left and all those berries will be back in my kitchen.
This weekend, I'm spending some quality time with my mother. It's carnival and, according to our annual family tradition, we all meet in the countryside to make Berliner (jam filled German doughnuts). We dress up funny (some of us) and listen to silly music, it's actually so silly that it's better to drink some wine or Champagne while it's on to stand its distinct humour. Two years ago, I wrote about this family feast and shared the recipe for our sweet treat. If you're up for it - carnival isn't over yet - here's the recipe. And if you prefer the Greek version, here are my Loukoumades with Honey, Cinnamon, and Pistachios.


Ricotta Polenta Almond Cake with Poppy Seeds and Lemon
Makes 1 cake
ground skin-on almonds 150g / 5 1/2 ounces
fine polenta 80g / 3 ounces
baking powder 2 teaspoons
fine sea salt 1/8 teaspoon
unsalted butter, at room temperature, 100g / 1/3 cup plus 2 tablespoons
granulated sugar 200g / 1 cup
organic eggs 4
fresh ricotta 100g / 3 1/2 ounces
freshly grated lemon zest 3 tablespoons
freshly squeezed lemon juice 3 tablespoon
spoppy seeds (preferably ground) 50g / 2 ounces
For the topping
icing sugar, sifted
freshly grated lemon zest 1 teaspoon
Preheat the oven to 180°C / 350°F (preferably convection setting). Butter a 20-cm / 8-inch springform pan.
In a medium bowl, combine the ground almonds, polenta, baking powder, and salt.
In a large bowl, use an electric mixer to beat the butter and sugar for a few minutes until light and fluffy. Add the eggs, one at a time, mixing well in between until creamy. Add the ricotta, lemon zest, and juice and beat for about 1 minute until combined. Using a wooden spoon, stir in the almond-polenta mixture and the poppy seeds until well combined. Spread the batter evenly in the prepared pan and bake for about 35-40 minutes (slightly longer if using a conventional oven) or until golden brown and firm on top. If you insert a skewer in the centre of the cake, it should come out clean. Let the cake cool for 10 minutes, then take it out of the pan. Dust with icing sugar and sprinkle with a little lemon zest.


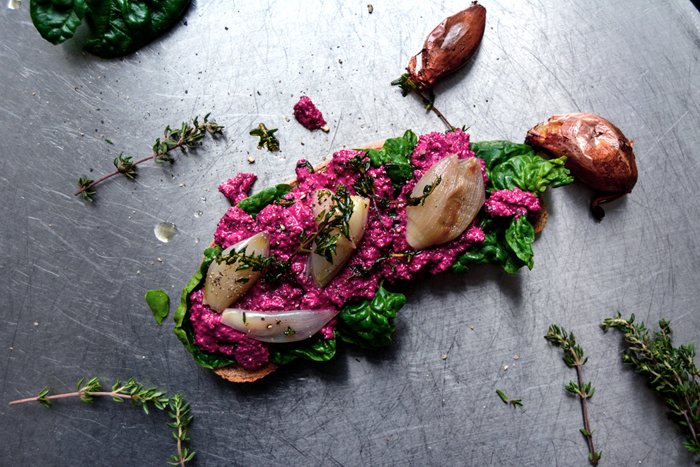
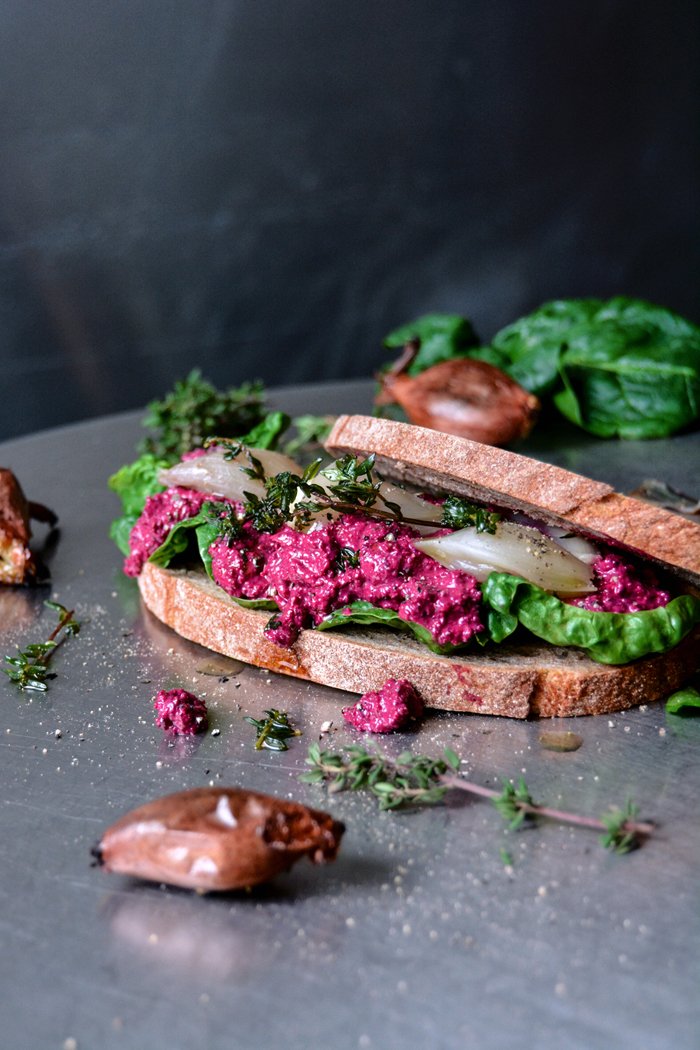
Beet Ricotta and Roast Shallot Sandwich with Spinach and Fried Thyme
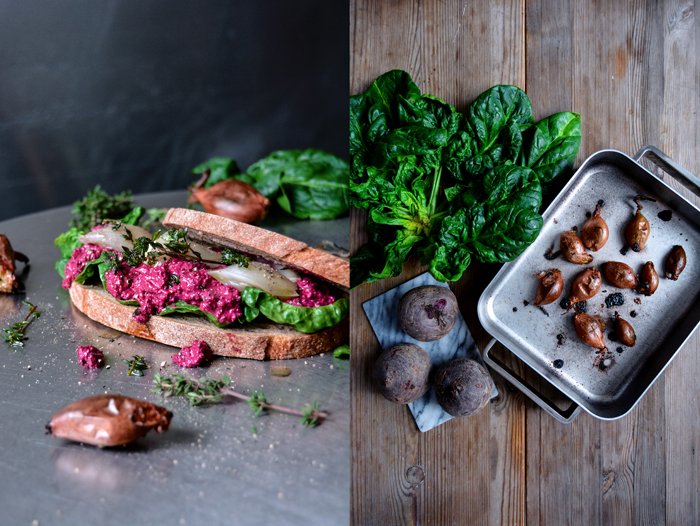
Few things frustrate me as much as trying to make vegetable chips and failing completely. The kitchen is in mess, everything is coated in a layer of oil (including myself) and the result is so hopelessly bad that it has to go right into the bin. My parsnip chips from a couple months ago turned out so perfectly that I felt brave enough to think it would be that easy with any kind of roots or greens. But I was wrong. I had thin, crisp beetroot and spinach bites on my mind but a burnt disaster on my plate. It was so frustrating as I already had the perfect sandwich for this composition ready in my head: the chips were supposed to lay gracefully on a bad of sweet, juicy shallots roasted in the oven in their skins. I could already see the bright purple and green screaming in front of the pale onions. But reality was different. There was no bright anything but a black, bitter disaster.
I know I should have done it before, but afterwards I read and learned that beet chips can be cooked in the oven, which should be much easier. At that point my mood had reached such a low point that I decided to go for a different creation. I looked at the two beetroots that were lucky enough to escape the scorching hot oil in the pan and stuffed one of them in a blender along with some fresh ricotta, olive oil, thyme, and lemon juice. You could boil the root first but I actually enjoyed the crunchy raw bites in the dip. Fried thyme was next and a success - the tiny leaves thrown into sizzling olive oil and taken off the heat immediately, were just right - neither dark nor bitter. And all this piled up on a thick leaf of raw spinach. You could make a juicy ciabatta sandwich with it but I was too lazy to go to the bakery so I grabbed my dark spelt potato bread. It added heartiness to the earthy flavours. This is a proper winter sandwich, stuffed with taste and vitamins.


Beet Ricotta and Roast Shallot Sandwich with Spinach and Fried Thyme
Makes 2 large sandwiches
For the roast shallots
medium shallots, in their skins, 8
olive oil 1 tablespoon
For the beet-ricotta dip
peeled beetroot, raw or boiled, roughly chopped, 120g / 4 ounces
fresh ricotta 100g / 3 1/2 ounces
olive oil 3 tablespoons
freshly squeezed lemon juice 1 teaspoon
fresh thyme leaves 1 heaping teaspoon
fine sea salt
ground pepper
For the fried thyme
olive oil 3 tablespoons
fresh thyme 8 small, young sprigs
For the sandwiches
dark bread 4 slices
large mature spinach leaves 4 (or a small handful of baby spinach)
black peppercorns crushed with a mortar
Preheat the oven to 425°F (220°C).
For the roast shallots, in a baking dish, toss the shallots with 1 tablespoon olive oil. Roast for 15 minutes, then turn them over and roast for 15 minutes on the other side. If they feel soft when you push them down gently, they’re done; set aside.
For the beet-ricotta dip, combine the ingredients in a blender or food processor and pulse until smooth. Season to taste with salt, pepper, and thyme. If the dip is too dry, add more olive oil.
For the fried thyme, heat the olive oil in a small saucepan over high heat, add the thyme sprigs. Take off the heat immediately and set aside.
Brush 2 slices of the bread with the thyme oil from the saucepan and cover with spinach leaves. Sprinkle with generous dollops of the beet-ricotta dip. Snip the ends off the roast shallots and squeeze them out of their skins onto the dip. Lay some fried thyme on top and sprinkle with crushed peppercorns. Close the sandwich and enjoy.

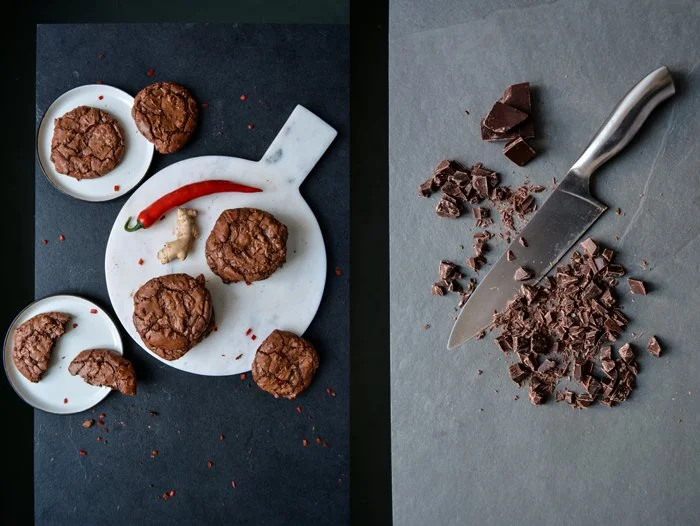
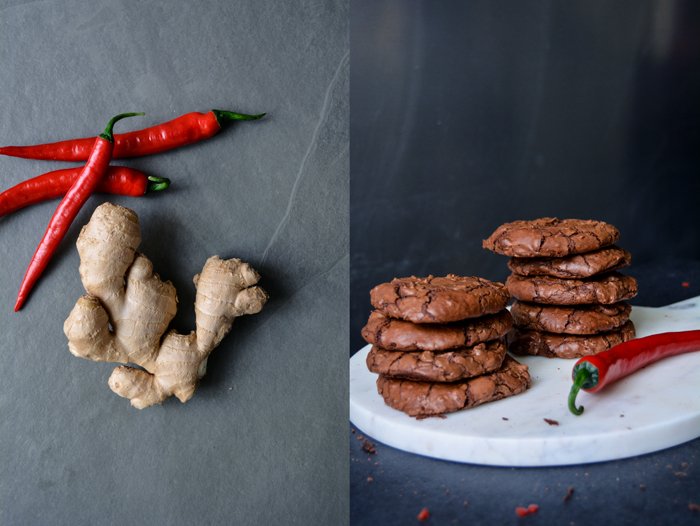
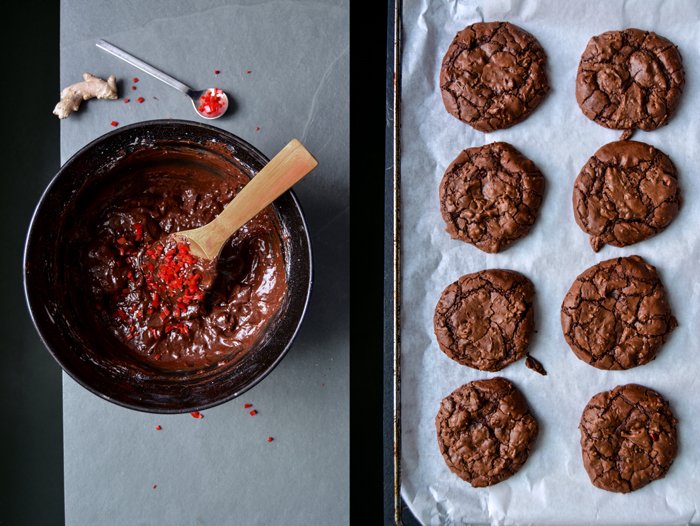
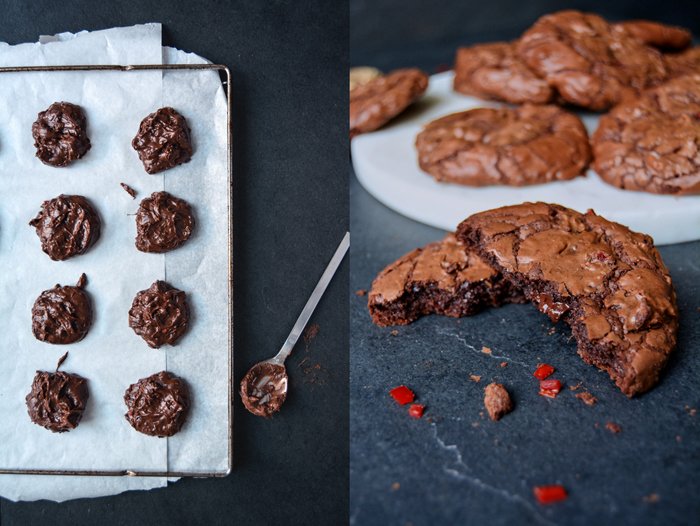
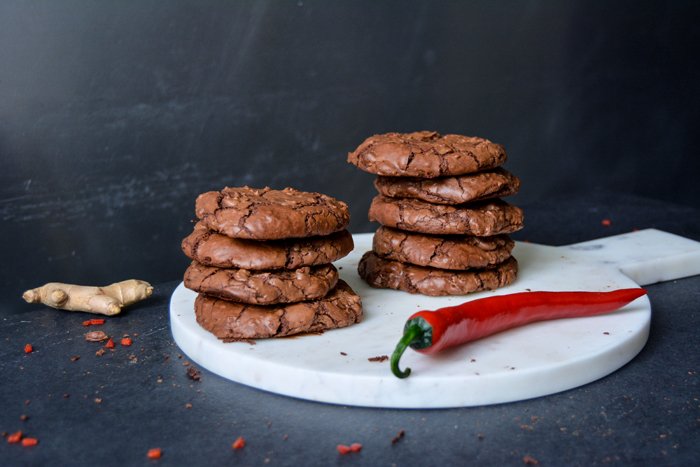
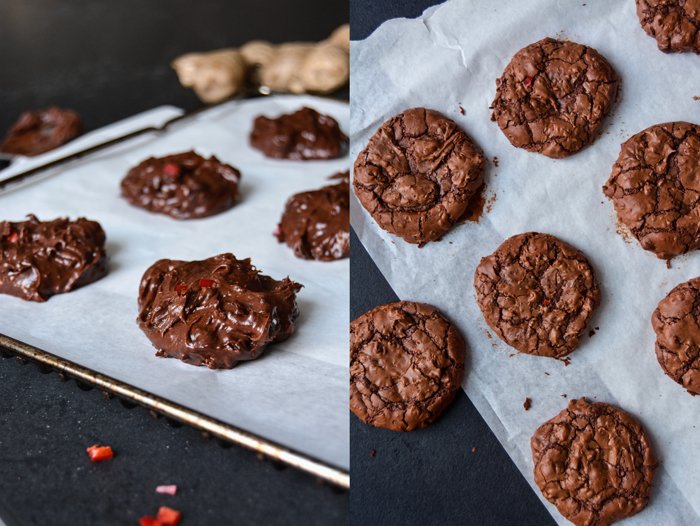
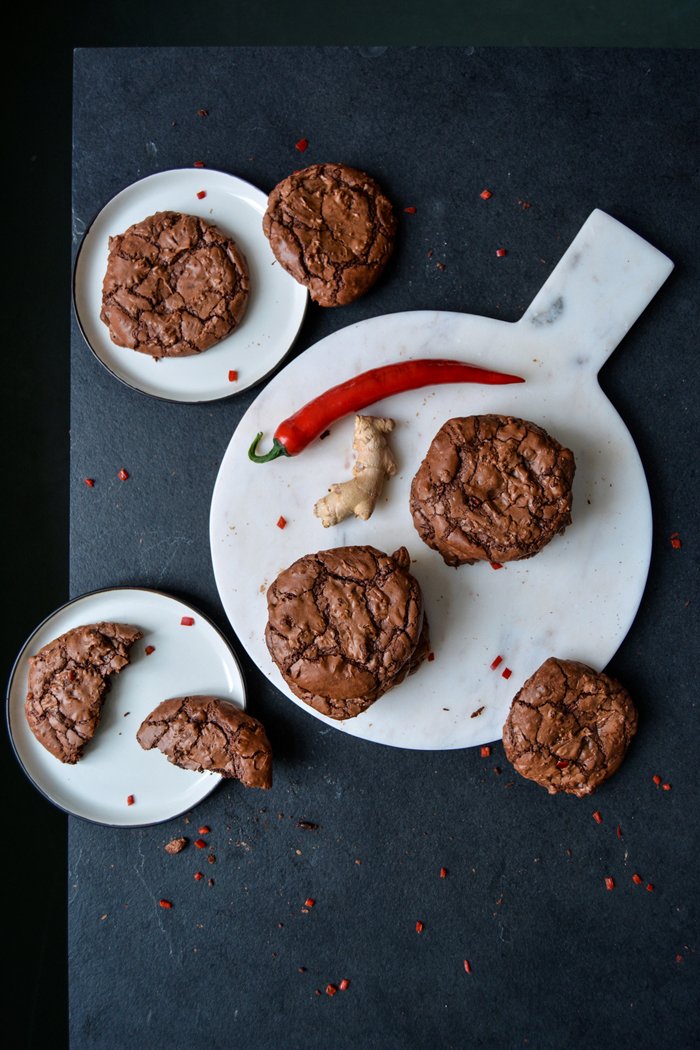
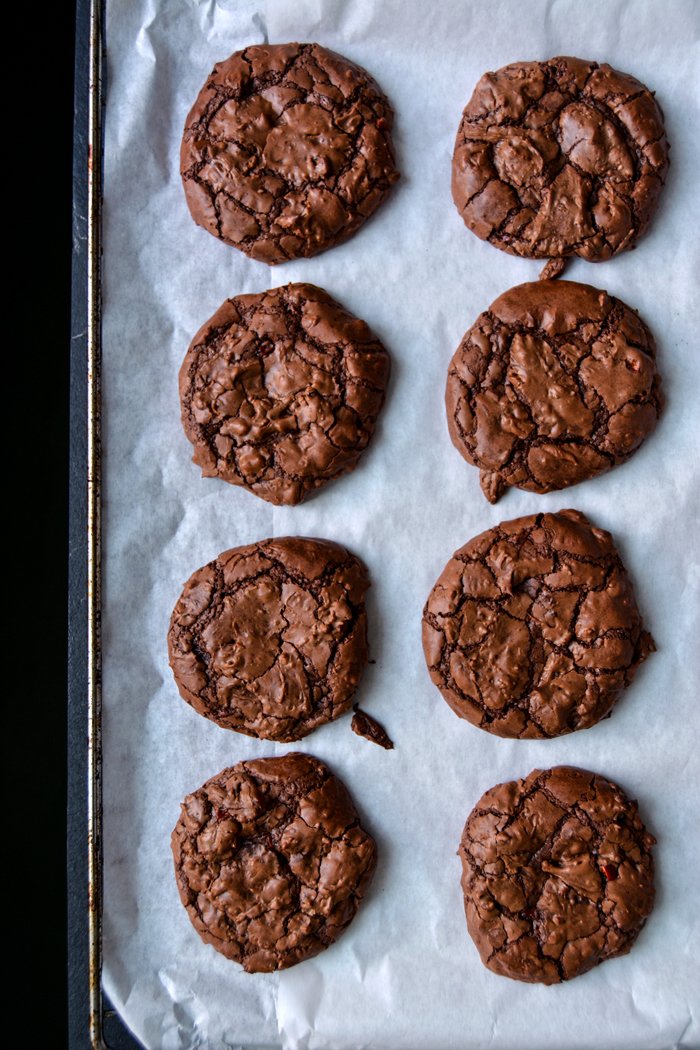
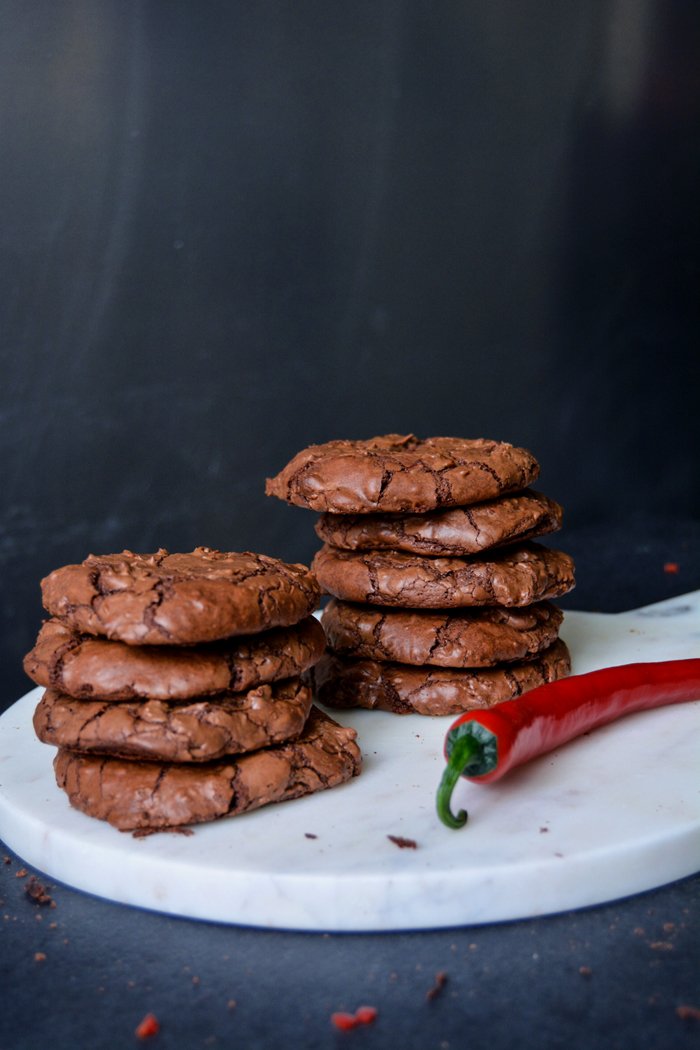
Perfectly Fudgy Ginger Chili Double Chocolate Cookies

Over the past few days, I've been working on last year's tax declaration, a rather frustrating task that is only bearable with lots of sweets on the side. Or a glass of wine, which I don't recommend to avoid serious problems with your tax office due to illogical inconsistencies caused by a tipsy mind. This highly responsible - but absolutely boring work - needs lots of concentration and sugar to keep the brain cells awake. I think any kind of cookie would have worked in my case - I'm always happy when I have these sweet, chunky bites in my mouth - but I was after a powerful treat, packed with spice and bittersweetness.
And here's what I came up with: Ginger Chili Double Chocolate Cookies. I would call it a proper man's cookie, at least our male friends who passed through our flat recently were absolutely hooked on them and praised the perfect balance of softness and crunch. They are very dark, with chocolaty depth, I used melted bittersweet chocolate plus roughly chopped chunks and only a little bit of flour, which had an amazing effect on the texture. These cookies are soft inside, a bit fudgy, and wrapped in a thin, shiny crust - perfect. I stirred in plenty of freshly grated ginger and finely chopped fresh red chili pepper. The result was hot, citrusy and fresh - don't expect a slight hint of the spices, they are present.
You have to take these cookies out of the oven at the right point, when the dough is just done. I made 11 cookies, 10 were perfect, and only 1 of them (for whatever reason) was still too gooey inside for my taste. The chocolate flavour is intense, I wouldn't use chocolate much darker than 55% for this recipe, the bitter note can become too overpowering and disturb the spices - even for men.
Ginger Chili Double Chocolate Cookies
Makes 10-12 cookies
bittersweet chocolate (about 55%) 300g /10 1/2 ounces
unsalted butter 45g / 3 tablespoons
freshly grated ginger 1 heaping tablespoon
ground cinnamon 1 teaspoon
plain flour 65g / 1/2 cup
baking powder 1/2 teaspoon
organic eggs 2
granulated sugar 100g / 1/2 cup
fine sea salt 1/4 teaspoon
medium hot fresh red chili, finely chopped, 2 teaspoons
Preheat the oven to 180°C / 350°F. Line 1 baking sheet with parchment paper.Roughly chop 1/3 of the chocolate (100g / 3 1/2 ounces) and set aside.
In a medium saucepan, melt the remaining chocolate, the butter, ginger, and cinnamon over low heat, stirring occasionally. Let it cool for 2 minutes.
Combine the flour and baking powder and set aside.
In a large bowl, use an electric mixer to beat the eggs, sugar, and salt for 2 minutes until light and fluffy. Whisk in the melted chocolate until well combined. Using a wooden spoon, fold in the flour and chopped chocolate until just combined. Stir in the chili and scoop 1 heaping tablespoon for each cookie onto the lined baking sheet, leaving a bit of space between the cookies. Don't flatten the cookies. Bake for about 11-12 minutes or until the cookies are a little crunchy outside and slightly soft in the middle. Take the baking sheet out of the oven and let the cookies cool for 10-15 minutes before you transfer them to a wire rack to cool completely, the chocolate will need a little while to become hard again.


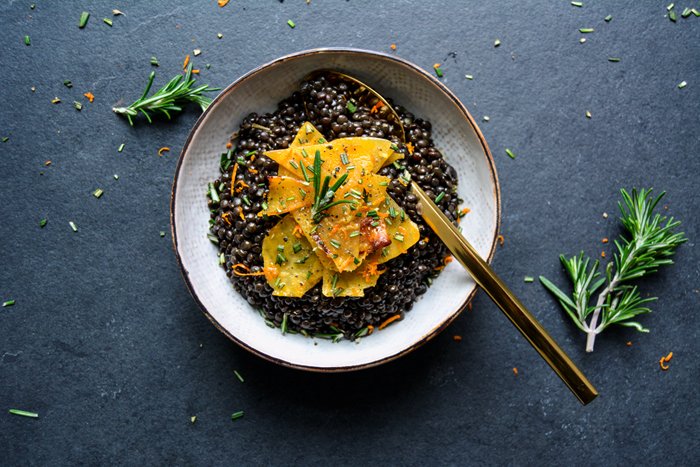
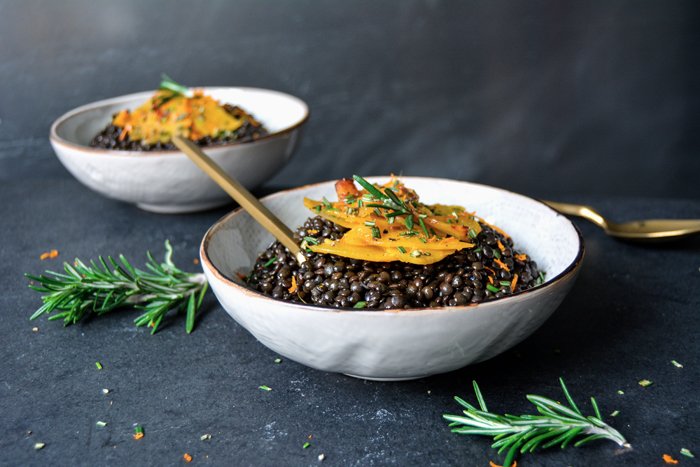
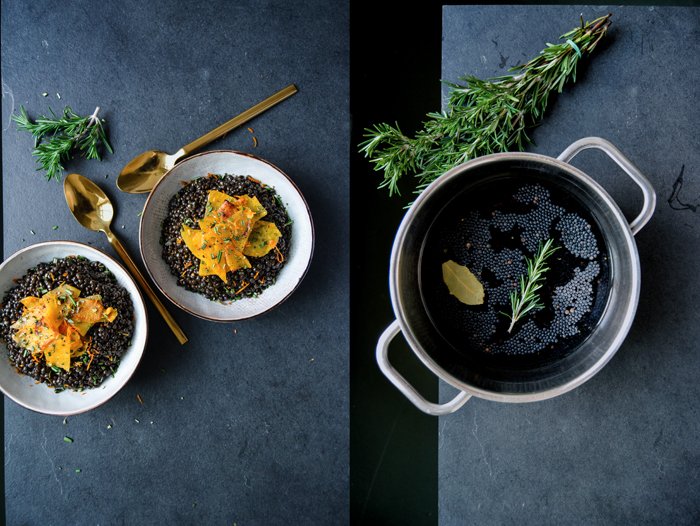
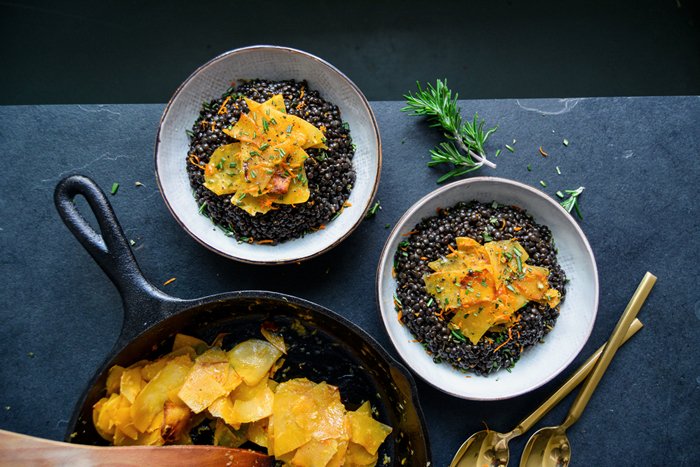
Beluga Lentils with Ginger Orange Rutabaga and Rosemary

I once read that the 3rd Monday of January is supposed to be the most depressing day of the year - Blue Monday. I don't know if it's true, luckily it has already passed, and I didn't notice my mood drooping drastically that day. However, I've felt a rising impatience for more light and warmer weather to come back into my life. So much so that I had to book flights to Malta last night. This always makes me feel so much better, no matter how far in the future the departure date lies, just the thought of it puts me in a good mood.
Another way to lift my spirits is food. Cosy food, colourful food, or simply delicious food. This dish combines all of it: nutty Beluga lentils, topped with thin slices of rutabaga, quickly cooked in the pan with lots of ginger, orange zest and juice, and fresh rosemary. The rustic root is as bright as the sunrise over Malta's east coast and its earthy flavour can easily deal with some strong aromas. I was surprised how well it merged with the dark legumes.

Beluga Lentils with Ginger Orange Rutabaga and Rosemary
Serves 3-4
For the lentils
Beluga lentils, or any lentils (no soaking required), 280 g / 10 ounces
small sprig fresh rosemary 1
bay leaf 1
olive oil
balsamic vinegar 1 tablespoon
fine sea salt
ground pepper
For the rutabaga
peeled rutabaga, cut into wedges and very thinly sliced (use a mandoline or cheese slicer), 300g / 10 1/2 ounces
freshly grated ginger 1 tablespoon
freshly grated zest of 1 orange
freshly squeezed orange juice 100ml / 1/3 cup plus 2 tablespoons
fine sea saltground pepper
finely chopped fresh rosemary needles 1-2 tablespoons
black peppercorns, crushed in a mortar
Place the lentils in a saucepan with plenty of (unsalted) water, add the rosemary and bay leaf, and bring to the boil. Simmer for about 20 minutes or until al dente (or follow the package instructions). Remove excess liquid with a ladle if necessary and stir in a generous splash of olive oil and the vinegar. Season to taste with salt, pepper and vinegar.
While the lentils are cooking, prepare the rutabaga: In a large, heavy pan, heat a generous splash of olive oil over medium-high heat. Add the rutabaga and cook for about 5 minutes, stirring occasionally, until golden and al dente. Scrape the rutabaga to the side, add a little more olive oil to the pan along with the ginger, cook for 1 minute, stirring constantly. Add the orange zest (leave a little of the zest for the topping) and juice and season with salt and pepper. Stir in the rosemary or use as a topping once the plates are ready. Cook for another 1-2 minutes until the desired texture is reached.
Divide the lentils between plates and lay the rutabaga on top. Sprinkle with rosemary, orange zest, and crushed peppercorns and drizzle with a little olive oil (optional). Serve immediately.

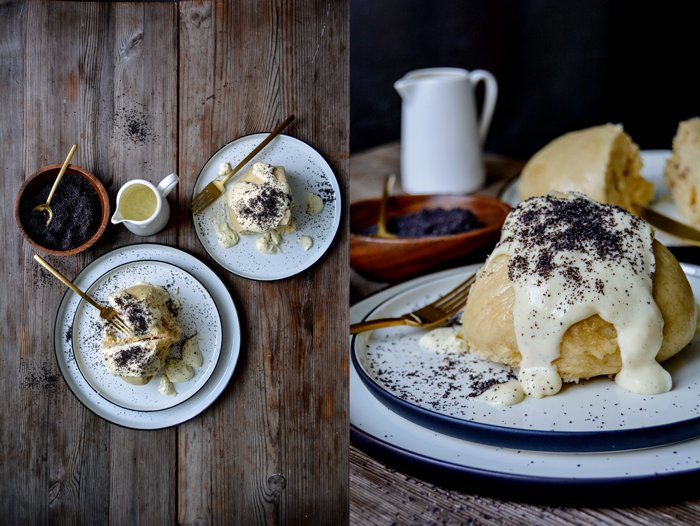
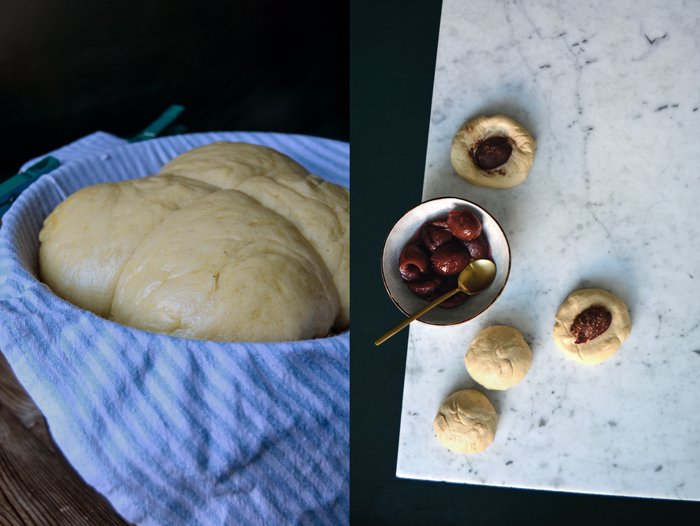
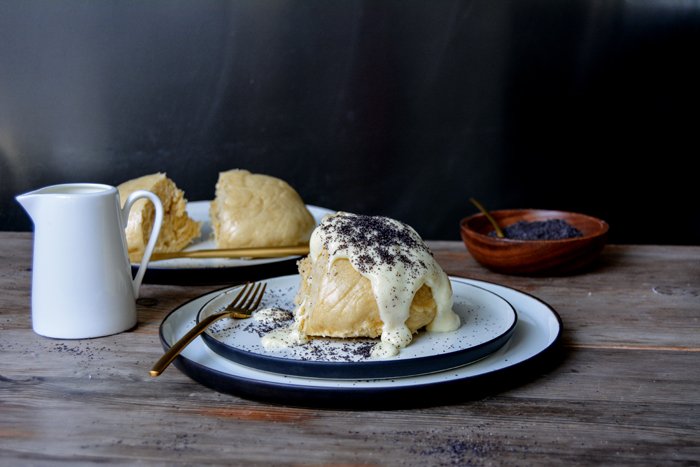
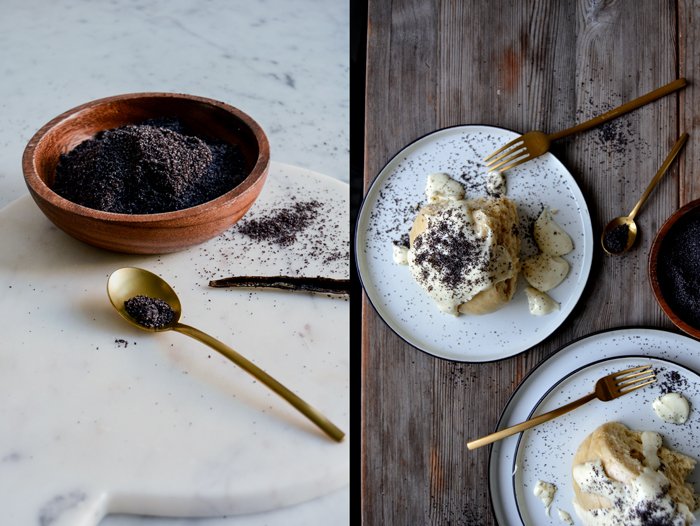
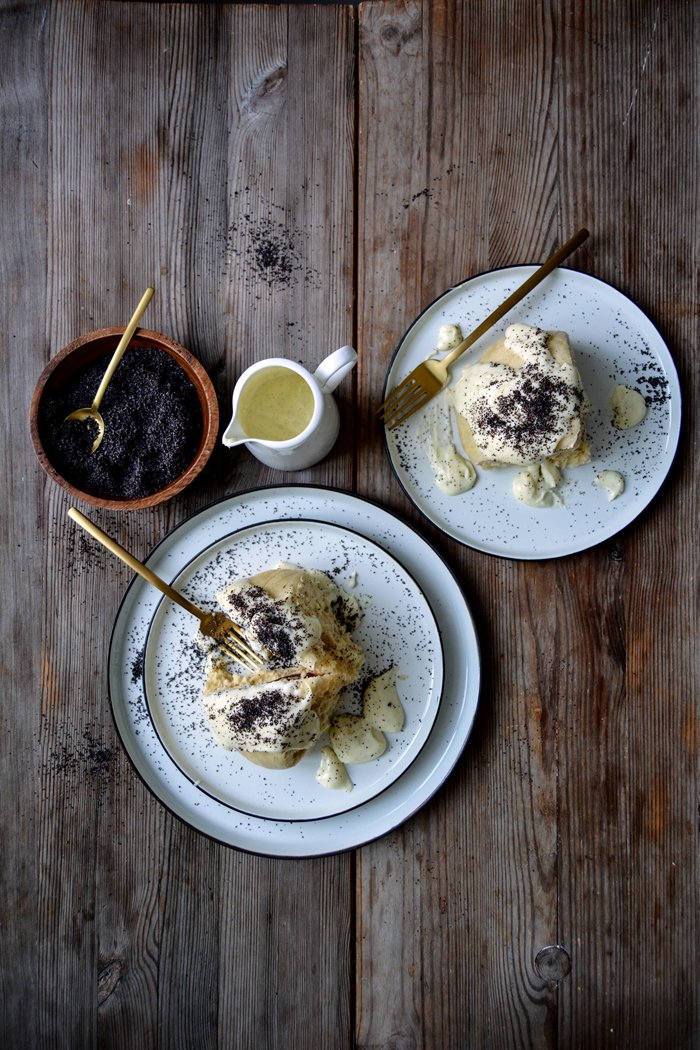
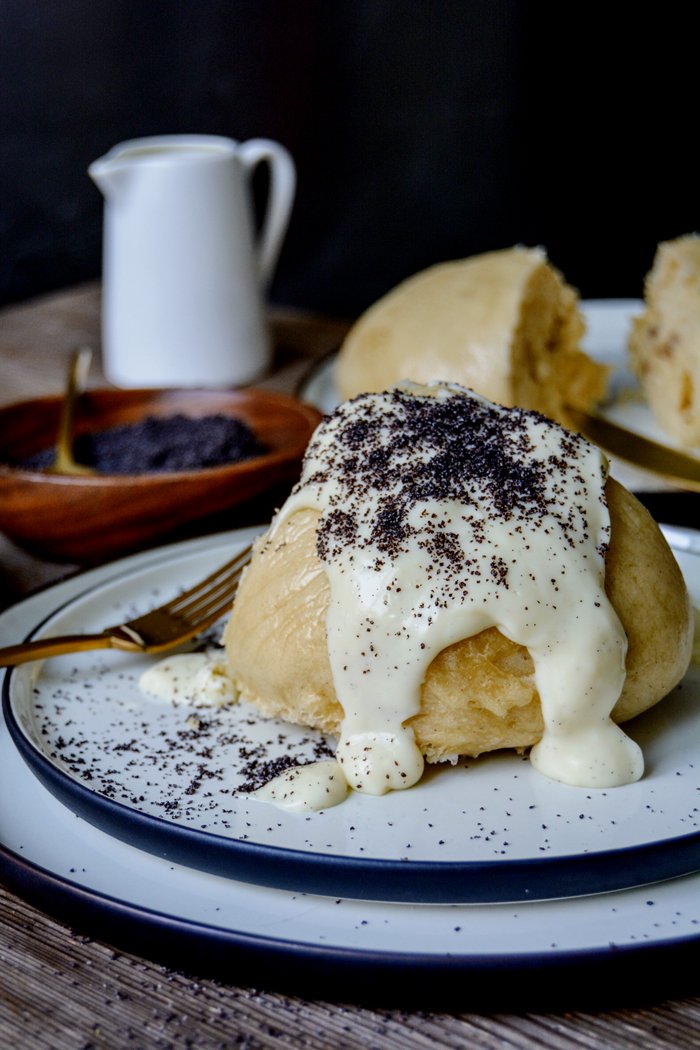
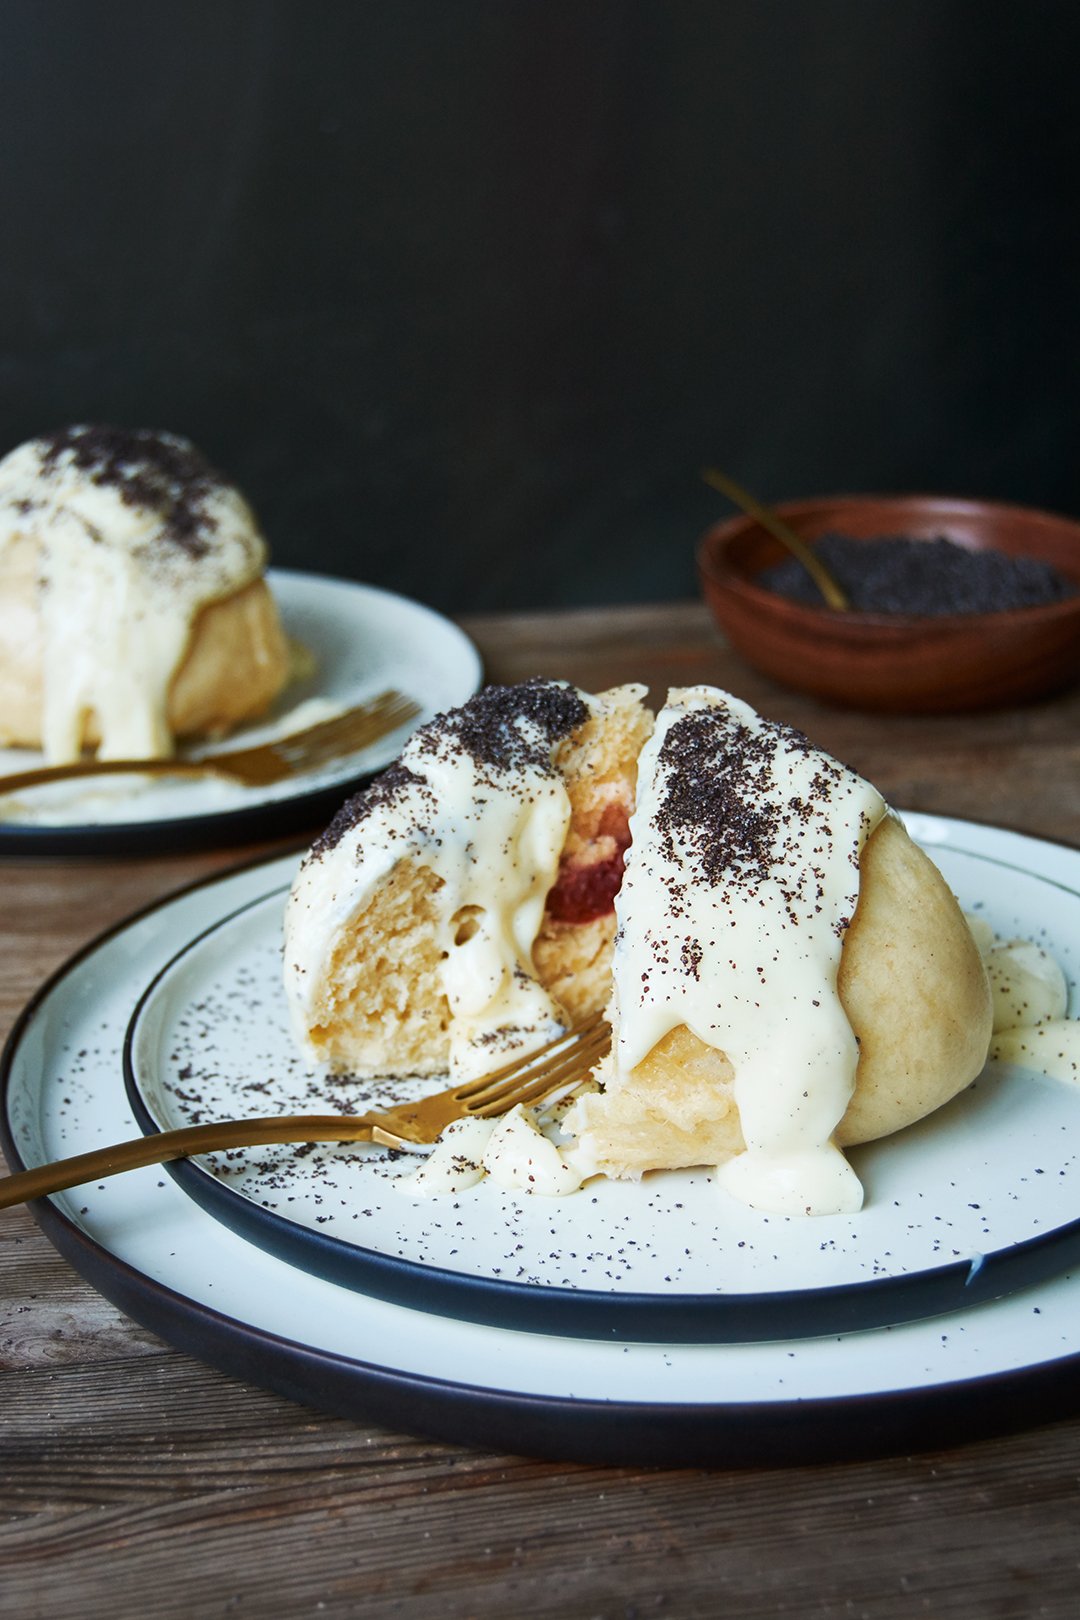
Germknödel - Austrian Yeast Dumplings with Plums, Poppy Seeds & Vanilla Custard

Somewhere in the snowy mountains in northern Italy, is a tiny village that you can only reach through a dangerously narrow road. Winding up higher and higher, dark fir trees on one side and deep gorges on the other, it makes you pray with gratitude once you get to the village safely. I used to spend a lot of time there, skiing and walking through the woods, through knee-deep snow until I reached one of the cosy wooden huts that are luckily spread all over to offer the frozen wanderer a bit of warmth, rest, and food. The culinary treasures of this region - in South Tyrol - are outstanding and one of the best things you can give your body when the temperatures are freezing.
One of these treats actually originated in Austria but crossed the border and became a staple in the local cooking: wonderfully fluffy Germknödel. It's a yeast dough dumpling, usually filled with plum butter (thick and sticky plum jam) and topped with melted butter, poppy seeds, and icing sugar. It's one of those dishes that you can easily eat for breakfast, lunch, and dinner. I used to enjoy it so often on the terrace of a very old hut, it had a breathtaking view over icy-white mountains, often framed in a sparkling blue sky. The chef used to serve it with thick vanilla custard instead of the melted butter and that's what I do in my kitchen as well. I also replace the plum jam with whole plums for a bit more fruitiness. The only difficult task I had to solve, was to decide how I would steam the dumplings (I don't have a steam cooker in my kitchen). You could also blanch them in water but the results aren't as nice. A quick phone call with my mother and my problem was solved. I did it the way my granny Lisa used to cook dumplings: on a cotton tea towel tightened with clothespins over a wide pot filled with simmering water - old-fashioned, cheap, and my Knödel were perfect. I could have steamed them one after the other to give them a pretty round shape, but I was impatient. I cooked all at once, up against each other, and broke their fluffiness apart when they were done. Warm, tender, and fragrant, you don't want to eat anything else ever again.

Germknödel
Makes 4 large dumplings
For the dumplings
plain flour 270g / 2 cups plus 1 heaping tablespoon
granulated sugar 25g / 2 tablespoons
ground cinnamon 1/2 teaspoon, plus more for the plums
fast-acting yeast, scant 2 teaspoons
fine sea salt 1/4 teaspoon
milk, at room temperature, 120ml / 1/2 cup
butter, melted and cooled, 40g / 3 tablespoons
organic egg 1
jarred plums, cut in half, 2
For the topping
ground poppy seeds 2-3 tablespoons
For the vanilla custard
whole milk 500 ml / 2 cups plus 2 tablespoons
organic egg yolks 4
granulated sugar 100 g / 1/2 cup
cornstarch 30 g / 1/4 cup
fine sea salt 1/8 teaspoon
vanilla pod, split lengthwise, 1
To steam the dumplings, you need a large, wide pot (mine is 24cm / 9 1/2" wide), a cotton or linen tea towel plus 4 clothespins to fix the towel, and a metal (or heat-resistant) bowl, large enough to cover the pot as a domed lid.
For the dumplings, combine the flour, sugar, cinnamon, yeast, and salt in a large bowl.
Whisk together the milk, butter, and the egg - the mixture should be lukewarm. Add to the dry mixture and mix with the dough hooks of an electric mixer for a few minutes or until well combined. Continue kneading with your hands for a few minutes until you have a soft and silky dough ball. Place the dough back in the bowl, cover with a tea towel, and let rise in a warm place, or preferably in a 35°C / 100°F warm oven, for about 70 minutes or until doubled in size.
Punch the dough down, take it out of the bowl, and knead for about 30 seconds. Divide the dough into 4 equal portions and use your hands to form each one into a 10cm / 4" disc. Lay 1 plum half in the middle of each dough disc and sprinkle with a little cinnamon. Fold the dough up and use your fingers to squeeze the dough together to close the dumplings and seal the plums tightly inside. Roll into balls with your hands and transfer the dumplings to a lightly floured baking dish or baking sheet. Cover with a tea towel and let rise in a warm place for about 20 minutes until puffy.
While the dumplings are rising, fill about 1/3 of the pot with water and bring to the boil. Take the pot off the heat and lay a cotton or linen tea towel over the pot (mind the hot steam). Fix the towel with clothespins at the handles so that the towel can hang in the pot without touching the water. Lay the dumplings - 4 at once or in batches, if you want to have round shaped single dumplings - onto the towel, they shouldn't touch the water. Cover with a tight fitting metal bowl (upside down) and transfer the pot back to the heat. Turn the heat down to a low simmer (medium to medium-low) and steam the dumplings for 20 minutes without lifting the top (!).
While the dumplings are cooking, make the custard: In a small bowl, whisk 4 tablespoons of the milk with the egg yolks, sugar, cornstarch, and salt until well combined. In a medium saucepan, bring the remaining milk and the vanilla pod to the boil. Take the vanilla out and scrape the seeds from the pod into the milk. Whisking constantly, add the egg yolk mixture to the hot milk and bring to a boil. Take the saucepan off the heat; continue whisking for 2 minutes and set aside.
After 20 minutes take the pot off the heat and the top off the dumplings - mind the hot steam. Carefully transfer the towel with the dumplings to a table, wait for about 2 minutes then use a knife to peel the dumplings off the towel. If you cooked all of them at once, break them into 4 pieces. Serve immediately with the warm vanilla custard, sprinkled with poppy seeds.

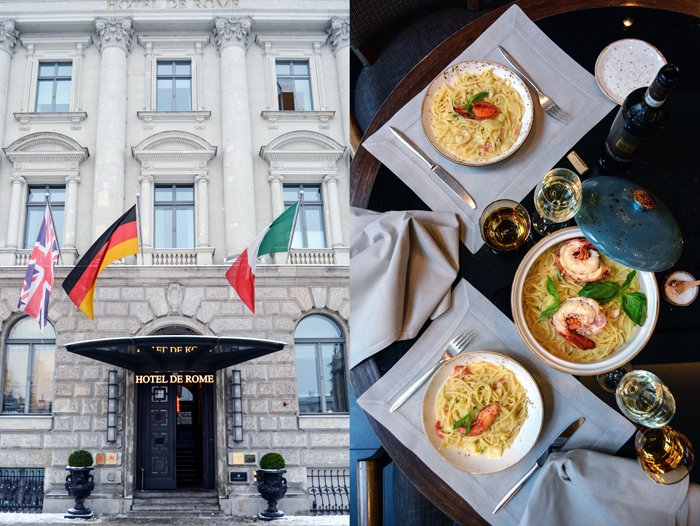
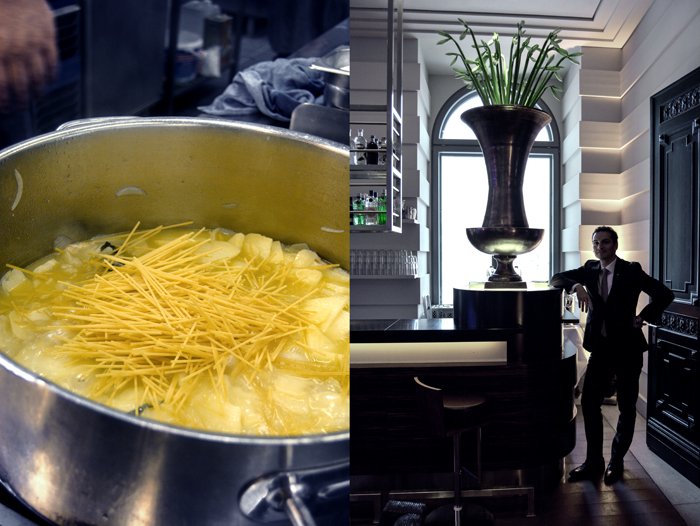
meet in your kitchen | Capri, Lobster & Pasta e Patata at Hotel de Rome in Berlin

I always had a weak spot for grand hotels. It must have been my mother who planted this seed in the early days of my life. We used to travel a lot together, to Europe's old cities, Mediterranean getaways and snowy villages in the mountains. And wherever we went, we fell for the splendid charm, beautiful architecture and culinary excitement of a luxurious hotel - we're girls after all. Be it for a few nights, or just a cappuccino or glass of wine at the bar, these places tend to take us into another world as soon as we walk through the revolving door.
In Berlin, you can find one of these magical houses at a beautiful piazza framed by the imposing buildings of the Humboldt University and the Berlin State Opera, right on one of the city's most prominent boulevards - Unter den Linden. Walking into Rocco Forte's Hotel de Rome reveals a house full of elegance and history. The former Dresdner Bank Headquarter was built in 1889, thick stone walls, marbled columns, gold leaf mosaics, and Berlin's prettiest ballroom covered by a huge skylight, are symbols of an era of grandeur. The bank managers' former offices have been turned into chic suites, and in the basement, where the hotel's spa is located in our days, you can still see the rooms secured by heavy iron doors where the bank once held its gold deposits. Its a piece of the city's history, preserved and turned into a place to relax, enjoy and savour. My personal highlight is the spacious roof terrace overlooking the city, it's one of Berlin's best locations to enjoy a sundowner on a warm summer's night. I can't wait for them to come back.
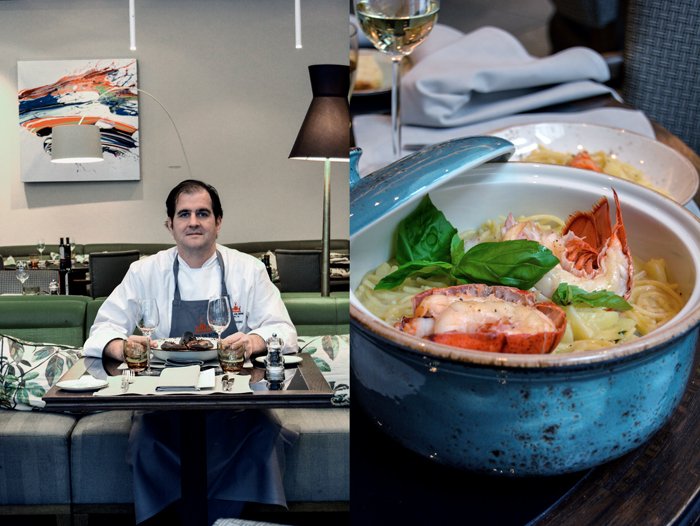
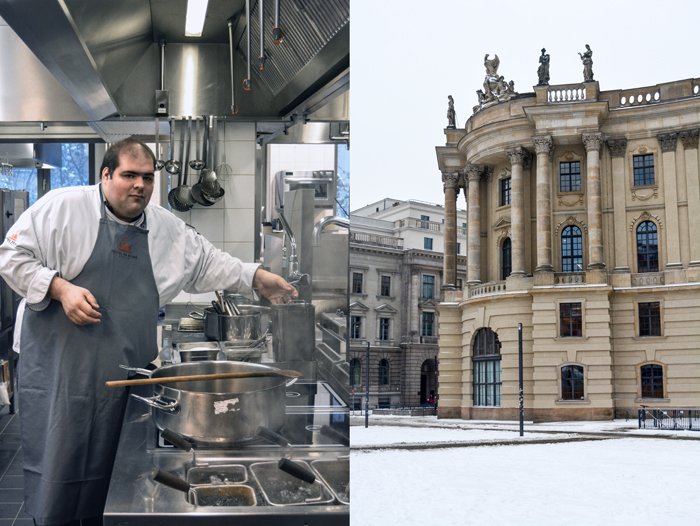
The Hotel de Rome combines two cultures - Germany and Italy - and especially in the kitchen, the Mediterranean side took over. The legendary Tuscan Michelin-stared chef Fulvio Pierangelini, Director of Food responsible for the honest approach to Italian cuisine in a few hotels of the Rocco Forte family, has a fantastic team here in Berlin. Jörg Behrend, Executive Chef, and his Sous-Chef Davide Mazzarella create such delicious treats at the La Banca Restaurant that I decided to meet them in their kitchen. On an icy-cold and snowy morning, I walked into the hotel's bar in desperate need of a warming tea. After a chat with the Bar Supervisor, Jörg Wischner, I found out that the choice wouldn't be easy. He offered me a selection of 40 delicate leaf compositions, which you can also enjoy at a traditional afternoon tea ceremony at the hotel's cosy Opera Court, inspired by their London sister, the Brown's Hotel. While I was sipping on a fragrant golden green tea, he explained the extensive cocktail menu, which made me wish I had come in the evening. But I was here to cook and learn about Capri's cuisine.
Davide's family used to have a renowned restaurant on Italy's little island in the Gulf of Naples, when Capri was still the place to be for Europe's high society and American movie stars. He says those days are over, but the traditional recipes he learned to cook from his family, the time spent with them in the kitchen, peeling potatoes and chopping vegetables, made the young man want to become a chef and take his home's scrumptious food out into the world. Jörg Behrend is from western Germany but he feels strongly inspired by Italy's culinary treasures. Through traveling and working with his Italian-German team for many years, he has almost become Italian himself. So it didn't take long for us to decide what we'd like to cook together: Pasta e Patata all Astice. It's a Capri classic that was completely new to me, thinly sliced potatoes and spaghetti cooked like a risotto and topped with a lobster. The everyday basic version is made without seafood, which isn't necessary, but it turns it into an extravagant treat. Pasta e Patata is often served as one of many courses during a special family lunch.
Needless to say, the meal was perfect, it's one of the secrets of Italian cooking, you don't need many ingredients to create something outstanding. I find it even better than risotto. To make our Italian lunch complete, we enjoyed it with crisp white wine at a big table together with the Hotel de Rome family. This is how it feels at this hotel, it's a family taking care of you. Thank you Jörg, Davide, Türkan, Sebastian, and Jörg (at the bar) for a bit of Capri in Berlin!
Pasta e Patata all Astice
Serves 4
olive oil
garlic, crushed, 1 clove
onions, peeled, 220g / 8 ounces
red chili pepper, seeded and thinly sliced, 1/4 - 1/2
waxy potatoes, peeled, quartered, and cut into 1/2cm / 1/4" slices, 500g / 17 1/2 ounces
vegetable broth, about 1 1/2l / 6 1/4 cups, plus more as needed
dried spaghetti spezzati (broken into 6cm / 2 1/2" pieces) 400g / 14 ounces
cherry tomatoes, cut into quarters, 10
Parmesan, freshly grated, 180g / 6 1/2 ounces
fresh basil, a handful, torn into pieces
fine sea saltground pepper
lobster, cooked, removed from its shell, 2 (each about 500g / 17 1/2 ounces)
butter 1 tablespoon
a few thyme leaves
In a large, wide pot, heat a generous splash of olive oil over medium heat and sauté the garlic, onions, chili, and potatoes for a few minutes until the onions are golden and soft. Cook like a risotto, add a little vegetable broth to cover the potatoes, let the potatoes soak the liquid, and add a little more when it's all soaked, stirring occasionally. Repeat until the texture is velvety thick and the potatoes are almost soft. Add the spaghetti and more broth and let the spaghetti cook, stirring, until al dente. Add more broth as necessary. In the last few minutes, let the dish thicken like a risotto. Stir in the tomatoes, Parmesan, basil (leave out a few leaves for the topping), and season to taste with salt and pepper. Cover and let sit for a few minutes.
While the potatoes are cooking, prepare the lobster: In a medium, heavy pan, heat the butter and thyme over medium heat, add the cooked lobster, and cook until golden.
Divide the pasta e patata among plates, lay the lobster on top, and sprinkle with fresh basil leaves.
Buon Appetito!
Jörg, you are Chef de Cuisine at Rocco Forte'sHotel de Rome and the La BancaRestaurant where the kitchen is run by a German-Italian team: Sous-Chef Davide Mazzarella is from Capri and Fulvio Pierangelini, Director of Food and founder of the famous – but now closed - Gambero Rosso in Tuscany, was born in Rome. Did this experience make you a little Italian? How important are different cultural backgrounds in the kitchen?
Jörg Behrend: My Italian side grew considerably through working in our team. To understand the philosophy, the easiness, and the purism of the Italian cuisine, it's important to have this constant exchange with my Italian colleagues. It helps to create delicious dishes.
Davide, you worked in Michelin-starred restaurants in Italy, the L'Olivo in Capri and Davide Scabin's Combal. Zero in Rivoli, before you decided to work abroad. What are the differences between working as a chef in restaurants in Italy and in Germany?
Davide Mazzarella: I don't think that the differences between Italy and Germany are that big. It's important to work professionally, in both places. There is a difference regarding the availability of ingredients and products, it's much easier to get them in Italy. Always fresh and seasonal, it's possible to buy whatever you need twice a day. In Germany you have to trust your suppliers and hope that they bring you what you need.
Jörg, you are from Limburg, a picturesque town in the west of Germany. Does your home region's cuisine come through in your work sometimes?
Jörg Behrend: Unfortunately not, my home's cooking is quite rich and rustic. There are also a few popular combinations that might be hard to understand if you're not a local, like potato soup with plum cake.
Davide, you grew up in Capri where your family ran a renowned restaurant for decades. How did this restaurant influence your life? How did Capri change over the years?
Davide Mazzarella: I learned the kitchen basics in our family restaurant and I have to thank my grandmother and parents that I'm a chef today. They inspired me and they passed their passion for this job on to me. Capri is beautiful, and famous, but it had its glorious days between the 50's and late 70's. In the past 20 years, the island became too touristy and, with time, we lost many traditions.
How important is the food and the cuisine that we grow up with as children for our adult life?
Jörg Behrend: The cooking of our childhood is essential and a guidance for the rest of our life. Looking back, I'm very thankful for my mother, giving us fresh, homegrown vegetables, freshly squeezed juices from the fruit from our own trees. The meat and cold cuts we ate came from butchers and farmers, where the animals were treated well. My grandmother was the queen of preserving. Be it sauerkraut or raspberry jam, all year round, she was busy preserving fruits and vegetables. It came with age, that I understood how - unknowingly - conscious my mother used to cook. This is a guideline for me and my wife, which we're trying to hand down to our own kids, and to show them the recipes from our childhood.
Davide Mazzarella: It's everything. What we eat as a child and what we like is saved as a memory for the rest of our life. The smell is also important. The smell of tomato sauce still excites me as it did then, when I lived at home.
How did the German and the Italian cuisine change over the past 10-15 years?
Jörg Behrend: The old recipes were forgotten. Then Nouvelle Cuisine took over, followed by a renaissance of the Deutsche Küche (German Cuisine) with the most modern techniques. Today, we cook regional, seasonal, and sustainable. We use the most simple products to create culinary highlights. We also use the entire animal again, rather than single parts. Back to the roots.
Davide Mazzarella: After the Nouvelle Cuisine, and the Spanish cuisine - with Ferran Adrià and the Molecular Cuisine - the Italian cuisine found its way back to its roots. Many recipes from the 18th century have been re-discovered and newly interpreted, with new cooking techniques and methods.
How important is seasonal and local produce for your creations?
Jörg Behrend: The quality is important, if you can't find the right quality in your region, you have to search for it outside the regional borders. We use seasonal produce for our creations.
Davide Mazzarella: It's very important. To work with seasonal and local produce is a MUST in our days. I love it, when our suppliers bring the produce from small producers from the countryside to our kitchen, it makes cooking more fun.
How do you develop new recipes? Where do you find inspiration?
Jörg Behrend: There's a growing influence through social media, and through travels to Italy, looking for original recipes.
Davide Mazzarella: Tradition, experience, personal technique, and knowledge. Inspiration comes naturally, and sometimes you have to take a peek at what others do.
Who has been your biggest inspiration in the kitchen? Who or what inspired you to start a career in food?
Jörg Behrend: Friends of my parents owned a hotel with a very good restaurant. I used to work there during my summer holidays and I was fascinated by the kitchen processes and the dishes they created. They offered me an apprenticeship and I gladly excepted.
Davide Mazzarella: My family, but especially my grandmother and my mama.
What was the first dish you cooked or baked on your own, what is your first cooking memory?
Jörg Behrend: My earliest memory is the smell of fresh jus in the cooling room. I can never forget about it. Unfortunately, I don't remember my first dish.
Davide Mazzarella: I think it must have been spaghetti aglio e olio. It was disgusting. And I can never get the smell of O' Rau’ (Neapolitan Sunday and holiday dish) out of my head.
What are your favourite places to buy and enjoy food in Berlin?
Jörg Behrend: Restaurant Grünfisch in the Gräfekiez, the farmers' market at Karl-August Platz in Charlottenburg, Frischeparadies on Morsestrasse, Cafe Set´s on Schlüterstrasse, Küstlichkeiten in the Markthalle Neun.
Davide Mazzarella: Vitaminchen at Oliver Platz, Frischeparadies on Morsestrasse, Masaniello Pizzeria on Hasenheide.
If you could choose one person to cook a meal for you, who and what would it be?
Jörg Behrend: Beef stew, together with my mother.
Davide Mazzarella: Neapolitan Salsiccia wrapped in fig leaves and cooked in ashes, together with my father.
You're going to have ten friends over for a spontaneous dinner, what will be on the table?
Jörg Behrend: Everything that I can find in the fridge, and everybody should bring something to the table.
Davide Mazzarella: There will definitely be something on the table, I just don't know what yet.
What was your childhood's culinary favourite and what is it now?
Jörg Behrend: Spinach, potatoes and egg in my childhood. Salt-baked fish with artichokes and a salad of bitter lettuce leaves whenever I can get it. Or pasta sugo in all its variations.
Davide Mazzarella: Riso e lenticchie (rice and lentils) in my childhood. Today: spaghetti aglio e olio my way.
At home, do you prefer to cook on your own or together with others?
Jörg Behrend: At home, I let my wife cook. When we have guests, everybody is involved.
Davide Mazzarella: I don't like cooking at home. And if I did cook, it would have to be for a beautiful woman.
Which meals do you prefer when you cook privately, improvised or planned?
Jörg Behrend: Improvised.
Davide Mazzarella: Improvised.
Which meal would you never cook again?
Jörg Behrend: Snails. I had to cook them during my apprenticeship.
Davide Mazzarella: Once I got a sturgeon, alive. It's an experience I don't need ever again.
Thank you, Jörg and Davide!


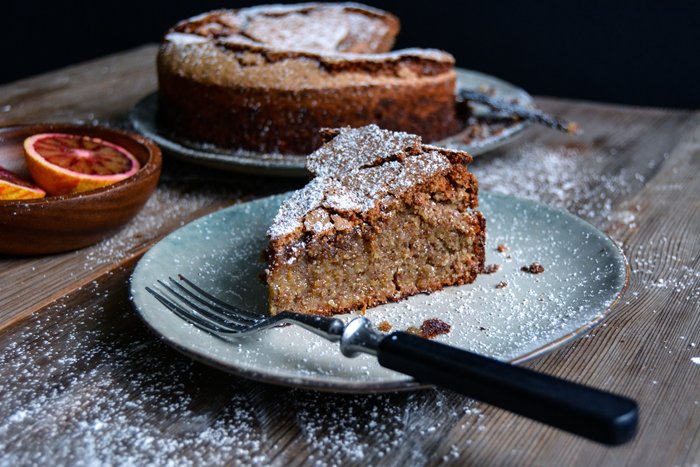
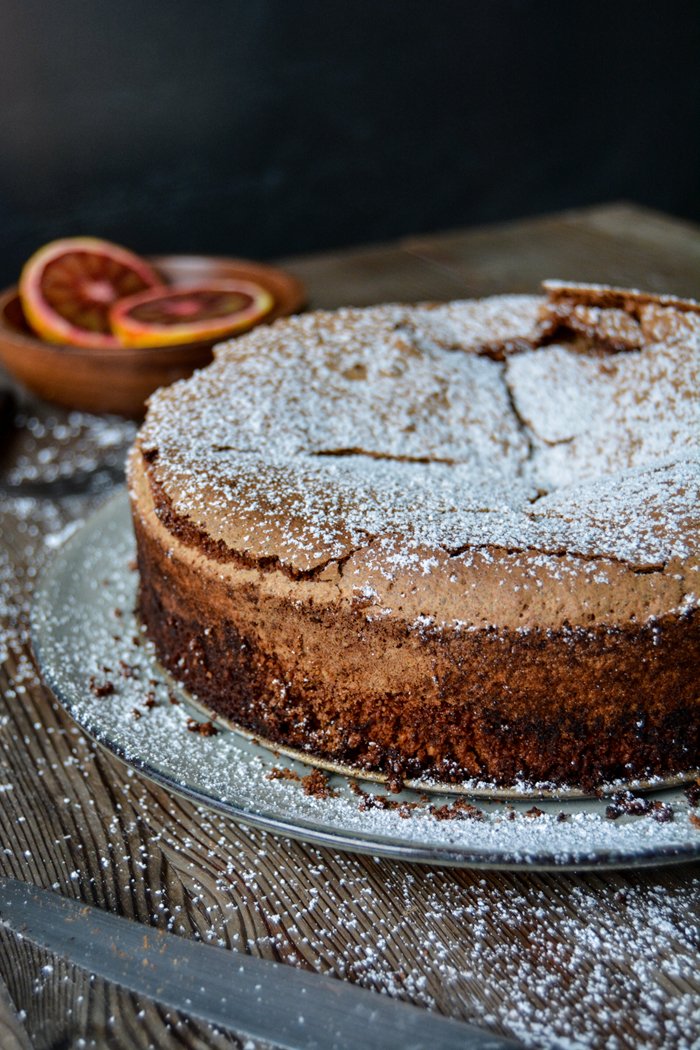
Spanish Almond Tart with Blood Orange
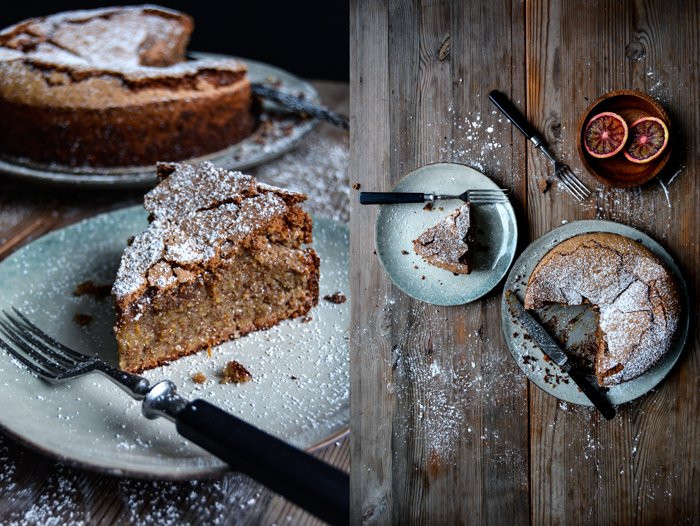
No butter and no flour: The traditional Galician Torta de Santiago is only made with almonds, sugar, and eggs plus a little lemon zest and sweet wine for flavouring. Originating in the Middle Ages, when people didn't really think about gluten-free or butter-free baking, it's a cake that happens to please even the ones who want to cut down on calories or avoid normal flour in their diet in the year of 2016.
I'm neither of them but I got hooked on the idea of baking a cake with only three main ingredients - about one third of this cake is nuts, the other third is sugar (it's still a cake) and the rest is eggs, seven to be precise. No baking powder or baking soda. The original Galician tart is more flat than mine - I wanted a juicy cake - and it has a pattern of the Cross of Saint James in the icing, which is where the sweet gets its name from, it translates to Cruz de Santiago. I skipped the religious reference. I also replaced the lemon with blood orange (zest and juice) and left out the wine. Cinnamon crept in instead and gave it a warming, wintery touch.
Although this cake may seem quite unspectacular, it tastes wonderful: It's moist, nutty, and fragrant. The inside is almost fudgy, but before you get there, you have to break the crisp crust. It's as delicate as the outside of a French macaroon and once you cut through it with a knife, the center of the tart will collapse a little, just a bit, there's no need to worry. This combination of soft cake and crispiness - apart from its delicious taste of course - is my personal highlight of this Spanish cake classic.


Spanish Almond Tart with Blood Orange
Makes 1 cake
ground almonds (or hazelnuts) 350g / 12 1/2 ounces
freshly grated blood orange zest 2 tablespoons
ground cinnamon 1 tablespoon
organic eggs 7
granulated sugar 350g / 1 3/4 cups
freshly squeezed blood orange juice 2 tablespoons
icing sugar, to dust the cake
Preheat the oven to 180°C / 350°F. Butter a 20 cm / 8" springform pan.
In a large bowl, combine the almonds, zest, and cinnamon.
Using an electric mixer, in a large bowl, beat the eggs and sugar for 1 minute until creamy.
Fold the almond mixture along with the orange juice gently into the egg-sugar mixture until just combined. Bake the cake for about 55 minutes or until golden brown and springy on top. Check with a skewer, it should come out almost clean. The centre of the cake will be a bit fudgy. Let the cake cool for about 10 minutes before you take it out of the pan. Sprinkle with icing sugar.


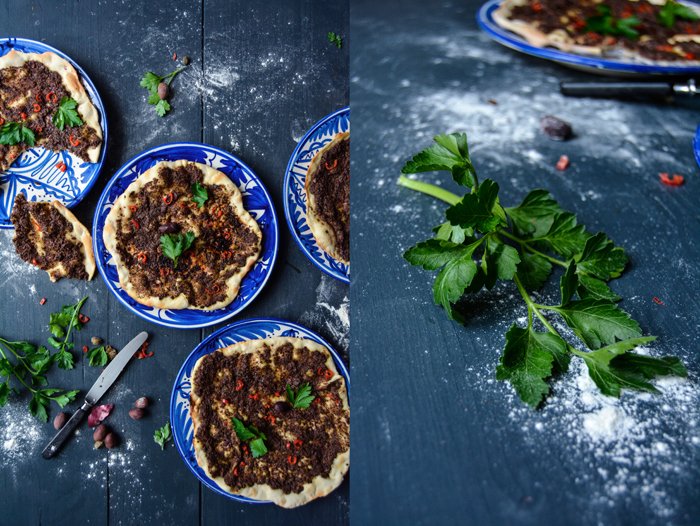
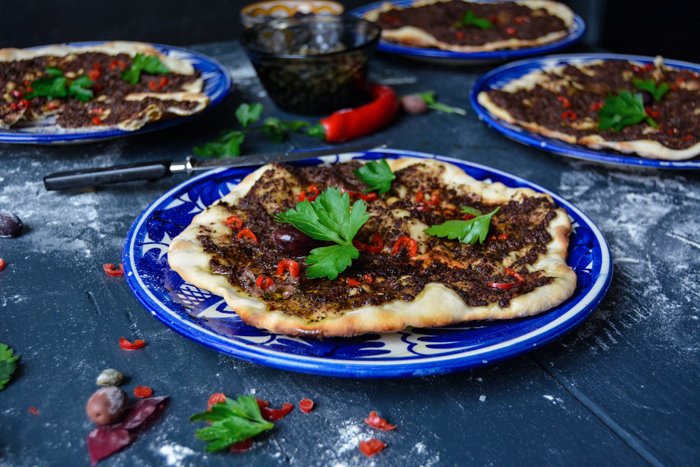
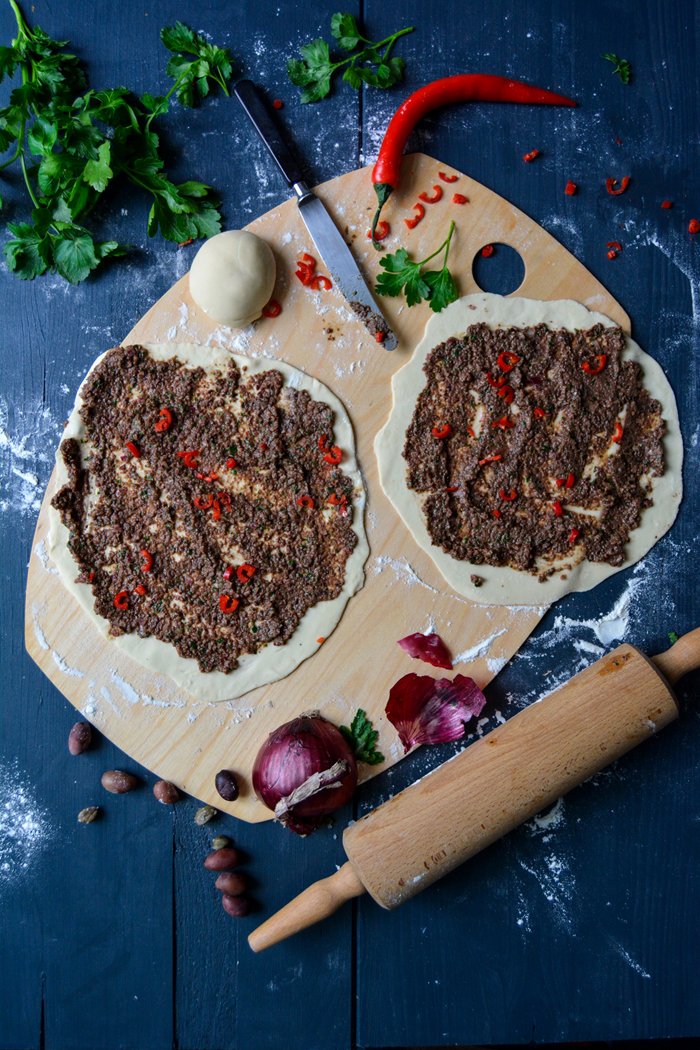
Turkish Pide with Provençal Olive Tapenade

Anatolia - my new favourite cookbook by Somer Sivrioglu and David Dale - inspired me to create a cultural fusion. Turkey and France meet in my vegetarian version of Somer's Lahmacun - thin pide (Turkish pizza) spread with a thin layer of minced meat and chopped vegetables. The original recipe uses minced lamb and tastes fantastic, but when I enjoyed this crisp treat a couple weeks ago, I decided to try a meat-less variation of it.
Compared to Italian pizza, it's a quick project. The dough is made without yeast and doesn't need to rise, and the ingredients for the tapenade pulsed in a blender don't need much time and attention either. The topping is dark and concentrated, lots of Kalamata olives, parsley, red onion, capers, anchovies, and mustard. It's quite an addictive little snack, the two of us ate all four pide in one go at lunchtime!


Pide with Provençal Olive Tapenade
Serves 2-4
For the dough
plain flour 270g / 2 cups plus 2 tablespoons
salt 1 teaspoon
water, lukewarm, 125ml / 1 cup
For the tapenade
pitted black olives, preferably Kalamata, 200 g / 7 ounces
flat- leaf parsley leaves 20g / 1 large handful, plus more for the topping
medium red onion, chopped, 1/2
capers, preferably preserved in salt, rinsed and dried, 25 g / 2 tablespoons
anchovy fillets, rinsed and dried, 4
olive oil 8 tablespoons, plus more for the topping
freshly squeezed lemon juice 2 tablespoons
Dijon mustard 2 teaspoons
ground pepper
For serving
Fresh red chili pepper, thinly sliced, 1/2
Preheat the oven to the highest setting (at least 260°C / 500°F) and put a baking sheet on the bottom of the oven.
For the dough, combine the flour and salt in a large bowl, add the water, and mix with the dough hooks of an electric mixer for a few minutes until well combined. Transfer the dough to a countertop and continue kneading and punching it down with your hands for 5 minutes until you have a smooth and elastic ball of dough. Divide the dough into 4 balls, place them back in the bowl, cover with a damp tea towel, and leave to rest while you prepare the tapenade.
Purée the ingredients for the tapenade in a blender or food processor until smooth.
On a floured table or countertop, roll out the dough with a rolling pin into four 23-cm / 9-inch rounds and cover with a tea towel. Transfer 1 round to a floured pizza peel (or medium cutting board) and spread evenly with 1/4 of the tapenade (you might need a bit less) and sprinkle with a little chili pepper. Transfer the pide to the hot baking sheet in the oven and bake for 4-5 minutes or until golden brown. Take the pide out of the oven, drizzle with a little olive oil, and sprinkle with a few parsley leaves. Repeat with the remaining pide. Enjoy warm or cold.


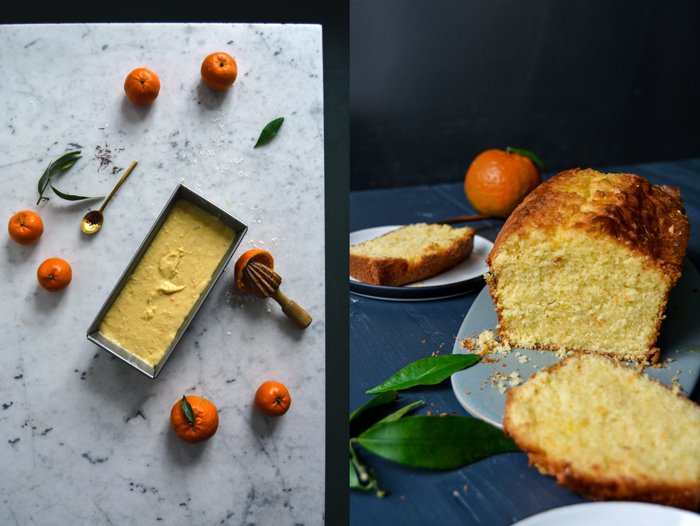
Clementine and Saffron Cake

In the past few days, my oven hardly stopped working - I baked, and baked, and baked. I wanted to give some recipes from my book a final test run, which meant we ended up with three cakes, a bowl of cookies, and a huge pot of soup on the table. We couldn't cope, so a bunch of friends came over yesterday - my happy helpers when there's more food in my kitchen than two people can possibly eat. We started with mulled wine in the late afternoon, had an extensive cake and cookie tasting session, enjoyed the soup to balance our sugar shock, and finished the night with even more mulled wine. The dishes were all received with great enthusiasm (and with different favourites, which is fantastic), and this morning I woke up without a headache. It's a good weekend!
Before I jumped into my test baking, I put a new creation in my oven, a fragrant clementine and saffron loaf cake inspired by Marilena's Milk Pan di Campobasso - a traditional cake from the Molise region, in Italy. Marilena's cake is infused with saffron threads and Strega liqueur (an Italian saffron spirit), and covered with a crunchy hazelnut chocolate icing. It was the first time that I used this sumptuous spice for sweets and I learned that it's absolutely delicious when used moderately. It's been almost two years since I mixed saffron into a cake batter so I thought it's time to take it out of the spice box again. I added the sweet juices of clementines, a little zest, and some buttermilk, and turned it into a juicy teatime cake.


Clementine and Saffron Cake
For a 24cm x 10,5cm / 9.5″ x 4″ loaf tin you need
buttermilk 90ml / 1/3 cup plus 1 tablespoon
saffron threads 1/3 teaspoon
plain flour 210g / 1 2/3 cups
cornstarch 70g / 1/2 cup plus 1 tablespoon
baking powder 3 teaspoons
salt 1/4 teaspoon
butter, soft, 180g / 3/4 cup plus 1 tablespoon
granulated sugar 180g / 3/4 cup plus 2 tablespoons
organic eggs 3
freshly grated clementine zest 2 tablespoons
freshly squeezed clementine juice 3 tablespoons
For the clementine syrup
icing sugar 2 tablespoons
freshly squeezed clementine juice 3 tablespoons
For the topping
freshly grated clementine zest
Set the oven to 160°C / 320°F (preferably convection setting) and butter a 24 x 10 1/2-cm / 9 1/2 x 4-inch loaf pan.
In a small bowl, add the buttermilk and saffron and stir to combine.
Combine the flour, cornstarch, baking powder, and salt in a medium bowl.
In a large bowl, beat the butter with an electric mixer until fluffy, add the sugar and continue mixing until well combined. Add the eggs, one at a time, mixing well in between. When the mixture is light and creamy mix in the zest and juice. Fold in the flour-cornstarch mixture with a wooden spoon in batches, alternating with the saffron-buttermilk (about 1/3 of each at a time). Pour the dough into the buttered pan and bake for about 52 minutes or until golden on top (slightly longer if using a conventional oven). Check with a skewer, it should come out clean. Let the cake cool in the pan for a few minutes before you transfer it to a wire rack.
For the syrup, whisk the icing sugar and clementine juice until combined. Prick the warm cake. Slowly pour the clementine syrup over the cake, sprinkle with a little clementine zest, and enjoy!

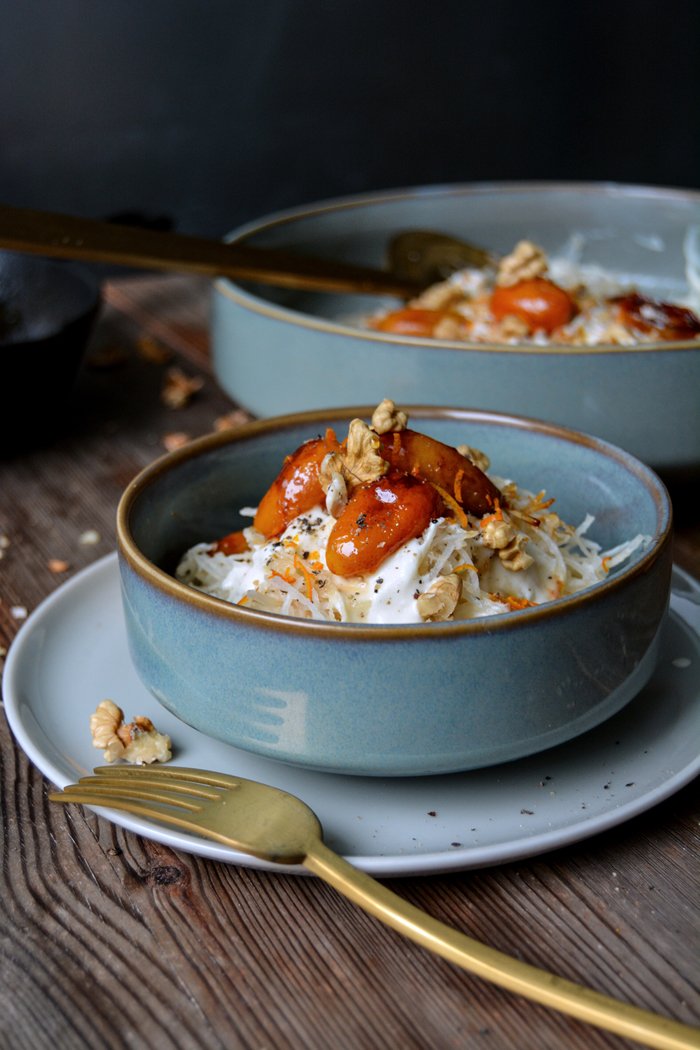
Celeriac Salad with Caramelized Honey Kumquats and Walnuts

Berlin, January 2016:
My little cookbook library got extended by a few amazing recipe collections. Santa was so kind to leave a few gems under the tree: Nigel Slater's new The Kitchen Diaries III, Jerusalem by Yotam Ottolenghi and Sami Tamimi (finally!), Vegetarian India by Madhur Jaffrey, and the fantastic Anatolia by Somer Sivrioglu and David Dale. The latter blew me away! This book is gorgeous, the pictures are mouthwatering and the dishes inspired me as soon as I laid my eyes on the first page. I'll definitely write about it again in the next few weeks, I already tried one of the recipes for a Turkish pizza and it was divine.
Madhur is a new find for me, I haven't had much time to thumb through the pages of her book but what I've seen so far looks divine. Nigel's book is a cooking bible with 250 (!) recipes - and I'm already struggling with the amount of work I have with the 100 recipes in my Eat in My Kitchen book! I love his approach to creating recipes, the way he writes about them and the beautiful photos taken by Jonathan Lovekin who's also been responsible for Nigel's former kitchen diaries, which I'm equally obsessed with. I'm sure I'll spend quite some time with this book in the next few years.
One of Nigel's creations, which is the 248th recipe in the book, struck me right away: a gorgeous celeriac and blood orange salad sprinkled with nigella seeds and capers. I haven't tried it yet - but I will soon - however, it made me think about celeriac salads. I like the addition of citrus, especially my beloved blood orange, but so far they haven't been in sight at the market. Kumquats came to mind, caramelized and softened in sizzling honey, I used these sweet, sour, and bitter bites for my luscious Orange Blossom, Ricotta, Kumquat, and Pistachio Tartine last April. It was quite a beauty. For my salad of grated celeriac, I also added a creamy yet light yoghurt-cardamom dressing, and sprinkled it with walnuts. Some honey drizzled on top to enhance the sweetness and my first winter salad of 2016 was born. Thank you Nigel!
If you're not that fond of kumquats, you can replace them with orange fillets.

Celeriac Salad with Cardamom-Yoghurt, Caramelized Honey Kumquats, and Walnuts
Serves 3-4
For the dressing
yoghurt 200g / 2/3 cup
olive oil 2 tablespoons
freshly squeezed orange juice 1 tablespoon
ground cardamom 1/4 teaspoon
freshly grated orange zest 1/2 teaspoon plus 1 teaspoon for the topping
fine sea salt
ground pepper
For the salad
peeled celeriac, grated, 250g / 9 ounces
freshly squeezed lemon juice 1 tablespoon
liquid honey 1 tablespoon plus 1-2 tablespoons for the topping
freshly squeezed orange juice 4 tablespoons
kumquats, cut in half lengthwise, 12 (or 12 orange fillets)
walnuts, 1 large handful
a few black peppercorns, crushed in a mortar
For the dressing, whisk together all the ingredients until smooth and season to taste with salt, pepper, cardamom and orange juice.
In a large bowl, mix the grated celeriac and lemon juice, using your fingers. Sprinkle with the dressing.
Heat 1 tablespoon of the honey in a small, heavy pan on high heat, add the kumquats and the orange juice and cook for about 2-4 minutes or until soft and caramelized, turn them once or twice and mind that they don't burn. Take the pan off the heat and arrange the kumquats on top of the salad.
Sprinkle the salad with walnuts, crushed pepper, and additional orange zest, and drizzle with honey. Enjoy immediately or let it sit for a few hours. It won't look as pretty anymore but tastes just as good.


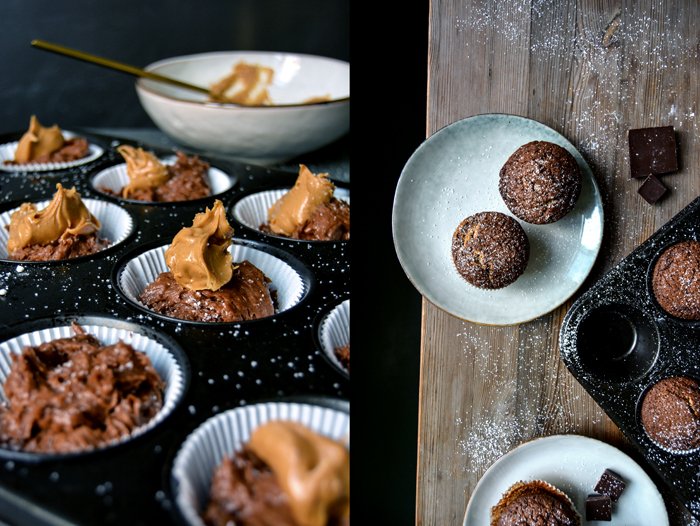
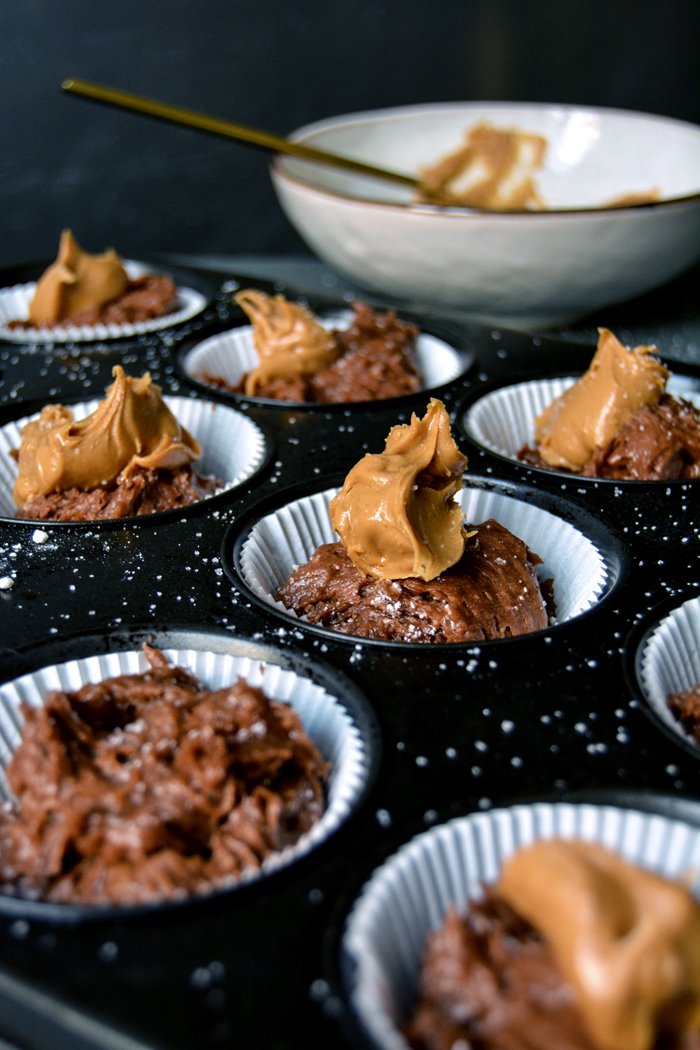
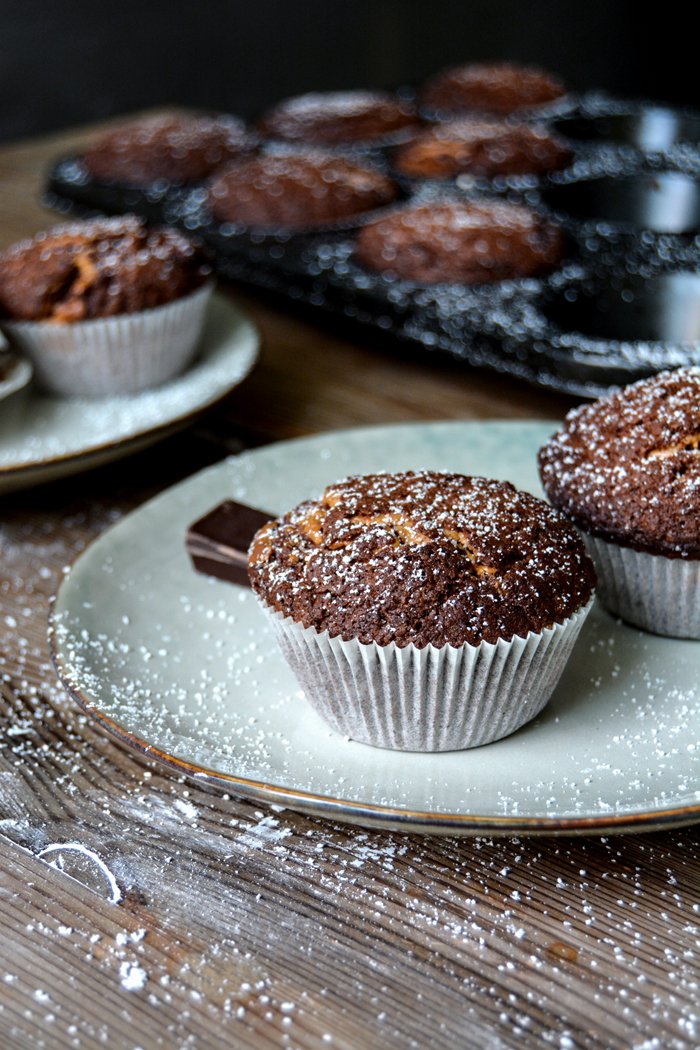
Bittersweet Chocolate Muffins filled with Peanut Butter
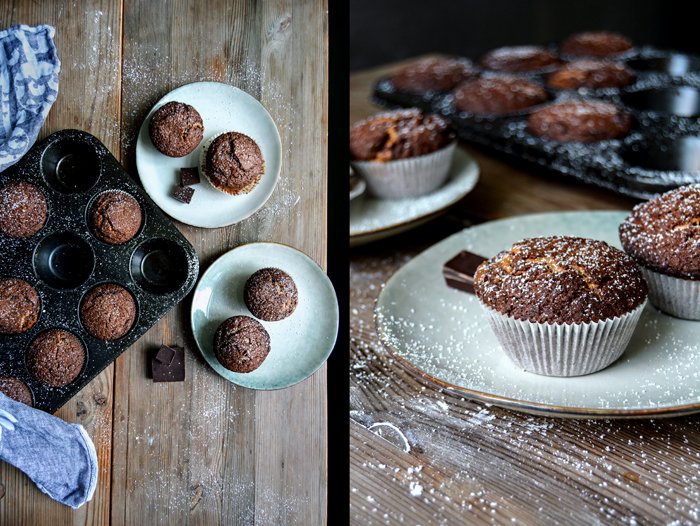
I'm not a big fan of New Year's resolutions, I'd rather be happy and feel good with myself and change what needs to be changed when I'm ready to give it a go - which is not necessarily at the beginning of a new year, especially if it involves changes to my (sweet) diet. During winter, my body loves to keep a few more pounds on my hips, it's cold out there so it does so for a good reason. And anyway, I wear large wool sweaters most of the time, it's not summer yet and there's no bikini or walks on long beaches in sight. So I accept my pounds, I'll even feed them well, and enjoy what makes this time of the year so special: getting cozy on the sofa, sipping tea or hot chocolate and nibbling on some cake or dark, chocolaty muffins. The cookie cutters get a break and my cake tins and muffin trays are back on the counter tops. Happy New Year!
To add even more richness to my spongy muffins made with melted bittersweet chocolate and butter - no vegetable oil and cocoa powder for me - I fill them with dollops of creamy peanut butter. The nutty golden filling is almost liquid when the muffins are fresh out of the oven and still warm inside. I got hooked on the combination of dark chocolate and peanut butter when I made my Peanut Butter Chocolate Chunk Cookies in autumn, I knew it would come back sooner or later.
If you're up for another kind of muffin treat, try one of these:
Fig, Ricotta, and Olive Oil Muffins (if you can't find fresh figs you can replace them with chopped dried dates)


Bittersweet Chocolate Muffins filled with Peanut Butter
Makes 12 muffins
plain flour 200 g / 1 1/2 cups
baking powder 2 1/2 teaspoons
baking soda 1/2 teaspoon
a pinch of salt
butter 150 g / 2/3 cup
bittersweet chocolate, broken into pieces, 100 g / 3 1/2 ounces
granulated sugar 150 g / 3/4 cup
organic eggs 3
peanut butter, about 135 g / 1/2 cup
icing sugar, to dust the muffins (optional)
Preheat the oven to 190°C / 375°F (preferably convection setting) and line the 12 molds of a muffin tray with paper baking cups.
In a large bowl, whisk together the flour, baking powder, baking soda, and salt.
Melt the butter in a small saucepan over medium heat. Take the pan off the heat and whisk the chocolate into the melted butter until combined. Add the granulated sugar and eggs and whisk until well combined.
Pour the chocolate mixture into the bowl with the flour mixture and stir with a wooden spoon until you have a lumpy dough, with a bit of flour left here and there. Keep in mind, the more you mix it, the more it will lose its light texture. Drop 1 heaped tablespoon of the dough into each muffin cup and add 1 heaped teaspoon of the peanut butter on top. Cover each dollop of peanut butter with the remaining dough, then flatten it lightly with a tablespoon. Bake for about 20-22 minutes (slightly longer using conventional) or until the muffins are firm and spongy on top. Let them cool for 1 minute before you take the muffins out of the tray, sprinkle the tops with icing sugar (optional) and enjoy, preferably warm.
You can keep the muffins in an airtight container for a few days but I find them best on the first day.


Salt Baked Salmon Fillet with Dill, Black Pepper and Juniper
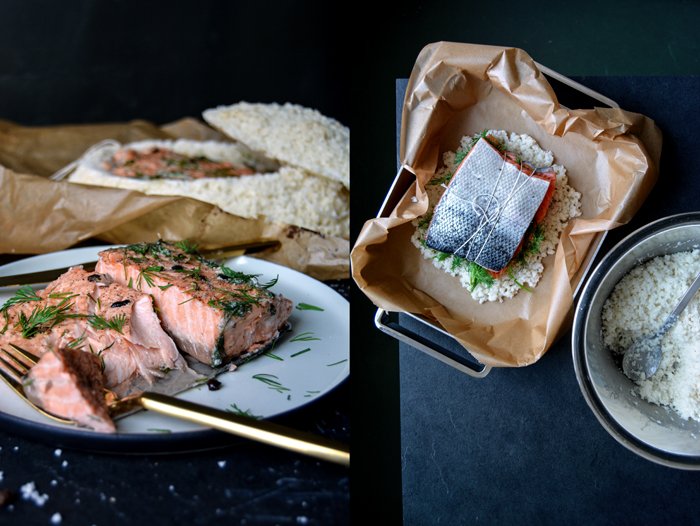
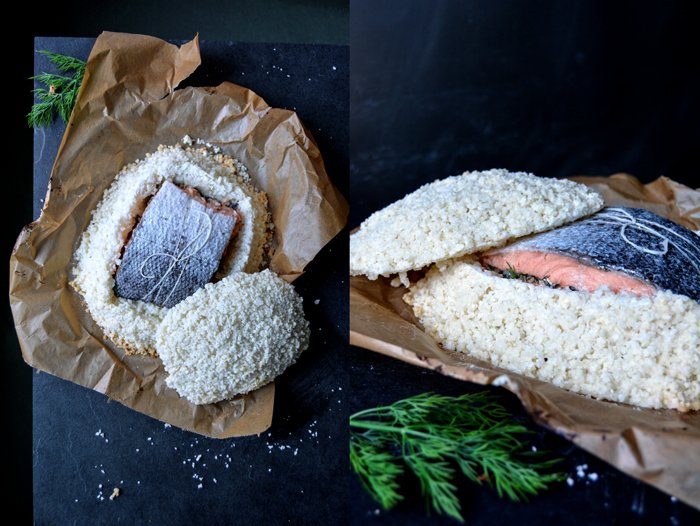
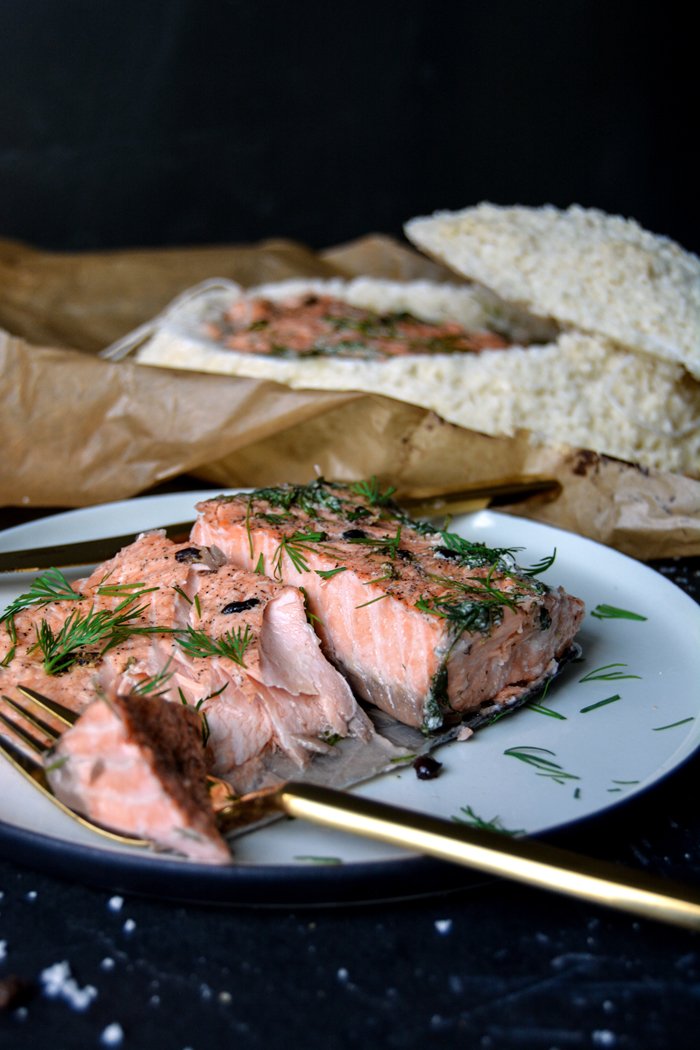
If you're still looking for a scrumptious but effortless main course for New Year's Eve and if you like salmon fillet, this is your recipe. After festive days of rich, meaty treats I prefer to start the new year with a lighter dish, seafood, lots of vegetables, or Asian inspired recipes, preferably easy dishes refined with colourful aromas, spices and herbs. Salmon baked in salt crust came to mind, but not a whole fish - I want to keep it simple - only the fillets, sandwiched with a handful of dill, crushed juniper berries and black pepper. Sealed under a mixture of coarse sea salt, flour, cornstarch, egg white and water, it bakes in the oven soaking up all these wonderful flavours. After 50 minutes it was done, which I checked by following Martha Stewart's tip: Insert a metal skewer, if it's warm to the touch, the fish is ready to leave its crusty shell. You have to use a sharp bread knife to cut open the salty crust, this is the only part of this recipe that demands a bit of work. You could also break it but I wanted to open it like a lid - only for visual reasons. The result is perfectly flaky, firm with a subtle hint of sea salt, it can be a bit overpowering on the edges of the fillet but you can easily scratch this excess salt off. I used fleshy fillets tied together with a cotton string, it was enough for 3-4 people - depending on the amount of dishes you're planning to serve. Two thick center pieces of roughly the same size are perfect, you could also fill them with other herbs or thin lemon or orange slices but I wanted to use the flavours which I use for my traditional gravad lax recipe: fresh dill, spicy pepper and fragrant juniper.
During the holidays, I cleaned the shelves in my kitchen, which were in a rather chaotic state, and to my surprise, I found far more packages of the Cini's sea salt than I had expected. They didn't last very long, I needed 1 kg / 2 1/4 pounds to cover my salmon. The Cini's salt comes from the Mediterranean Sea, from Gozo, where the family harvests the white crystals straight from the rocks. It tastes fantastic, it's obviously salty but not in a harsh way, it has a distinct flavour, which you can recognize in the cooked fish. I recommend using high-quality salt for this recipe, although you will discard the crust, it effects the final result tremendously.
A very exciting year has almost come to an end. I look forward to 2016 and I hope it will be more peaceful and united than the year before. My kitchen will be as busy as ever and I can't wait to share more recipes with you, here on the blog and in my first eat in my kitchen book, which will be published in September.
I wish you a wonderful start to the New Year, don't get intimidated by too many resolutions, just enjoy your life!
Meike xx

Salt Baked Salmon Fillet with Dill, Black Pepper and Juniper
Serves 3-4 (for more people you can use bigger fillets and leave them in the oven a little longer)
high-quality coarse sea salt 1 kg / 2 1/4 pounds
plain flour 100 g / 3 /4 cup
cornstarch 30 g / 1/4 cup
organic egg whites 2
water, cold, 75 ml / 1/3 cup
salmon fillet, 2 center pieces with skin (about 680 g / 1 1/2 pounds in total)
juniper berries, coarsely crushed in a mortar, 8
black peppercorns, crushed in a mortar, to taste
fresh dill, 1 small bunch plus 1 tablespoon chopped fresh dill, for the topping
Preheat the oven to 200°C / 400°F (conventional setting). Line a baking dish with parchment paper.
For the salt crust, combine the coarse sea salt, flour, cornstarch, egg whites, and water in a large bowl until combined, use your fingers or a spoon.
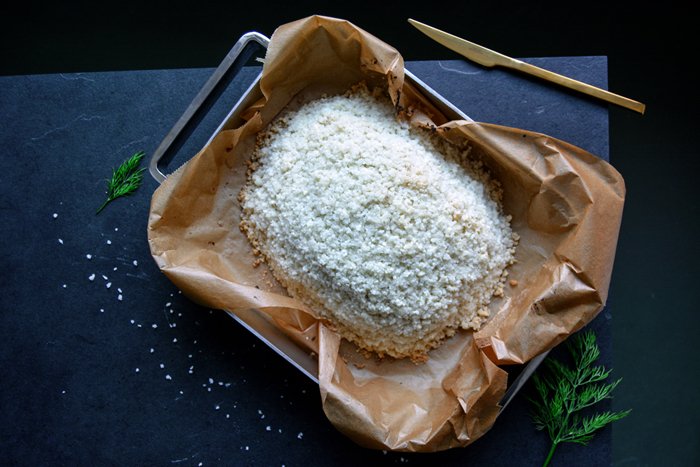
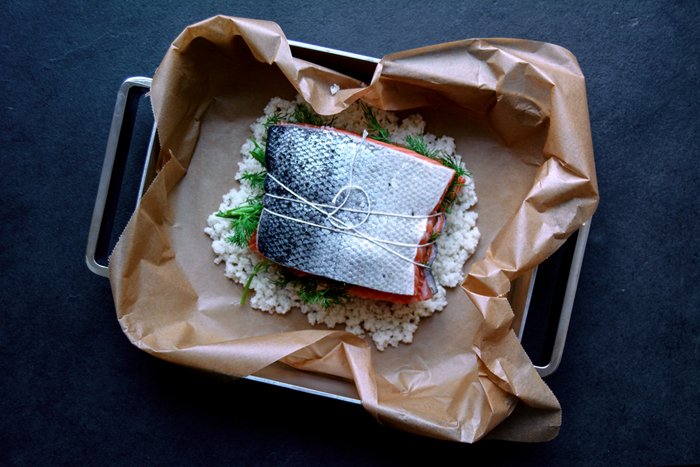
Spread a little of the salt mixture on the lined baking dish, lay 1 salmon fillet - skin side down - on top of the salt. Rub a little crushed pepper and half the juniper into the pink side of the salmon, then cover with the dill. Rub the second salmon fillet with pepper and the remaining juniper and lay it on top of the dill - skin side up. Tie the fillets together with a cotton string (see picture below), then cover the salmon with the remaining salt mixture until it's completely covered (see 2nd picture), push the salt mixture together gently. Bake in the oven for about 50 minutes or until a metal skewer, poked through the crust into the thickest part of the salmon, is warm to the touch when you pull it out of the salmon.
Let the crust cool for 1-2 minutes, then cut it open with a sharp bread knife. Cut the string open, divide the fish fillets in 3-4 portions, and serve immediately. Sprinkle with freshly chopped dill on the plates (optional).


New Year's Eve dessert testing and a heavenly favourite: Crêpes Suzette
After three days of cooking, feasting and chilling I could easily continue this life: just sitting under the Christmas tree, listening to Christmas carols, baking more cookies and pulling a roast duck or wild boar stew out of my oven. I know some people are happy when the craziness is over but I'm not one of them. I indulge in this time and its traditions and never want to let go of them again. Luckily, the next exciting event is right ahead - New Year’s Eve - and with it, a few choices need to be made. Apart from the main course, which I haven't really decided on yet but it looks like it's going to be seafood, there's another important dish waiting to be put on the menu: our dessert.
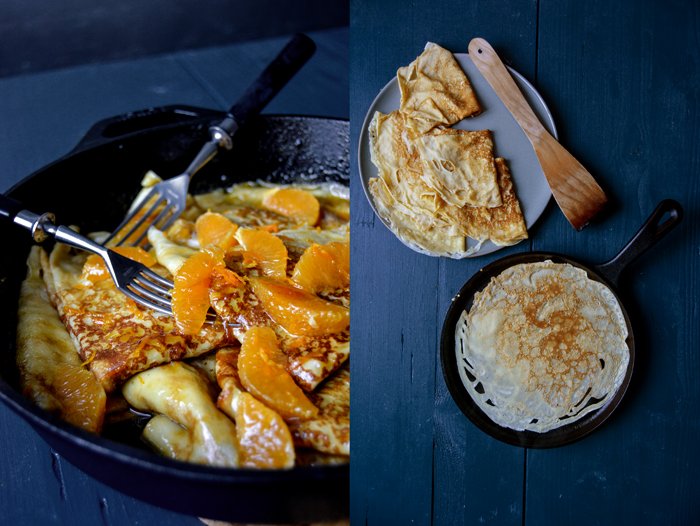
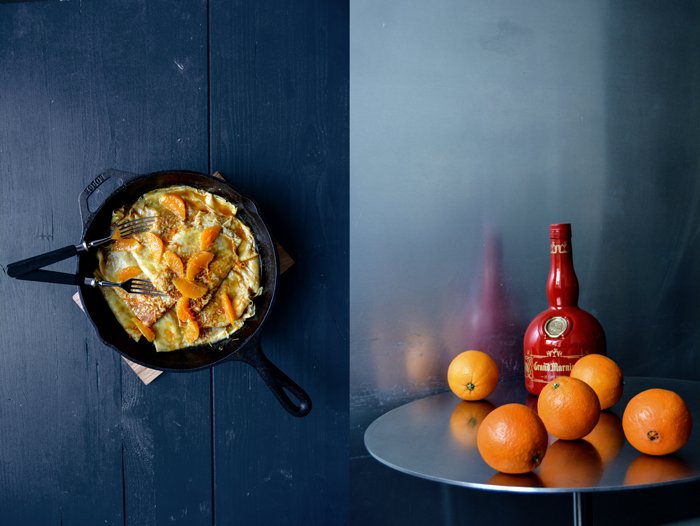
One of my all time favourite desserts is Tiramisu, I love it! It offers sponge soaked with coffee and brandy, creamy mascarpone and a hint of chocolate - it's perfect. Lemon Meringue Pie is another promising candidate, packed with citrus juices and fluffy meringue sitting on a buttery short crust base - delicious! Affogato would be the quickest and easiest solution, a spoonful of vanilla ice cream dropped into hot espresso. A Tarte Tatin, made with pear and star anise instead of apples, is quite a stunner. Although we already have a lemon dessert in this list, I can't stop myself from adding another one, Ricotta Pie with Lemon Syrup and Pistachios, a recipe by my friend Essa. It's so unbelievably good that I dreamed of it after I tried it the first time. I could also make my bittersweet Chocolate Tart with Whipped Cardamom Cream - just leave the cherries out or add a few orange slices instead. Before I include all the cakes and desserts I ever shared on eat in my kitchen, I'll stop for now and tell you what we will have: Crêpes Suzette! A bottle of Grand Marnier caught my attention and sparked the idea to stick to this sweet French classic to end this exciting year. I tested my recipe to avoid disappointment on this special night but it wasn't even necessary: The thin crêpes were golden and soft, the syrupy sauce full of orange flavour enhanced by a tasty amount of butter. And it's also quite spectacular as you can flambée it.
Crêpes Suzette
Serves 4 (makes 8-10 crêpes)
For the crêpes
plain flour, sifted, 130g / 1 cup
granulated sugar 25g / 2 tablespoons
salt 1/8 teaspoon
organic eggs 2
milk 240ml / 1 cup
butter, to bake the crêpes
For the orange sauce
organic orange, rinsed, 1
granulated sugar 60g / 1/3 cup
freshly squeezed orange juice 120ml / 1/2 cup
Grand Marnier 60ml / 1/4 cup
butter 60g / 1/4 cup
vodka or brandy, to flambée the crêpes (optional)
In a large bowl, using an electric mixer, whisk together the ingredients for the crêpes and mix until smooth. Let the batter sit for about 10 minutes.
In a large, heavy or non-stick pan, melt half a teaspoon of butter on medium-high heat. Pour in a ladle of the dough, holding the pan in your hand and turning it so that the dough spreads evenly and very thinly. The crêpes won’t need more than 30-60 seconds on each side once the heat is set right. When the crêpe is slightly golden on both sides, transfer to a plate, fold it in half twice so that it forms a triangle and set aside. Continue with the remaining batter until you have 8-10 crêpes. You should always melt 1/2-1 teaspoon of butter in the pan before you bake the next crêpe.
Grate the orange and set the zest aside. To cut the orange into segments, cut off the white pith. Hold the orange in 1 hand and use a small, sharp knife to cut between the membranes and release the segments, set them aside.
For the orange sauce, melt the sugar in a large, deep, heavy pan over high heat. When the sugar is golden brown and caramelized, slowly add the orange juice, Grand Marnier, and 3/4 of the orange zest and turn down the heat to medium-low. Stir and let the caramel melt completely, this will take a couple minutes, then add the butter and let it melt. When the butter is melted, bring to the boil then take off the heat immediately. Add one crêpe after the other to the pan, turning it in the juices and stack them on one side of the pan. Once all the crêpes are in the pan, spread them evenly, garnish with the orange slices and sprinkle with the remaining orange zest.
Optional: Add a generous splash of vodka or brandy to a small saucepan, light it up in the pan and pour it slowly over the hot crêpes, serve immediately.

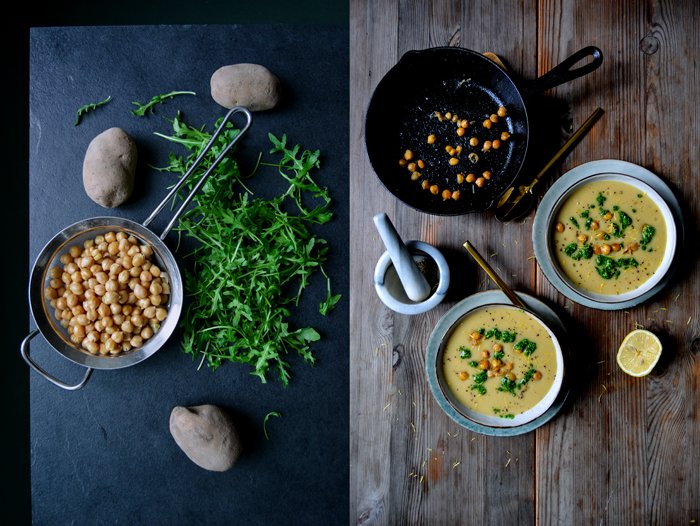
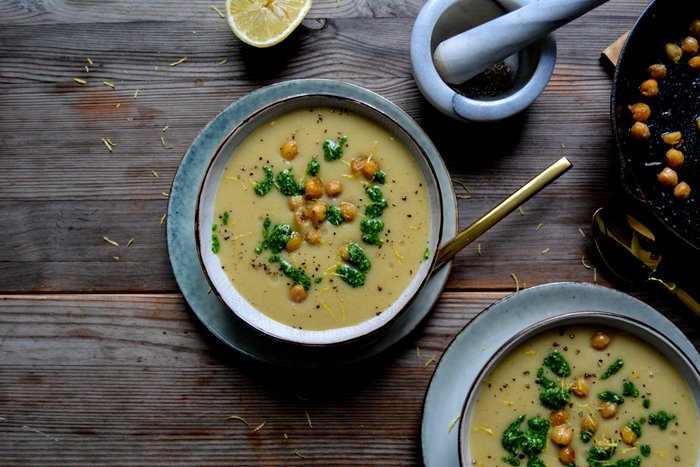
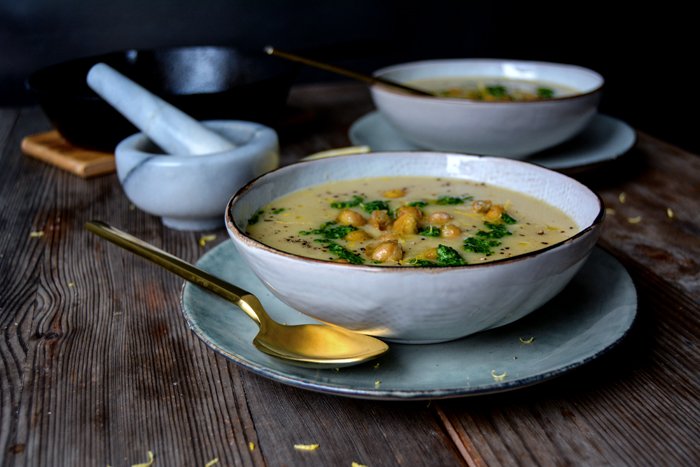
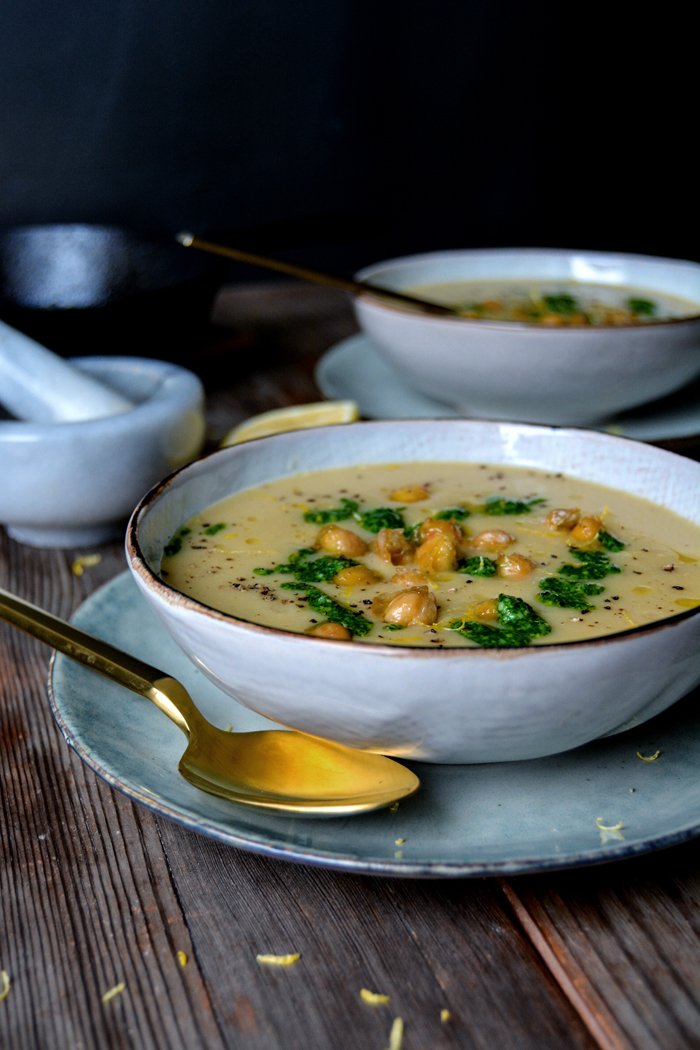
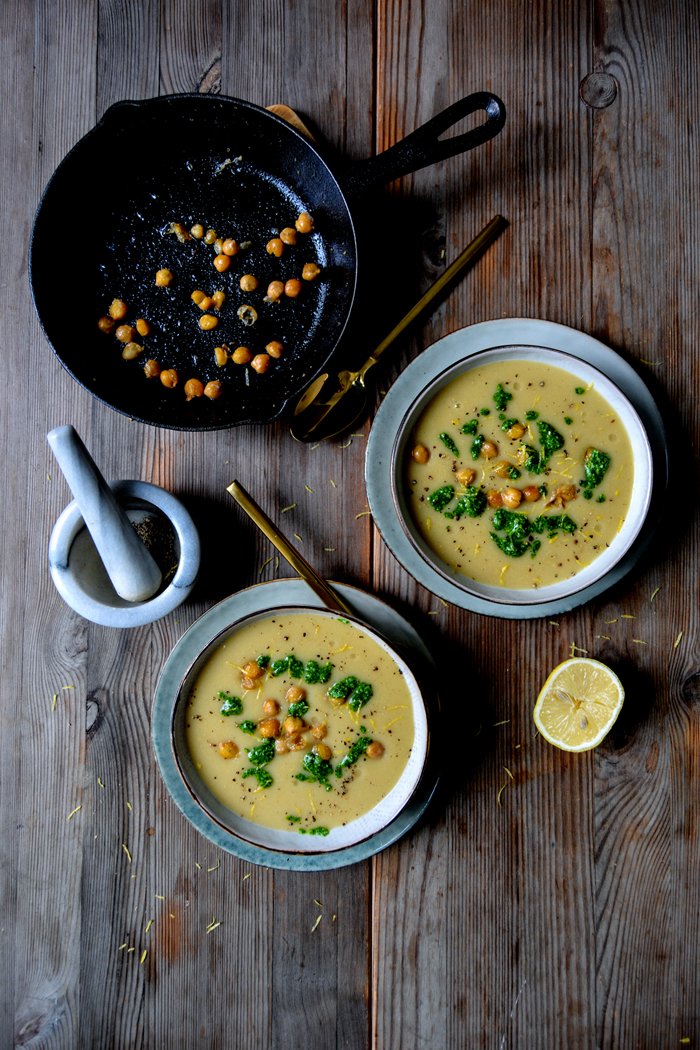
Chickpea Potato Soup with Rucola Pesto, Lemon and Fried Chickpeas
A couple days ago, we left Berlin to visit the gardens of Sanssouci Palace a few miles outside Berlin. The palace used to be the Prussian king, Frederick the Great's summer residence, built in the 18th century. The building itself is beautiful but the terraced garden is stunning. I love being there in summer, when it's all lush, green and in bloom but there's a certain melancholic mood woven into the misty air on a cold, grey day that fits this time of the year perfectly. It's pure silence, no leaves left on the trees, the marble sculptures high up on their pedestals looking down on us, wrapped in jackets and scarves on our way to another one of the park's winter attractions, a Christmas market and its warming mulled wine.
When we got home I felt so frozen that I promised myself I'd make a rich soup the next day. I cooked canned chickpeas and potatoes in broth, puréed it into a velvety, smooth soup and sprinkled it with fresh rucola pesto, lemon zest and fried chickpeas. It's a great winter soup, thick and refreshing, and just right before tomorrow's feasting begins.
I wish you a wonderful and peaceful Christmas with your loved ones. Enjoy the moments of love, joy and good food! xx

Chickpea Potato Soup with Rucola Pesto, Lemon and Fried Chickpeas
You won't need all the pesto for the soup but I don't like making pesto in small batches. We used the remaining pesto to spread on toasted dark bread, which we enjoyed with the soup.
Serves 2-4
For the soup
olive oil
medium onion, chopped, 1
garlic, crushed, 2 large cloves
potatoes, peeled, cut into cubes, 250g / 9 ounces
canned chickpeas, rinsed and drained, 250g / 9 ounces, reserve 4 tablespoons for the topping
vegetable broth 900ml / 3 3/4 cups
bay leaf 1
salt
ground pepper
nutmeg, preferably freshly grated
ground cumin 1/8 teaspoon
For the pesto
rucola (arugula) leaves 60g / 2 ounces
Parmesan 25g / 1 ounce
pine nuts 25g / 1 ounce
olive oil 75 ml / 1/3 cup
salt 1/8 teaspoon
For the topping
freshly squeezed lemon juice
olive oil
lemon zest
black peppercorns, crushed in a mortar
For the soup, heat a splash of olive oil in a large pot and sauté the onion on medium-heat for a few minutes until golden and soft. Add the garlic and cook for 1 minute. Add the potatoes and chickpeas, stir and cook for 1 minute. Pour in the broth, add the bay leaf, and season with a little salt and pepper. Lower the heat and simmer, uncovered, for 20-25 minutes or until the potatoes are soft.
While the soup is cooking, purée the ingredients for the rucola pesto in a blender or food processor. Season to taste and set aside.
For the fried chickpeas, heat a splash of olive oil in a small, heavy pan on high heat. Add the reserved chickpeas, close with a lid immediately (the chickpeas will pop) and fry for 1 minute or until golden. Take the pan off the heat.
When the potatoes are soft, discard the bay leaf and purée the soup in a blender, food processor or with an immersion blender until smooth. Season with salt, pepper, nutmeg and cumin to taste, bring to the boil, and simmer for 1 minute, stirring constantly. Divide the soup between bowls, drizzle with a little lemon juice and olive oil and sprinkle with rucola pesto, lemon zest, crushed pepper and the fried chickpeas.


Mulled Wine Pretzel Cookies
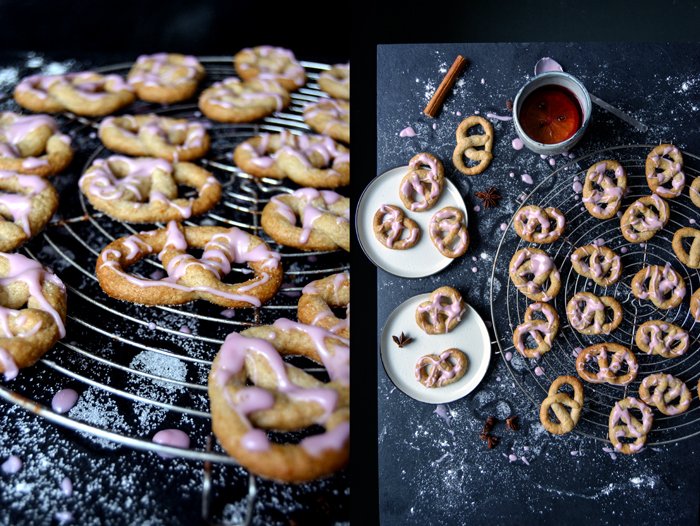
My mugs haven't seen much mulled wine this season unfortunately. I had to go through the corrections of my book almost every single day of December and I didn't dare blur my mind and risk some silly mistakes - and annoy my editor Holly - by enjoying more than a tiny sip of the hot wine. I've been a really good girl up until now, but a couple days ago I gave in all the files of my manuscript so now I'm ready to indulge in the sweet pleasures of the aromatic red juices. A large pot full of wine, orange, black tea and spices (you can find my recipe here) filled my kitchen with the most tempting smell of Christmas and I happily enjoyed it under our Christmas tree. In tune with the season and its treats, I came up with an idea for a mulled wine cookie, crunchy like shortbread and shaped like a pretzel.
I only used a few tablespoons of the spiced wine for the dough as I didn't want to soften the shortcrust pastry too much. To enhance the Christmassy feel and taste, I added a spice mixture of cinnamon, cloves, nutmeg, all spice and orange zest to the dough. A pink glaze made of icing sugar and mulled wine sprinkled on top finished my Christmas pretzels off.
Happy 4th Advent! xx

Mulled Wine Pretzel Cookies
For the cookies
plain flour 300g / 2 1/3 cups
salt 1/8 teaspoon
cinnamon 2 teaspoons
nutmeg, preferably freshly grated, 1/4 teaspoon
cloves, crushed in a mortar, 1/2 teaspoon
allspice, crushed in a mortar, 1/4 teaspoon
butter, soft, 160g / 2/3 cup plus 1/2 tablespoon
organic egg yolk 1
granulated sugar 130g /2/3 cup, plus more for sprinkling
orange zest, freshly grated, 1 1/2 teaspoons
strong mulled wine 3 tablespoons (you can find my recipe here)
For the icing
icing sugar 100g / 1 cup
mulled wine, about 2-3 tablespoons
For the cookies, combine the flour, salt, cinnamon, nutmeg, cloves and allspice in a bowl.
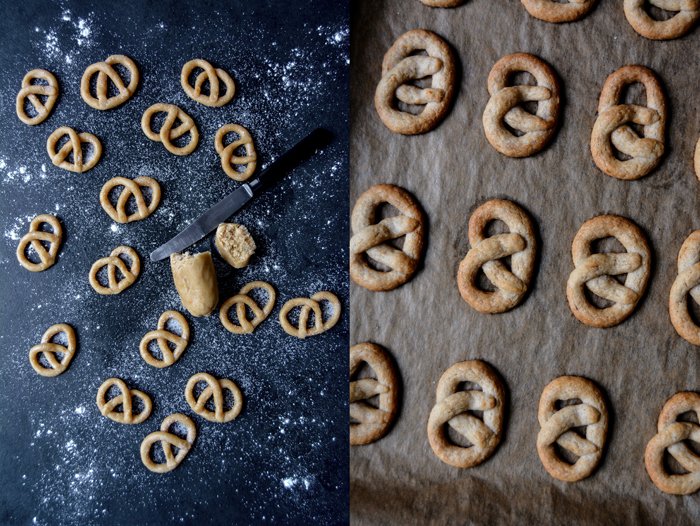
In a large bowl, beat the butter, egg yolk, sugar, and orange zest with an electric mixer until creamy and well combined. Add the dry flour mixture and the mulled wine and mix with the dough hooks of an electric mixer until combined. Divide the dough in half, scrape each half on a piece of plastic wrap and form both into logs then wrap tightly in the plastic wrap. Freeze for 15-20 minutes or until the dough is hard enough to cut with a knife.
Set the oven to 180°C / 350°F (preferably convection setting). Line 2 baking sheets with parchment paper.
When the dough is hard, take it out of the freezer. Cut thin slices off the log. Roll each slice to a ball between your hands then roll into a 24cm / 9 1/2" long pencil shape on a counter top. Twist into a pretzel and spread on the lined baking sheets, sprinkle with a little sugar. Bake in the oven for about 10 minutes (slightly longer using conventional setting) or until golden. Let them cool on the baking sheet for a few minutes before you transfer them onto a cooling rack. If you want to sprinkle them with icing, they have to be completely cool.
Whisk the icing sugar and mulled wine until well combined, add more sugar or wine to reach the desired texture, and sprinkle over the cookies. When the icing is hard, you can store the cookies in an airtight container for up to 1 week.


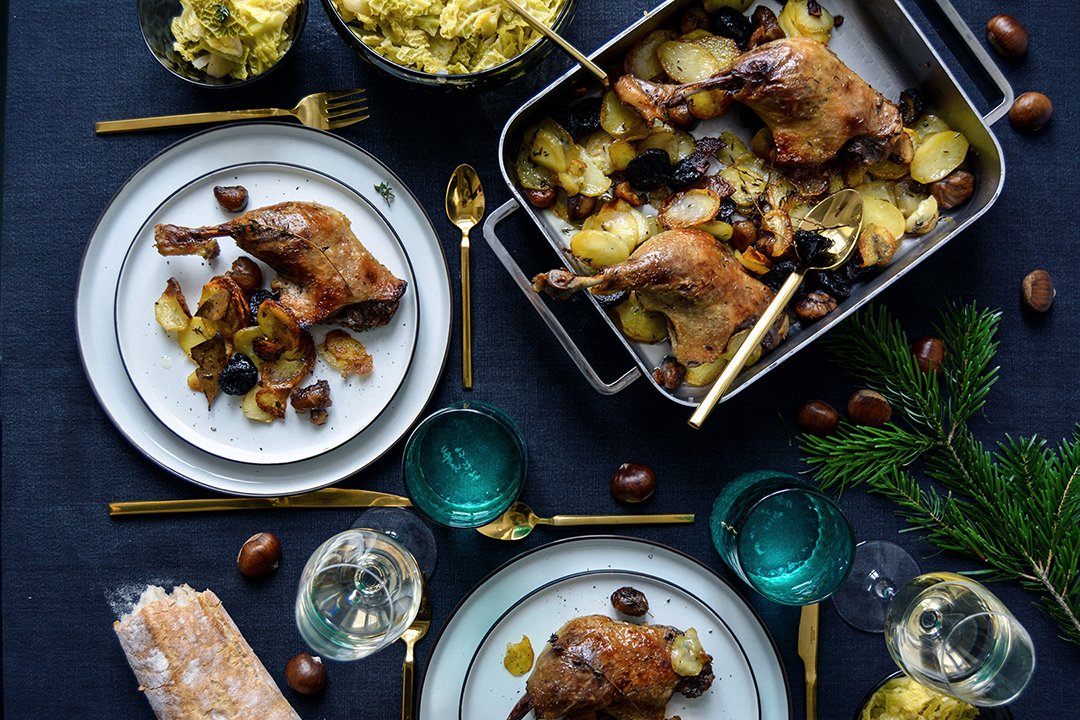
Christmas Duck Confit with Roast Potatoes, Chestnuts, Plums, and Star Anise
Berlin, December 2015:
It's only a week until Christmas and I'm starting to get excited! The culinary plan for the holidays isn't complete yet, there are still a few important questions to discuss, but flambéed Christmas Pudding for dessert and my obligatory slow roasted duck are already on the list. In the past 2 years of eat in my kitchen, I shared 2 Christmas recipes with you that feature a whole duck cooked for hours at very low temperature. This year, I decided you deserve a break - although I'll still put mine in the oven, early, on the 24th for Christmas Eve, at 85°C / 185°F, as always.
Recently, I had another one of my food phone calls with my mother, we spoke about confit de canard, duck legs cooked in the oven for hours in a dutch oven full of the bird's fat. The meat is succulent and meltingly tender and - conveniently - you can use the fat that it cooked in for months to fry potatoes and sear your meat. It's the best! I decided to have a little pre-holiday-celebration and cook a Christmas-y duck confit roasted on crispy potatoes refined with chestnuts, dried plums, and star anise. Although the duck legs don't need as long as my whole Christmas duck, you'll need about 1 1/2 days in advance for the preparation. First, you marinate the meat in salt and herbs for a few hours, or preferably overnight. The next day, you'll cook the legs in the oven in 1kg / 2 1/4 pounds of duck or goose fat (for 4 legs), I used goose fat as I forgot to place my order at the butcher in time but it works just as well. It takes about 2 1/2 hours before the meat almost falls off the bones - it's beautifully tender but pale at that point. Now, you can either keep the duck confit in the fridge until you'll need it - you could even store it for months as long as it's completely covered in fat (although I have never tried that). Instead, I would turn the oven on the next day, lay the legs on top of thinly sliced potatoes and roast everything for about 30 minutes (plus 20 minutes for the potatoes before you lay the meat on top). You use some of the tasty fat - that you'll have plenty of - to cook the duck and vegetables to crisp and golden brown perfection. During this time, I cooked a bowl full of apple Savoy cabbage, fresh and light without cream but with tender bite instead.
If you spread the preparation over 2 1/2 days it's quite an easy Christmas lunch - or dinner - that doesn't actually demand much work, just the right logistics. And if you're still looking for some really good wine for Christmas, we already made our choice: We'll enjoy Martin Albrecht's Gelber Muskateller (Muscat) and his 2012 Herbstnebel (Syrah, Cabernet-Sauvignon and Nebbiolo)! I wrote about his fantastic wine a couple months ago, click here to find out more about his old vineyards in the south of Germany.
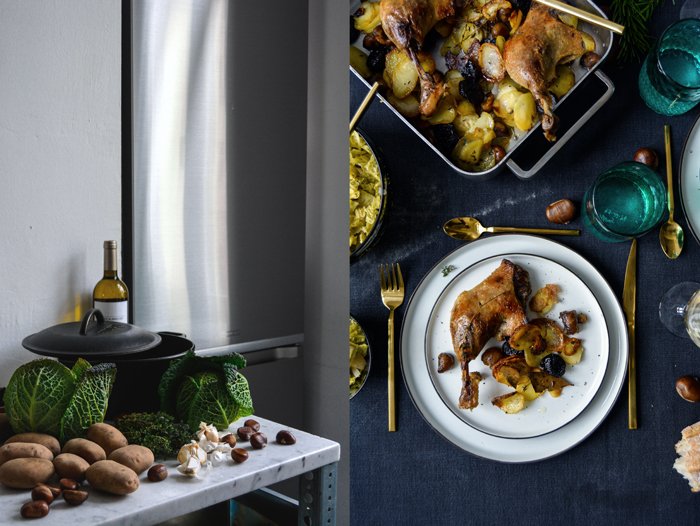
Apart from this culinary pre-celebration, there was also a pre-Christmas gift that I got overly excited about: we have a new fridge in the house! In the past few months, while cooking and baking even more than usual due to my book, I often suffered from my old fridge's limitations and I knew that something had to change sooner or later. I did some research behind the silver doors of today's chic refrigerators, which all look quite similar from the outside. I remembered a tall model by Samsung that had caught my attention last year but at that point, my 12-year old fridge was still fully functioning and I was still forgiving regarding its limitations. So when Samsung had invited me to a presentation of their latest Chef Collection, a series of kitchen appliances developed together with Michelin-starred chefs, I wasn't ready for a change yet. But as soon as they offered me this huge, elegant silver fridge, after months of trying to fit in all the vegetables that I needed to cook and shoot for my book, I said "Yes, please!" I got it - thank you so much for that Samsung - and I'm totally happy about the fact that it keeps the temperature constantly stable and is especially energy saving - and I particularly enjoy the telescopic slide out drawer at the bottom, the Chef Zone. Maybe this is how some people feel about cars, but these little details are more than just practical, this is fun! But first and foremost, it's huge compared to our old fridge and I love it. There's so much space that I haven't even managed to fill it yet but I'm sure this will change next week, once the Christmas shopping begins.

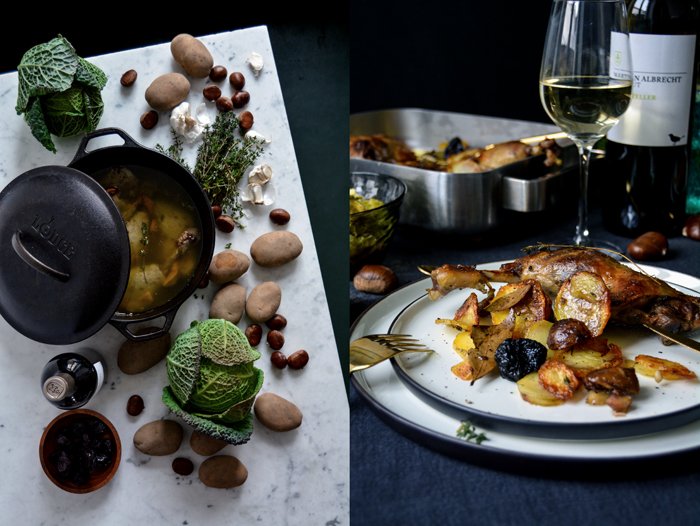
Duck Confit with Potatoes, Chestnuts, Plums and Star Anise
Serves 4
For the duck confit
coarse sea salt 1 1/2 tablespoons
black peppercorns, crushed in a mortar, 1 1/2 teaspoons
duck legs 4
fresh thyme 1 small bunch
duck or goose fat (jarred, or fresh uncooked goose fat from your butcher, cleaned from skins and veins, finely chopped) about 1 kg / 2 1/4 pounds
firm, sour apple, peeled, cored and sliced, 1
bay leaves 2
For the roast duck legs and potatoes
medium, waxy potatoes, peeled and very thinly sliced, 8
pre-cooked chestnuts 200g / 7 ounces
dried plums 150g / 5 ounces
garlic, thinly sliced, 3 cloves
star anise 3 pods
a small handful fresh thyme sprigs
fat used to cook the duck, about 180ml / 3/4 cup
coarse sea salt
black peppercorns, crushed in a mortar
For the apple Savoy cabbage
fat used to cook the duck 3 tablespoons
medium onion, finely chopped, 1
a small head of Savoy cabbage, cut into quarters, cored, roughly chopped, rinsed and slightly wet, about 500g /17 1/2 ounces
firm, sour apple, peeled, cored and roughly chopped, 1
dry white wine about, 300ml / 1 1/4 cups
nutmeg, preferably freshly grated
fine sea salt
ground pepper
Day 1
For the duck confit, combine the salt and pepper. Lay the duck legs in a baking dish, rub the skin with the salt-pepper mix and lay half the thyme under the meat and the other half on top. Cover with plastic wrap and keep in the fridge for a few hours, preferably overnight.
Day 2
Set the oven to 120°C / 250°F (conventional setting). Rub the salt off the duck legs with a paper towel, reserve the thyme sprigs.
Melt the (jarred) duck or goose fat in a large dutch oven over medium heat. If you use fresh goose fat from your butcher, let the cleaned and chopped fat cook over medium-high heat for 1 1/2 minutes or until the fat is melted. Take the dutch oven off the heat and let the fat cool for 2 minutes. Add the duck legs, the reserved thyme sprigs, the apple slices and bay leaves, everything should be covered in fat. Place the pot, uncovered, in the oven and cook for 2 1/2 hours. Take the dutch oven out of the oven and continue roasting the legs or cover the dutch oven and roast the legs the next day.
Once the duck legs are roasted you can pour the remaining fat in a sterilized jar and keep it in the fridge for months. It's great for fried potatoes, roasts and cabbages.
Day 3
Set the oven to 220°C / 425°F (conventional setting).
Spread the potatoes in a large baking sheet (don't use a small baking dish like in the picture below, I had to transfer them to a bigger sheet after 10 minutes as they were too moist). Add the chestnuts, plums, garlic, star anise, thyme, and fat, season with salt and pepper, and toss to combine with your fingers. Roast for 10 minutes, stir, and roast for another 10 minutes. Take the duck legs out of the fat - if the fat is hard place the dutch oven over medium heat to soften it - and lay them on top of the potatoes, skin side up. Roast in the oven for 25-30 minutes, stirring the potatoes every 10 minutes, or until crisp and golden brown.
While the potatoes are roasting, cook the cabbage: In a large pot, heat the fat over medium-high heat. Add the onion and cook for a few minutes until soft and golden. Add the cabbage and apple, stir, and cover. Lower the heat to medium and cook for 1 minute. Add the wine, nutmeg, salt and pepper and cook for 10-15 minutes or until the cabbage is just tender. Season to taste.
Arrange the duck legs and the potatoes on plates, serve with the cabbage filled in little bowls.


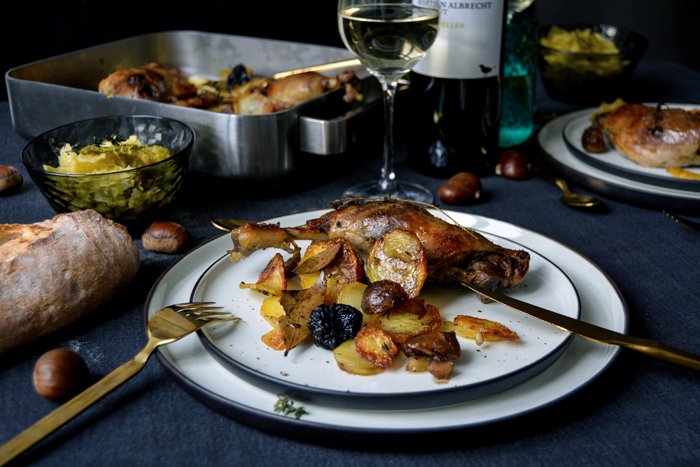
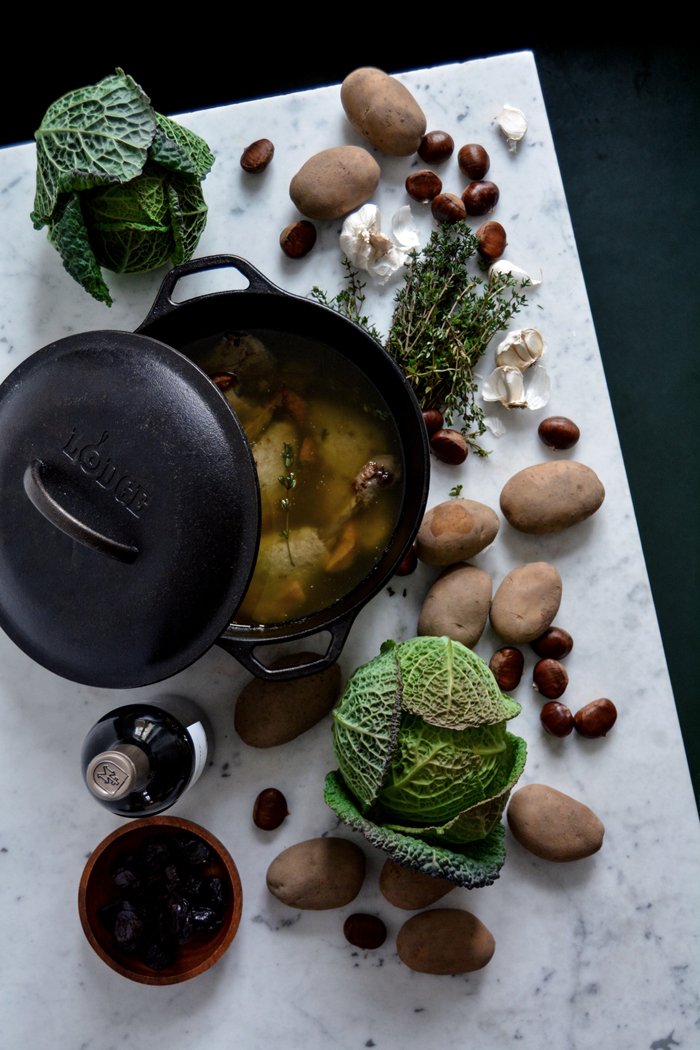

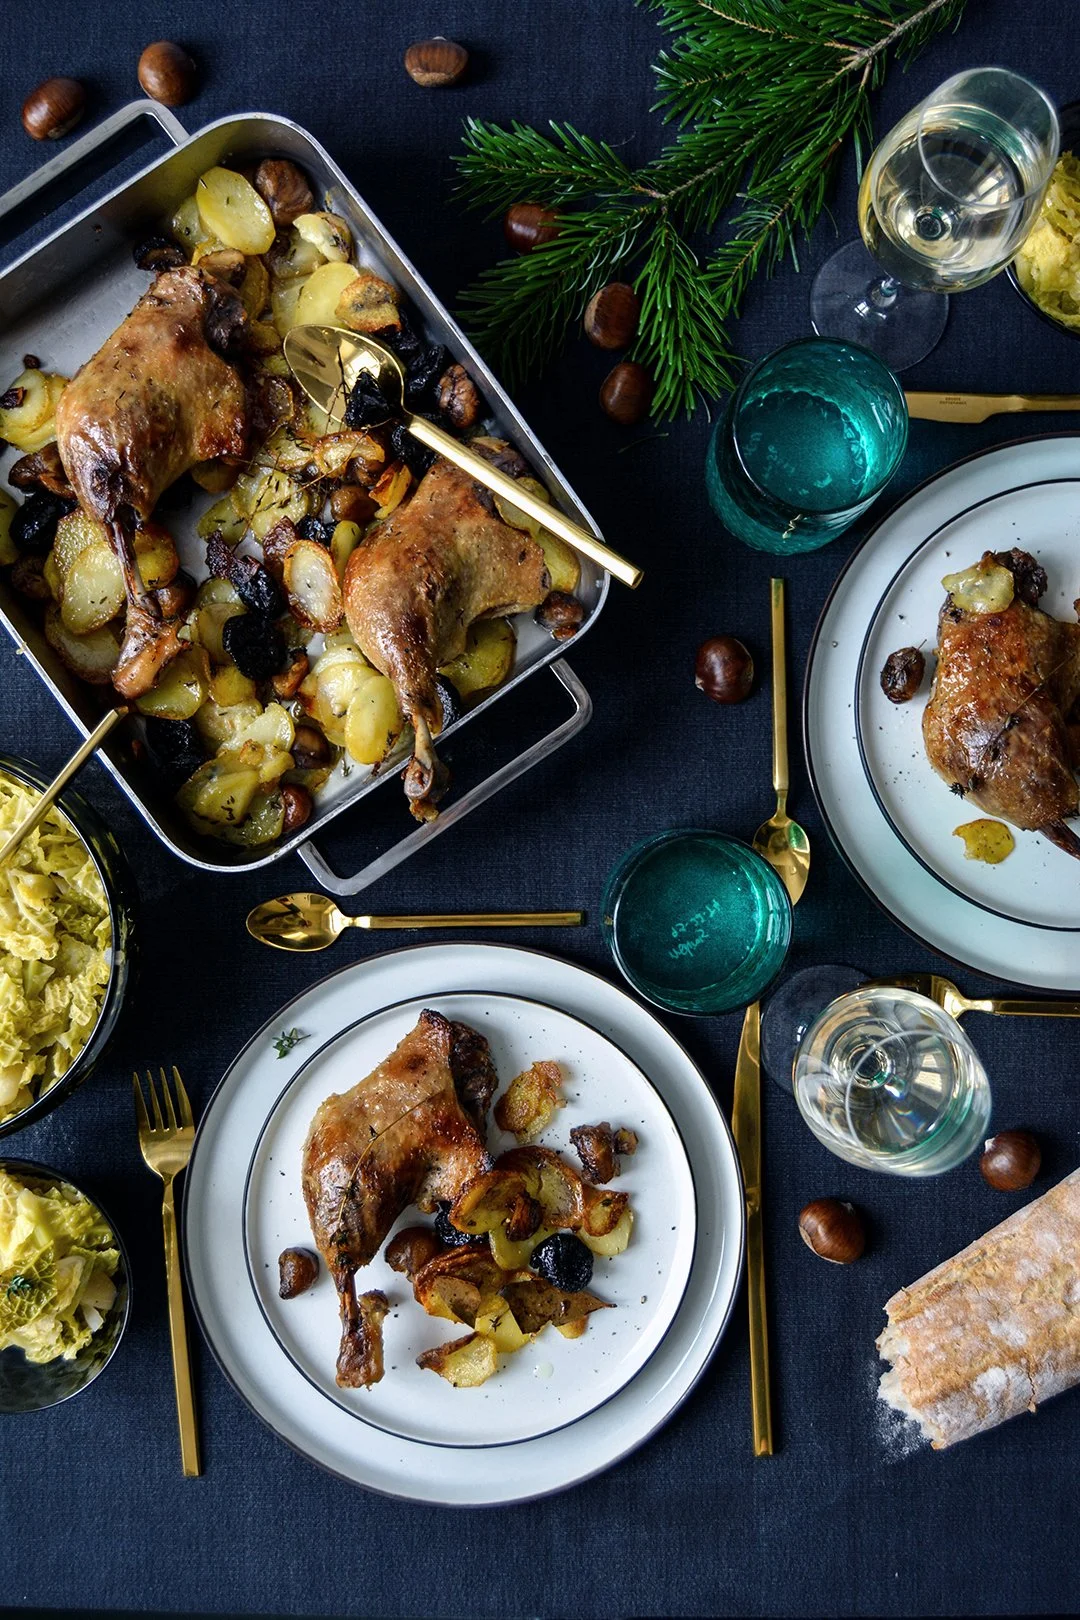
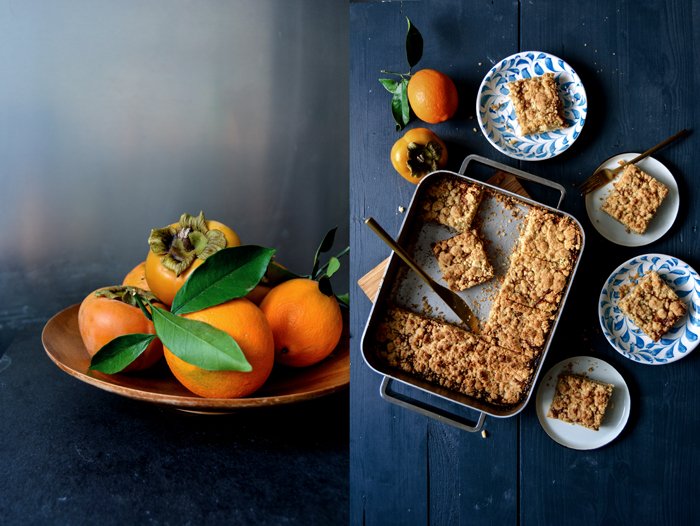
Persimmon and Orange Streusel Bars

I had cookie-like streusel bars on my mind but I couldn't help myself, they tasted too good, so I ended up cutting them into big pieces rather than petite bars. My idea was to combine a buttery shortbread base with crunchy crumbles and a sweet filling of puréed persimmons, orange juice and lots of fresh vanilla. The candied fruitiness was distinct although it was hard to guess which fruit it was exactly if you hadn't seen the overly ripe, jelly-like persimmons on my kitchen table.
It's already the 3rd Advent today and I still have quite a few cookie baking projects ahead of me before Christmas. Here's a list of a few recipes - my favourites - which you'll definitely find in my cookies jars:
Mince Pies (they aren't cookies, but still taste amazing, I already baked my first batch)
There are more recipes on the blog but I think I have to stop here for now, this is more than enough to keep our jars filled.

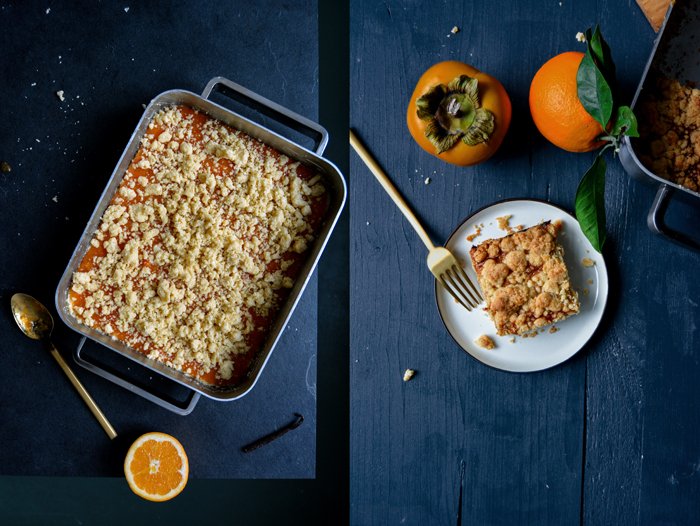
Persimmons and Orange Streusel Bars
Makes 12 large pieces or 24 bars
For the filling
very ripe persimmons, pulp only, 500g / 17 1/2 ounces (about 3-4 persimmons)
orange juice, freshly squeezed, 2 tablespoons
honey 1 tablespoon
vanilla pod, scraped 1/4
a pinch of salt
For the dough
plain flour 400g / 3 cups plus 2 tablespoons
granulated sugar 200g / 1 cup
vanilla pod, scraped, 1/4
salt 1/4 teaspoon
butter, soft, 225g / 1 cup
organic egg, beaten, 1
Preheat the oven to 180°C / 350°F (preferably convection setting). Butter a 23 x 28cm / 9" x 11" baking dish.
For the filling, purée the persimmons, orange juice, honey, vanilla seeds, and salt in a blender or food processor until smooth.
In a large bowl, combine the flour, sugar, vanilla seeds, and salt. Add the butter and cut it into the flour with a knife until there are just small pieces left. Add the egg and quickly rub the butter and egg into the mixture with your fingers until crumbly.
Take about 2/3 off the crumbles and spread in the buttered baking dish. Push the dough firmly into the baking dish, especially along the edges. Spread the persimmon filling on top and even it out. Spread the remaining crumbles on top of the filling and bake for about 52 minutes or until golden brown (slightly longer using conventional setting). Let it cool for about 15 minutes before you cut it into streusel bars and take them out of the baking dish.
The streusel bars taste best on the first and second day. You can keep them in an airtight container for up to 4 days but they will soften.