Langostini al Cartoccio cooked in seawater

Malta, August 2017:
I'm sure I spent more time in the water than on land in the past few weeks. When I'm in Malta, I turn into a fish, I practically live in and from the sea. Crystal blue water, secluded bays, and hidden caves under limestone arches are my very own little Mediterranean paradise. And once I'm out of the water, there's often the freshest seafood on my plate. Simplicity rules Malta's summer cuisine, a whole fish or pink crustaceans from the grill seasoned with a squeeze of lemon and some parsley from the fields, tender octopus in an aromatic stew - great quality ingredients don't need much to shine.
Although I enjoy visiting the islands' villages on Malta and Gozo a lot, walking down the quiet alleys and stopping for a cappuccino or ice cream at one of the old cafés, if there's a chance to put my goggles on and snorkel, you can be sure to find me in the water within a split second. In the first week, I went to my beloved Fomm ir-Riħ to sadly find the gravel beach considerably narrowed by clay swept down from the steep hill behind it. The sea was rough, so I didn't even bother walking down the hidden track along the cliff face. I went to Sliema's city beach instead and finished the day with my obligatory sun-downer - a glass of Ricard at the Exiles bar. Sitting on the warm rocks and smelling the salty air - after a dip in the sea of course - is one of the best ways to end a day in the Mediterranean.
Another trip took me to Marsaskala, a seaside village that I never really gave the attention it deserves. It's a very Maltese place, not many tourists, old houses, bars, and palm trees lined up along the promenade where the young and old meet after sunset. I had a Ftira sandwich for dinner, but before I dove into village life I discovered a beautiful rocky beach north of the Xrobb l-Għaġin Temple. It was so peaceful, the endless sea framed by chalk-white cliffs softly sliding into the water.
On one of my trips to Gozo, I discovered a recipe that I'd love to share with you today. Noel, the excellent chef at his open-air restaurant at the deep Mgarr ix-Xini bay - which is a bit tough to find - cooked the sweetest langostini al cartoccio in seawater. He doesn't have to go far, a few steps from his place he finds the cleanest Gozitan sea, always at hand to cook seafood in his preferred method: wrapped in a package, al cartoccio, with a splash of seawater, on the grill. Don't worry if you don't happen to live at the sea, just use normal water mixed with the best sea salt you can find, that's what I do at home. I got Maltese langostini, which are the sweetest I know. Noel's crustaceans were a little smaller than mine and tastier, however, my fish monger only had the larger size. You just have to add some lemon wedges to the package and cook it on the grill for a few minutes (or in the oven). They cooked to perfection, with a gentle touch of the salted water. I used Gozitan salt, which I find not only subtle in saltiness, but also tastier than any other I've tried. Choose a good one, it's worth it!


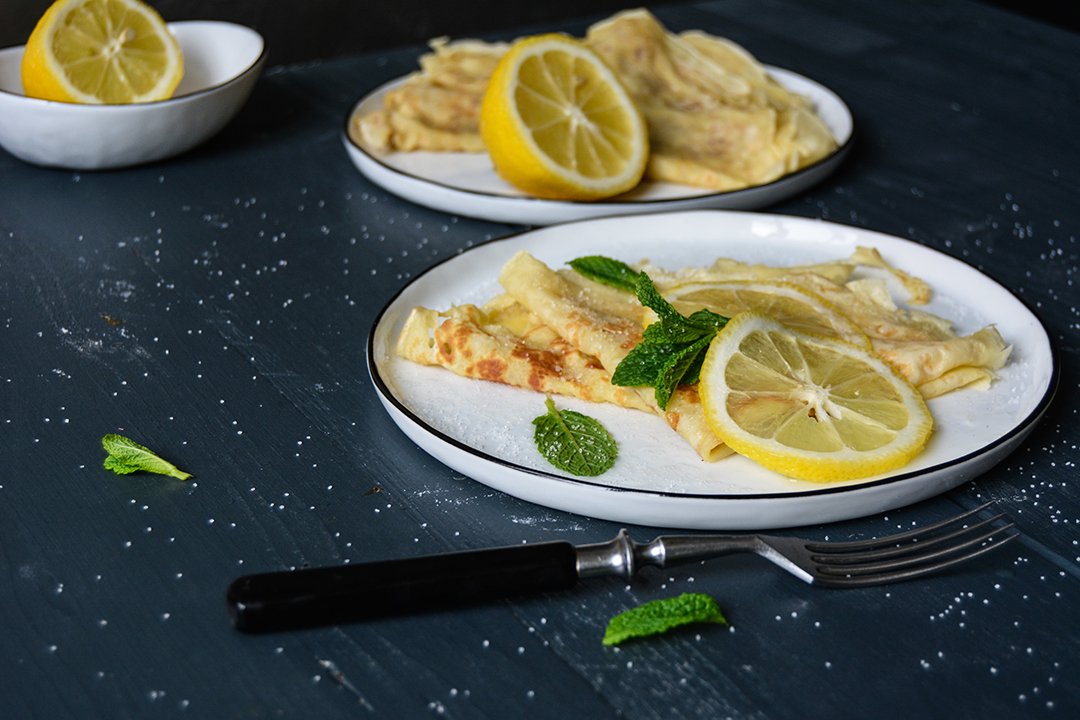
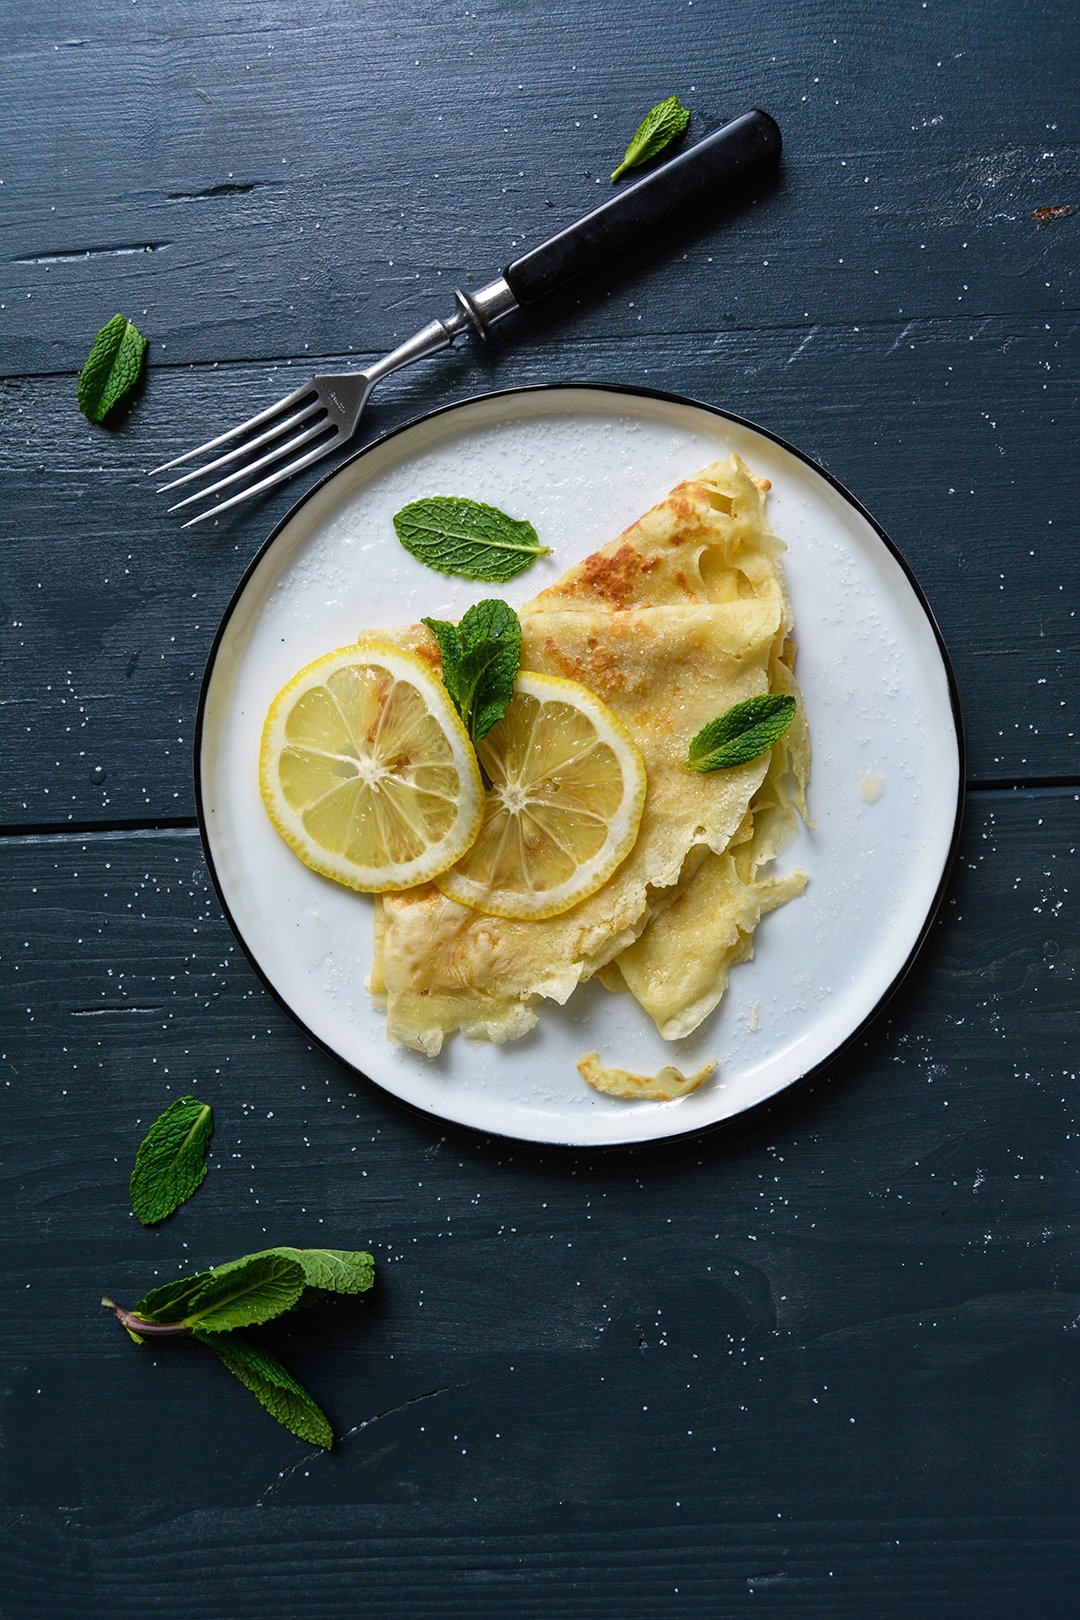
Seawater cooked Langostini al Cartoccio from the Grill
You can cook the langostini on the grill or in the oven.
Serves 2
extra wide aluminium foil
medium langostini, fresh and uncooked, 8-10
sea salt 1 tablespoon
water, warm, 300ml / 1 1/4 cups
olive oil
organic lemon, cut into wedges, 1
Start the grill or preheat the oven to 200°C / 400°F (conventional setting).
Lay 2 pieces of aluminium foil on top of each other, large enough to wrap the langostini.
Stir the salt into the warm water and let it sit until the salt dissolves. Or, if you happen to live close to the clean sea, use the same amount of fresh seawater.
Lay the langostini in the middle of the aluminium foil and fold up the sides. Add the salted water / seawater, a generous splash of olive oil, and the lemon wedges. Wrap the package and seal the ends well.
Cook the langostini for about 3-5 minutes on the grill (I closed the lid of the grill), or in the oven, until they are just done.
Serve immediately with fresh bread and, if you like, a glass of chilled white wine.


Cherry Chocolate Meringue Pie
Think of Black Forest Torte and meringue pie, take out the heaviness of the whipped cream, and you have a rough idea of the taste of this opulent beauty. My Cherry Chocolate Meringue Pie has all the nice features of the famous southern German coffee table classic, including dark chocolate, Kirsch Schnaps, and sweet summer cherries - it's just lighter. You can also find this recipe in my 365 book.
My friend Jenny was the first baker who introduced me to meringue pie, her formidable lemon meringue pie blew my mind. Although we have similar cakes in Germany, like a sponge cake layered with gooseberries and meringue, it doesn't have the same qualities as a pie. It's richer, a proper German torte. A pie, however, focuses on the fruit filling, there's only a thin buttery short crust base holding all that lusciousness together. The wonderfully fluffy, airy meringue topping adds a very fine sweetness, wrapped in fragile crispiness. It works perfectly with sour rhubarb, a pink spring pie that became a popular recipe on the blog. I could have used the same formula for my plump black cherries, but I wanted a chocolate base. I couldn't get it out of my mind and I'm glad that I didn't, it's the perfect Schwarzwälder Kirsch Pie (the German name for black forest).

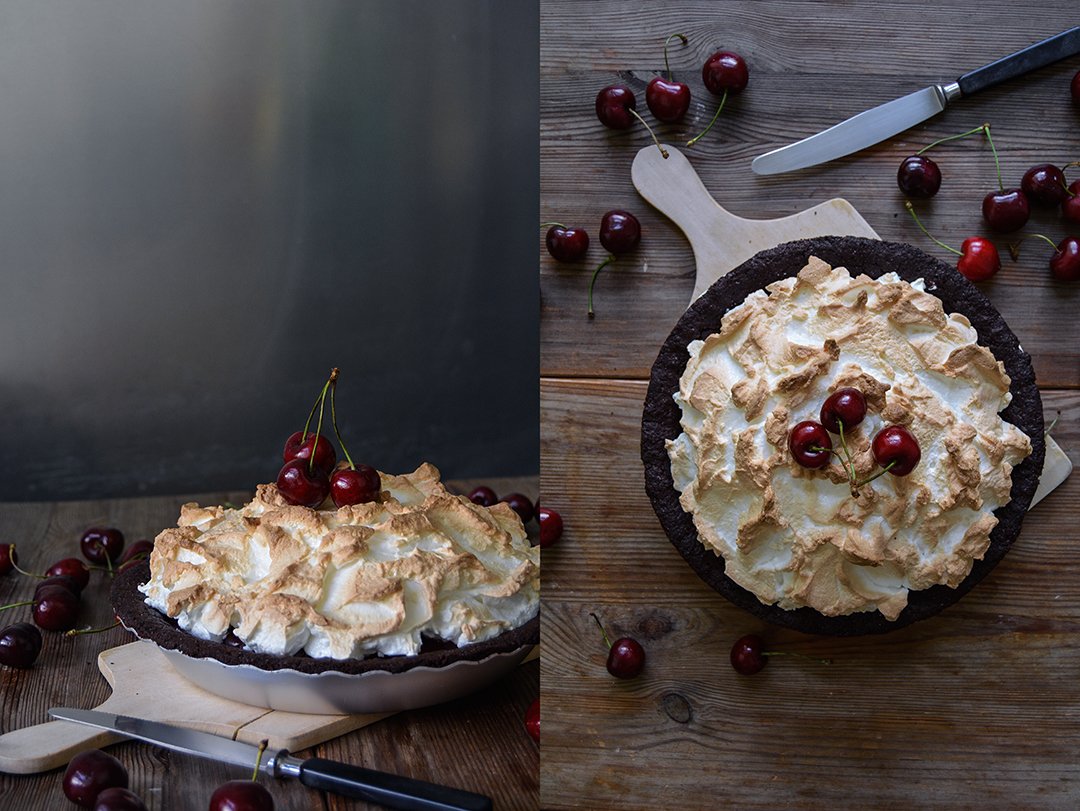
Cherry Chocolate Meringue Pie
You'll need a 23cm / 9″ shallow pie dish for this recipe.
Makes 1 pie
For the cherries
fresh sweet cherries, pitted, about 550g / 1 1/4 pounds (about 4 cups pitted cherries)
granulated sugar 100g / 1/2 cup
ground cinnamon 1 teaspoon
Kirsch schnaps 3 tablespoons
cornstarch 30g / 1/4 cup
For the pastry
plain flour 160g / 1 1/4 cups
Dutch-process or natural unsweetened cocoa powder 50g / 2 ounces
granulated sugar 3 tablespoons
fine sea salt 1/4 teaspoon
unsalted butter 120g / 1/2 cup
cold water 3 tablespoons
For the meringue
fresh organic egg whites 3
a pinch of fine sea salt
granulated sugar 80g / 1/3 cup plus 1 tablespoon
For the cherry filling, in a medium saucepan, heat the cherries, sugar, and cinnamon over medium heat, stirring constantly. When the sugar dissolved, stir in 2 tablespoons of the schnaps, close with a lid, and cook for about 5 minutes or until the cherries soften. Turn the heat down to low. Add 2 tablespoons of the liquid of the cherries to a small bowl and whisk in the cornstarch until smooth, pour back into the saucepan, stirring constantly until well combined. If you'd like the schnaps to be more prominent, add 1 tablespoon of the spirit. Pour the cherries and all the liquid into a wide pan and let them cool completely.
For the pastry, in the large bowl of a stand mixer fitted with the hook attachment, combine the flour, cocoa, sugar, and salt. Add the butter and use a knife to cut it into the flour until there are just small pieces left. Quickly rub the butter into the flour with your fingers until crumbly. Add the water and, using the hooks of the stand mixer, mix until combined. Form the dough into a thick disc, wrap it in plastic wrap, and chill in the freezer for 15 minutes.
Preheat the oven to 210°C / 410°F (conventional setting).
On a table or countertop, place the dough between 2 sheets of plastic wrap and use a rolling pin to roll it into a circle, large enough to line a 23cm / 9″ shallow pie dish. Push the pastry into the dish, trim any excess dough off the rim with a knife, then prick the pastry all over with a fork. Bake for 15 minutes. Let the pastry cool completely before you assemble the pie.
In the large bowl of a stand mixer, whisk the egg white and salt for 1 minute. Adding the sugar gradually, continue mixing for about 1-2 minutes or until stiff.Preheat the oven to 210°C / 410°F (conventional setting).
Pour the cool cherries and all the liquid on top of the pastry. Scrape the stiff egg white on top, shape it to a dome and form little peaks with a knife to create an uneven surface. Bake for 7 minutes or until the top is golden brown and crisp. Let it sit for about 30 minutes before serving, the cherries need to set.
The pie tastes best on the 1st and 2nd day, however, you need to keep it in the fridge, which softens the pastry.


Maltese Fennel & Coriander Cheeseburger Toast
A few weeks ago, I received a message from someone excitedly telling me that she visited my 'fennel lady' in Malta. I often wrote about this lovely farmer, on the blog and in my cookbook, and I can't imagine cooking without her aromatic harvest anymore. Every Sunday, she spreads her fennel and coriander seeds on the wooden table at a tiny stand at the farmers' market in Marsaxlokk, a picturesque fishermen's village in the south of my beloved Mediterranean island. It seems like this is what she's done all her life, picking and selling seeds, always with a happy smile on her tanned face. The person who wrote me the email did what I always do in summer: she bought bags of fragrant seeds to fill the spice box in her pantry.
Malta is the reason why fennel became so prominent in many of my recipes. It grows wild all over the islands, the plants dig their sturdy roots into every patch of soil they can find. I guess its abundance is one of the reasons why you can find fennel in many traditional dishes in Malta's Mediterranean cuisine - and its wonderful sweet taste of course. If you visit the small local restaurants, you often find baked fennel potatoes as a side dish on the menu.
When Leerdammer asked me if I'd like to create a recipe with their new Toast and Burger Cheese, I didn't think twice. I love a good cheeseburger. I live in Berlin, a city where new burger joints pop up at every street corner like mushrooms. Although I like to try a new spot once in a while, I still have my favourite place when my meaty cravings creep over: The Bird. I always go for a perfectly cooked steak burger topped with a slice of Swiss cheese. However, in my own kitchen, I'm a little more experimental.
Leerdammer's aromatic cheese tastes slightly sweet and it melts on top of a warm, juicy burger like butter. The cheese has a fine taste, but it's not shy, it can easily take a generous amount of warming spices stirred into the burger mixture: fennel and coriander seeds, alongside lots of garlic, fresh parsley, and spicy black peppercorns crushed in a mortar. I felt inspired by the famous Maltese sausage, which is coarse, rough, and so tasty. It features all the spices that you can find in my burger. When it comes to flavour, Malta's traditional sausage is one of the richest and most delicious I know. And what works in a sausage, can't go wrong in a burger.
The burgers are bedded on a thinly sliced fennel bulb that adds freshness and crunch, a few red onion rings and arugula (rucola) instead of a lettuce leaf brings a sharp note. Usually, I prefer to buy my cheese in one piece, but when it comes to cheeseburgers, I don't mind working with sliced dairy products. This way it looks like a proper American style burger, one with a Mediterranean make-over. You could pack the whole thing in a bun, but what about trying something new and layering it between two thick slices of toasted white bread? And instead of using the toaster, make use of the burgers' buttery cooking juices and crisp the bread in the pan.
Thank you Leerdammer for inspiring me to make a Maltese cheeseburger toast. You can find more Toast & Burger recipes celebrating regional treats here.
Last year I created a few scrumptious sandwiches together with Leerdamer, here are some of my favourites:


Maltese Fennel Cheeseburger Toast
Makes 4 burgers
For the burgers
minced meat (beef and pork) 500g / 18 ounces
dry breadcrumbs 30g / scant 1/4 cup
organic egg 1
garlic, crushed, 2 large cloves
fresh flat-leaf parsley leaves, chopped, 1 medium bunch
fennel seeds 1 tablespoon
coriander seeds, crushed in a mortar, 1 tablespoon
black peppercorns, crushed in a mortar, 2 teaspoonsf
laky sea salt 1 1/2 teaspoons
butter, to cook the burgers
olive oil, to cook the burgers
To assemble the burger toast
fresh white loaf, 8 thick slices
medium fennel bulb, cored and very thinly sliced, 1
medium red onion, cut into thin rings, 1
Leerdammer cheese (or another aromatic cheese that melts well) 4 slices
arugula (rucola), a small handful
olive oil
fennel seeds, crushed, for the topping (optional)
For the burgers, in a large bowl, using your hands or a stand mixer, mix and knead the minced meat, breadcrumbs, egg, garlic, parsley, fennel seeds, coriander seeds, pepper, and salt until well combined. Shape the meat mixture into 4 thick burgers.
In a large, heavy pan, heat 1 tablespoon of butter and a generous splash of olive oil over high heat. Reduce the heat to medium-high, add the burgers, and, turning them 2-3 times, cook until medium rare. You might have to turn the heat down to medium after a few minutes if the burgers turn dark. This takes about 10 minutes. Add more oil if the pan becomes too dry.
Transfer the burgers to a plate (cover them with a lid), leaving the fat in the pan, and turn the heat up to high. Add the bread slices to the pan and toast each slice on just one side until golden and charred at the corners.
To assemble the burger, lay a slice of bread on a plate (toasted side facing down) and lay a few fennel slices and red onion rings on top. Arrange the warm burger and a slice of cheese on top, then finish it off with some more onion rings and a few rucola leaves. Drizzle with a little olive oil, sprinkle with some fennel seeds, and close the sandwich with a slice of bread (toasted side facing upwards). Squeeze and enjoy!


Lemon Butter Roast Chicken with Peaches and Rosemary
Roast poultry is always a feast. Nothing beats a whole roast chicken, the skin golden and crisp, the meat succulent and tender. And when it comes to seasoning the chubby bird, there are no rules to obey. Sweet or sour, fruity or veggie-focused, spiced-up or plain, a chicken can deal with everything. Lemon butter sounds fresh, tastes fresh, and turned my chicken into a perfect summer lunch. Italian peaches lend juice and fruitiness, a little sweet, but not too much, and rosemary brings in woody tones. Seeing as we're talking about feasting, there had to be wine on the table. The bird didn't necessarily need it, but my mood called for a German Riesling, chilled, fresh, and fruity.
If you love wine, here's a little experiment for the next time you open a bottle: choose a good bootle of white or red wine and pour it into three to five different wine glasses. You can also go for champagne, if you're in the mood for bubbles, but take your time and consciously taste the wine, its complex tones and colours, revealed by the dimensions of each glass, its shape, volume, height, and curves. If you have three glasses, you'll taste three variations of the same wine.
My mother - who loves wine at least as much as she loves food - introduced me to this kind of wine tasting in my early twenties. She has a huge crystal glass collection handmade by 260 year old glass maker Riedel, not only for white, red, and sparkling wine, but also for different regional wine and grapes. The taller Bordeaux glass, the rounder Burgundy that opens at the mouth, the elegantly shaped Syrah glass, they all bring out the best, the typical characteristics of these wines. That doesn't mean that a fine Chablis can't be enjoyed out of a glass that was made for a Riesling, but it might miss certain nuances that give it the final touch, the magic that goes beyond words.
After my first lesson in the art of wine glasses, I decided to follow my Mama's food steps and invest in a basic collection, my first machine-blown Riedel glasses. My budget was a bit more limited than my mother's, I focussed on shapes that work well for various grape varieties. Riedel's Rheingau glass, for example, is quite an allrounder, it flatters crisp and fruity whites like my beloved German Grauburgunder (pinot gris), but I also found out that a bubbly Crémant d'Alsace doesn't mind this shape either - in case a Champagne glass isn't at hand. When it comes to the reds, I'm a fan of body, weight, and depth. The classic Bordeaux shape goes quite well with a few of my favourite wines. These wine glasses were the start of my ever growing collection, which also led to ever growing kitchen shelves, but that's another story.


Falling for wine glasses is a passion, it makes sense once you start investing in finer wines. A glass collection grows and changes every year, like a wine collection, there will be losses and new additions. It's alive, like the wines that they're filled with. It's always sad to lose a precious glass, but it's also so exciting to see a new shape added to the shelf.
When Riedel asked me, if I'd like to try out their new Fatto A Mano range, handmade at their headquarters in Kufstein in the western Austrian province of Tyrol, I could already hear my mother's ecstatic voice. Fatto A Mano is a beautiful collection, thin and light at the top, tall and elegant, and it introduces a new feature. Inspired by the Venetian tradition of glass making, a coloured handmade stem is the base of each glass of this collection. The bowl, however, sitting on top, is machine-blown and then fused with the stem, a process developed by Riedel. The colour scheme, including bold yellow, red, blue, and green, and more minimal black and white, adds fun to the table. The art of wine making is a science, but the art of wine drinking is first and foremost a pleasure that allows us the luxury to relax and let go, to taste and just smile at life.
Setting up the table for a dinner party or a weekend lunch feast with friends - especially now, in summer - doesn't need to follow strict rules anymore. We play with the arrangement and mix and match tableware, colours, shapes, and materials. Whatever mood I'm in, the food I choose, but also the way I lay out my table, reflects how I feel. The table is the stage for the feast, where we gather with the ones we love to enjoy a few hours of good food and wine, of closeness and conversation.
Thank you, Riedel, for introducing me to your artful Fatto A Mano collection. It has already created quite a few hours of pleasure at our table - for me and my friends.
In the pictures you see the Riedel Riesling glasses from the new Fatto A Mano range, the stemless Viognier / Chardonnay glasses from The O Wine Tumbler collection, which I used for water, and the perfectly shaped round-bellied Marne wine decanter.


Lemon Butter Roast Chicken with Peaches and Rosemary
You can use leftover meat, sauce, and fruit to stir into warm pasta and sprinkle with fresh basil.
Serves 2-3
unsalted butter 60g / 4 tablespoons
freshly squeezed lemon juice 75ml / 1/3 cup
whole free-range or organic chicken, about 1.5kg / 3.3 pounds, 1
flaky sea salt
ground pepper
medium sprigs fresh rosemary 6
large lemon, cut into 8 wedges, 1
large, firm peaches, cut into 8 wedges each, 3
Preheat the oven to 190°C / 375°F (convection setting or Rotitherm setting, if available).
In a small sauce pan, melt the butter and pour into a medium baking dish, large enough to fit the chicken in. Whisk in the lemon juice, then transfer the chicken to the baking dish and toss in the lemon butter until coated on all sides. Season the chicken with salt and pepper inside and out and lay 2 sprigs of rosemary inside the chicken. Arrange the remaining rosemary, lemon and peach wedges around the bird. Roast, spooning the juices from the pan over the chicken every 15 minutes, for 45-55 minutes or until the juices run clear when you prick the thickest part of a chicken thigh with a skewer. Turn on the broiler (grill) for a few minutes or until the chicken skin starts sizzling, mind that it doesn't burn. Take the chicken out of the oven and let it rest for a few minutes.
Carve the chicken and serve with the peaches and baguette to dip into the juices - and with a glass of chilled Riesling of course.
If you're looking for a starter, or a dish to accompany the roast chicken for an easy lunch or brunch, try my leek, tomato, and thyme quiche or basil ricotta and tomato quiche.


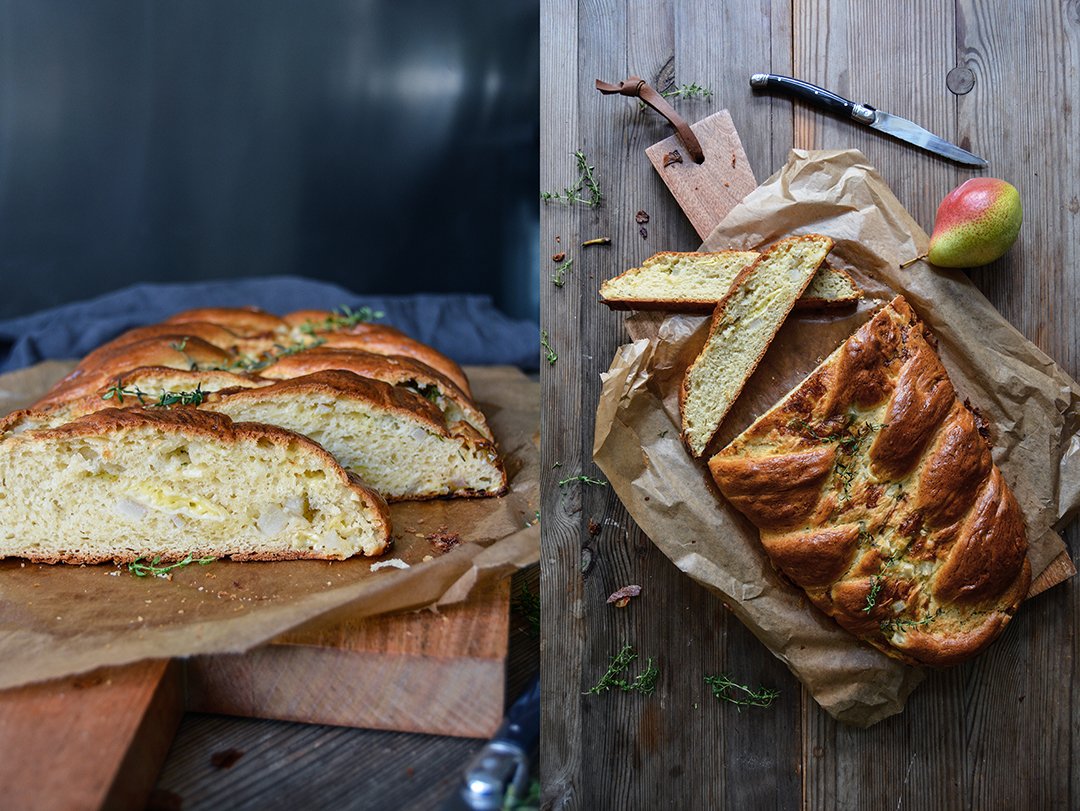
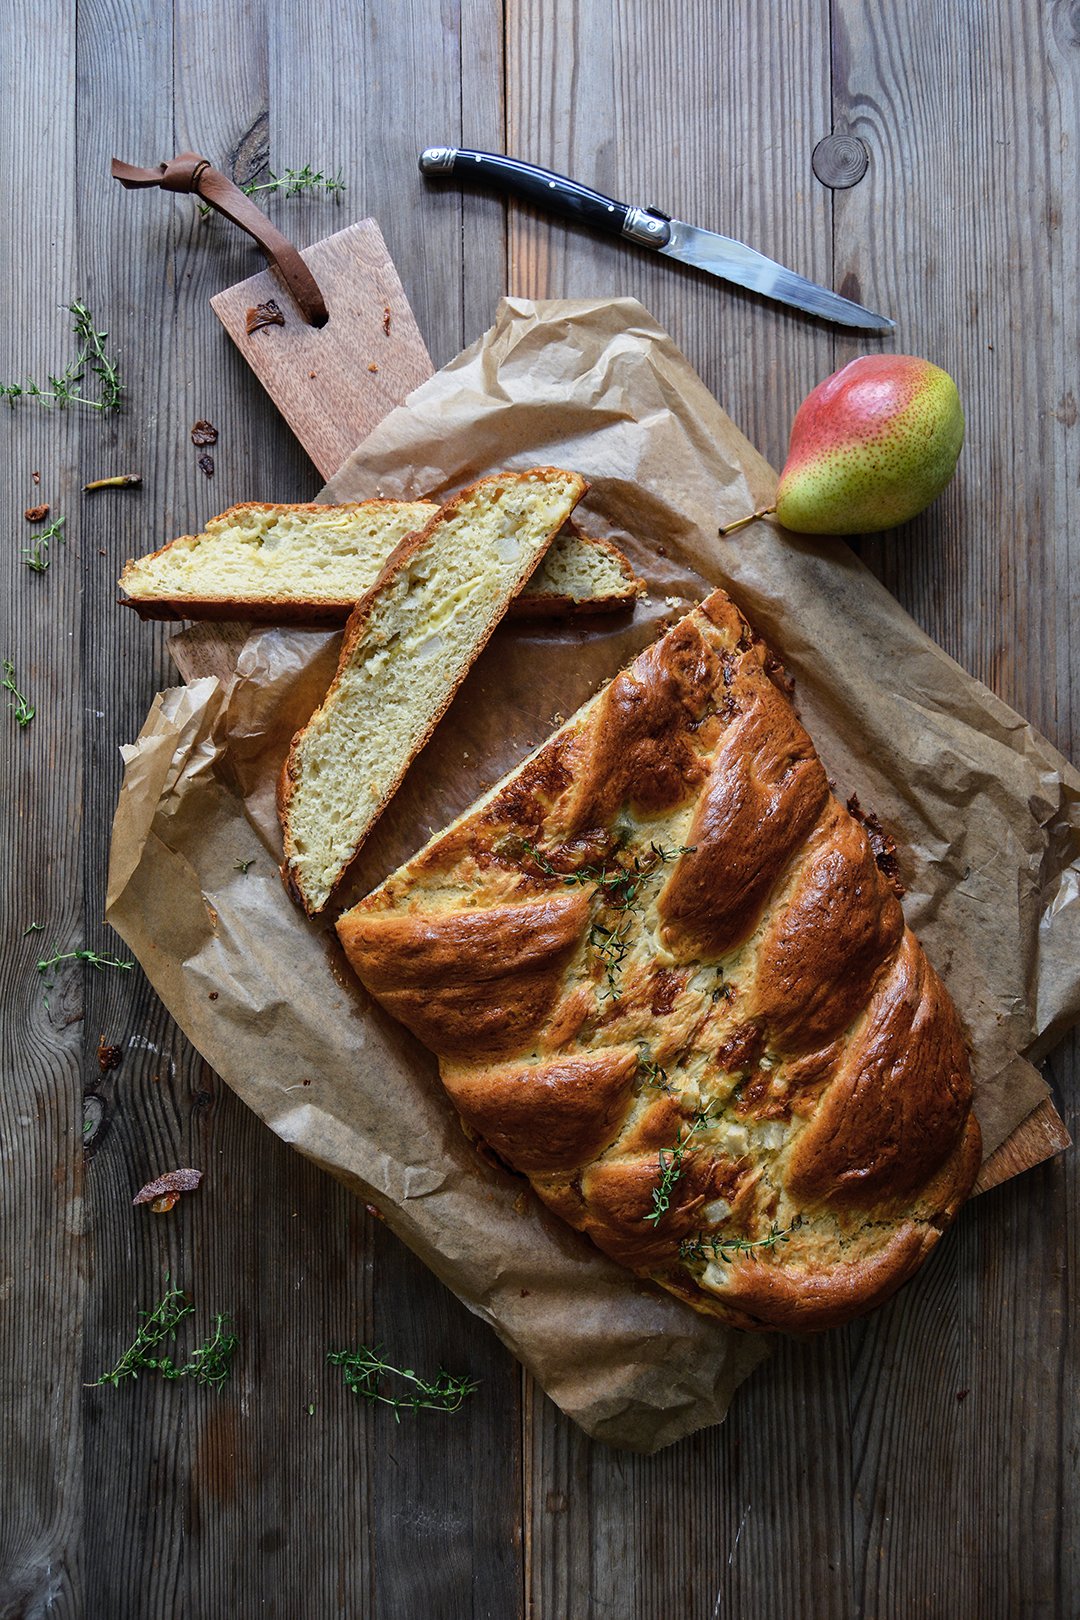
Camembert, Pear and Thyme Challah
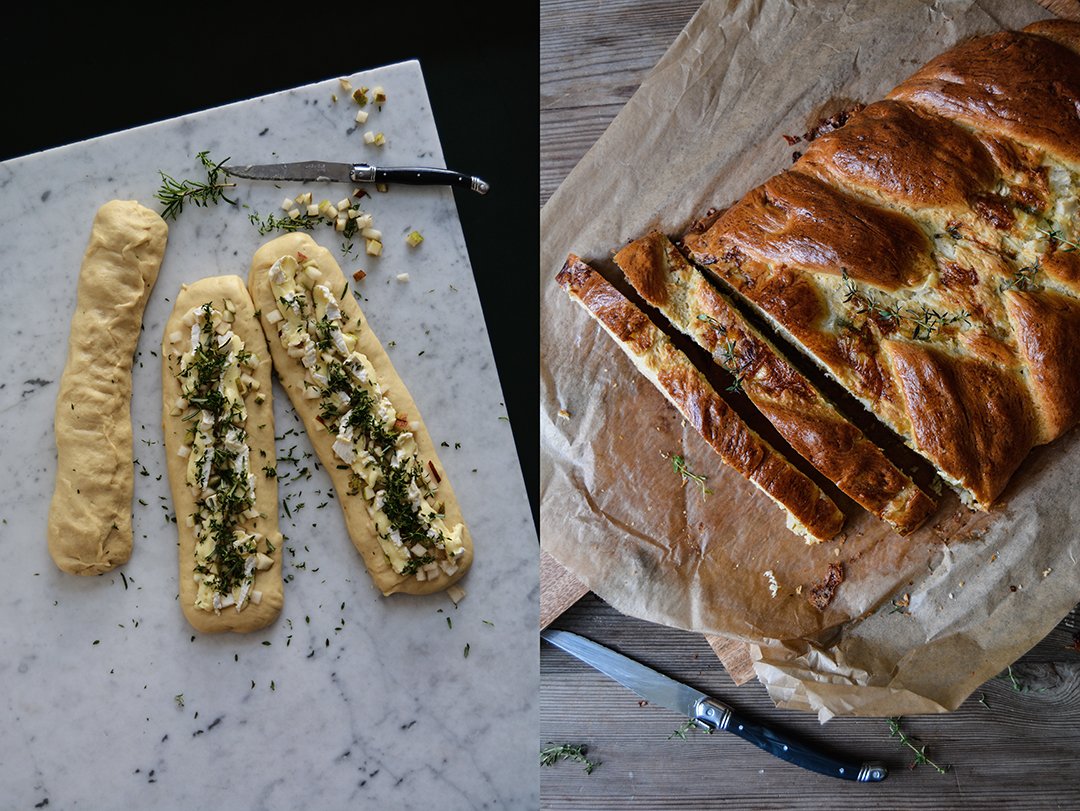
A lot of cracking and aching was going on in the oven while I watched my camembert, pear, and thyme challah bake. At one point I got worried that my braided bread was going to explode. It rose and expanded on all sides, it looked more like a challah pancake than the elegant breaded loaf I had in mind. Maybe I filled the single yeast dough strings a bit too generously with ripe - and stinky - cheese and chopped crisp fruit, but I had a feeling that the recipe needed it. So I trusted, which is always the only sensible thing a baker can do when the object of attention doesn't perform as expected.
To my surprise, it worked out in the end and the shape still reminded me of a Hefezopf - the German name for challah. I used my classic plain challah recipe and replaced the sugar with honey. It's common in Germany to use butter and milk for this kind of bread, instead of water and vegetable oil, which you usually find in traditional challah recipes. I like the added richness coming from the dairy products, I find it tastier. Seeing as the fruit and cheese bring in even more juice and moistness, I could have made the dough a bit drier, added more flour to help it keep its shape. But the final texture was so nice, soft and spongy, that I'd rather accept the pancake-look than ending up with a dry Hefezopf.
If you don't feel like camembert, you can also go for any other aromatic cheese that melts well. I already have a raclette challah in mind, next time. And I'm sure that apricots or peaches would also do a pretty good job instead of the pear. So feel free to experiment, but keep in mind, the juicier the fruit, the more it'll soften your dough.
This challah is a perfect picnic, brunch, or Saturday lunch treat, preferably accompanied by fresh fruits, wine, and a selection of cheese and prosciutto. A green salad with juicy tomatoes also goes very well with it.

Camembert, Pear and Thyme Challah
When I baked my challah, it was a very hot day. So the butter in the dough literarily melted in my hands and turned braiding into a fiddly task. The single braids stretched quicker than I reacted, I was too slow. If you also happen to go for this recipe on a day with high temperatures, to avoid stress and frustration, try to work quickly when you braid the loaf. Keep the braids a bit shorter to begin with, due to the filling they'll expand in length.
Makes 1 large challah
honey 2 tablespoons
butter, melted, 100g / 1/3 cup plus 2 tablespoons
milk, lukewarm, 150ml / 2/3 cup
organic eggs 2
plain flour 520-550g / 4 cups - 4 cups plus 4 tablespoons
fast-acting yeast 1 sachet (7g / 1/4 ounce)
fine sea salt 1 teaspoon
For the filling
aged camembert, cooled and cut into thin strips (it'll be a mess if it's too soft), 250g / 9 ounces
medium to large firm pear, cored and cut into tiny cubes, 1
fresh thyme and a little rosemary (the needles, chopped), a large handful
For the glaze
organic egg yolk 1
water 1 tablespoon
Stir the honey into the hot melted butter and whisk until combined, let it cool until it's lukewarm. Add the milk and eggs and whisk, the mixture should be lukewarm.
In a large bowl of a stand mixer fitted with the hook attachment, combine the flour, yeast, and salt. Add the milk-butter mixture to the flour mixture and mix for about 5 minutes or until well combined and smooth. If it's too soft and sticky, add a little (!) more flour. Continue kneading and punching with your hands for about 3-5 minutes or until you have a soft and silky ball of dough. Place the dough back in the bowl, cover with a tea towel, and let rise in a warm place, or preferably in a 35°C (100°F) warm oven, for 60-70 minutes or until almost doubled in size. If it's a hot summer day, you can let the dough rise at room temperature (that's what I did this time).
Line a baking sheet with parchment paper.
When the dough is puffy and almost doubled in size, punch it down, take it out of the bowl, and knead for about 30 seconds. Divide into 3 parts and roll them into longish, but not too thin sausage sausage shapes (see picture above). Flatten each piece of dough until it's roughly 7.5 cm / 3" wide. Divide the camembert, pear, and herbs between the 3 pieces of dough and spread, leaving a little rim all around the filling. Fold over each piece of dough, roll it gently, and seal the overlapping side and ends well. The filling should be completely wrapped inside the dough.
To braid the bread, work quickly, as the dough stretches. Lay the ends of the dough rolls on top of each other at one end and braid them tightly. If they become too long and thin, squeeze them together a little. Bend both ends of the bread under the loaf and quickly transfer to the lined baking sheet. Cover with a tea towel and let rise in a warm place for about 40-50 minutes or until fluffy.
Preheat the oven to 190°C / 375°F (conventional setting).
For the glaze, whisk the egg yolk and water and brush the top of the challah. Bake for about 25-30 minutes or until golden brown and spongy. When you knock on the challah's bottom, it should sound hollow. Let it cool for a few minutes before cutting the bread into thick slices.The challah tastes best on the 1st day.


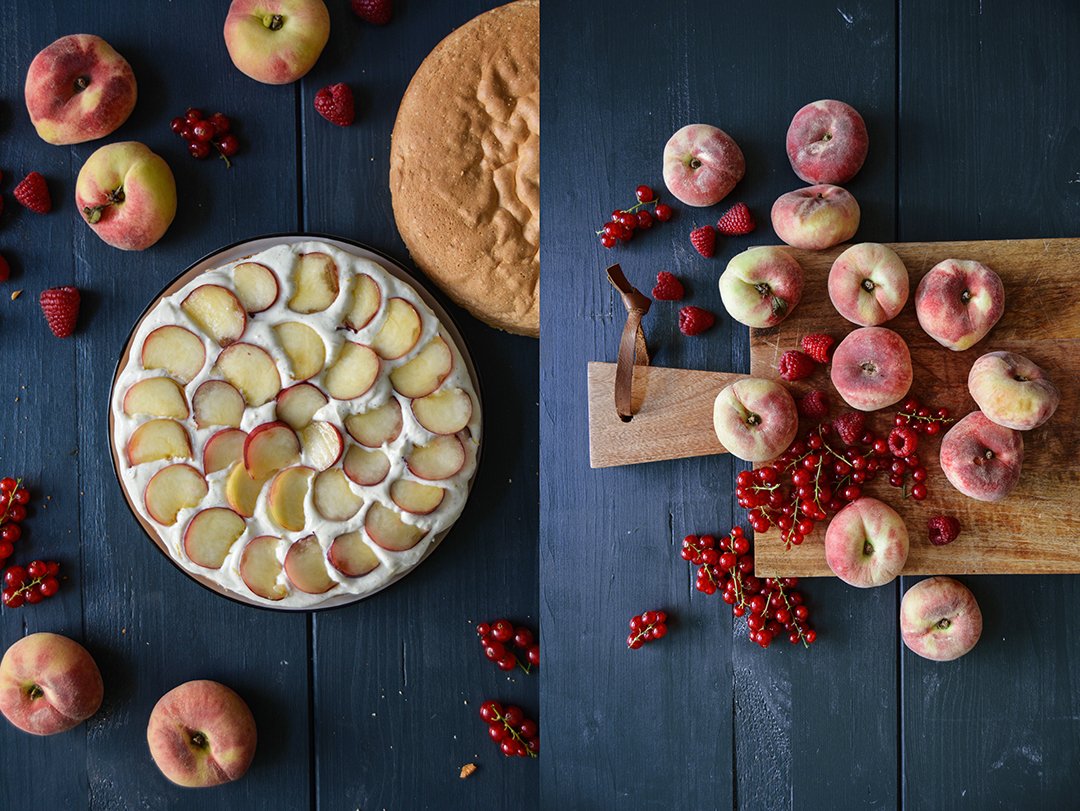
Peach and Ricotta Summer Sponge Torte
The temperature's high, the brightest blue is painted all over the sky, and my kitchen countertops are piled with berries and stone fruits. Strawberries, raspberries, the first red currents, peaches and apricots - I'm in fruit heaven. And soon I'll be back in Malta, where figs, naspli (also known as loquat fruit or Maltese plum), and bajtra (prickly pear) will be added to the table. I adore summer, I love its richness and lusciousness, the vast variety of colourful produce that inspires me every time I go to the farmers' market. A handful of ingredients perfectly ripened under the warm sun turn the most minimal dish into a regal meal. Or a simple sponge cake sandwiched with a creamy filling and seasonal fruit. Is there a better way to feast and celebrate summer than with a Peach Ricotta Torte?
When I was a child, my mother introduced my sister and me to a beautiful Sunday afternoon tradition. We'd pick a recipe, for cake or waffles, chat and bake, and listen to classical music. When our work was done, we'd get cozy on the sofa (in winter) or set up our teatime table in the garden. One of my culinary summer highlights is my mother's sponge torte with whipped cream and strawberries. It's almost too pretty to eat. And my uplifted summer mood called for a revival of our little tradition. Instead of German Rührkuchen - a sponge cake made with butter, which my mother bakes - I went for a lighter fat-free sponge, made with lots of beaten egg white. It's soft and airy, not filling at all, which explains why the two of us ate almost the whole cake in one day.
Malta was my inspiration when I thought about the filling: I chose the lemon-ricotta filling for Maltese cannoli from my Eat In My Kitchen book. Lighter than whipped cream, it has a slightly sour touch, perfect for a summer torte. My cake only had one layer of ricotta, but feel free to double the amount and also use it as a topping - in case you aim for a richer cake-sandwich. A little icing sugar to finish it off was just right for me.
White soft and juicy vineyard peaches (also known as doughnut peaches) added the right amount of sweetness, red currants to decorate the cake brought a sharp note to the palate. Stroll over the farmers' market and grab whatever fruit pleases your eyes and taste. Just try to balance out sweet and sour - that's what a fruity summer torte is all about.
More fruity summer sponge cake and swiss roll inspiration:


Peach and Ricotta Summer Sponge Torte
Double the amount for the ricotta filling if you also want to use it to spread it on top of the cake.
Makes 1 20.5cm / 8" cake
For the ricotta filling
fresh ricotta, drained, 250g / 9 ounces
granulated sugar 2 tablespoons
freshly grated lemon zest 2 teaspoons
vanilla bean, split and scraped, 1/2
For the sponge cake
organic eggs, separated, 4
fine sea salt 1/8 teaspoon
granulated sugar, divided in half, 150g / 3/4 cup
freshly grated lemon zest 1 teaspoon
vanilla bean, split and scraped, 1/2
plain flour, sieved, 160g / 1 1/4 cups
For finishing
ripe white vineyard peaches or doughnut peaches, with or without skin, cut into very thin wedges, 3 plus 1 cut into thicker wedges
peach cut into thicker wedges, for the topping
red currents and raspberries, for the topping, a handful
icing sugar, for the topping, in case you don't double the ricotta to also use it for the topping
Preheat the oven to 190°C / 375°F (conventional setting). Butter a 20.5cm / 8″ springform pan and line it with parchment paper.
For the ricotta filling, in a medium bowl, whisk the ricotta, sugar, lemon zest, and vanilla seeds until creamy and transfer to the fridge.
For the sponge cake, in a large bowl of a stand mixer fitted with a whisk attachment, whisk the egg white and salt for 1 minute. Add half the sugar (75g) and continue whisking for about 7 minutes or until very stiff and glossy.
In a clean bowl, using a stand mixer, beat the eggs yolks, the remaining sugar, lemon zest, and vanilla seeds for about 2 minutes or until light yellow and creamy.
Gently fold the stiff egg white into the egg yolk mixture, it should be almost combined. Then fold in the sieved flour, stir gently until relatively smooth and combined. Don't overmix it and don't worry if there are a few smaller pieces of egg white left here and there, however, there shouldn't be any flour left.
Scrape the batter into the lined springform pan and even out the surface a little. Bake for about 20-23 minutes or until light golden and spongy. Check with a skewer, it should come out clean. Let the sponge cake cool in the springform pan for about 10 minutes before you take it out and transfer it to a cooling rack. Remove the parchment paper from the cake; let it cool completely before you cut the sponge cake and assemble the torte.
When the cake is completely cool, using a sharp large knife, cut the cake in half horizontally. Spread the cold ricotta filling on the bottom half of the cake (if you doubled the amount of the filling, only use half the ricotta). Spread the thinner peach wedges in circles on top of the ricotta and gently push them into the filling. Lay the top of the sponge cake on top of the peaches. Either dust with icing sugar or, if you doubled the ricotta, spread the remaining ricotta filling on top of the cake. Decorate with the thicker peach wedges, raspberries, and red currants.
Serve immediately or keep the torte in the fridge, it tastes best on the first and second day. Take the torte out of the fridge about 10-15 minutes before serving and dust with additional icing sugar, if necessary.


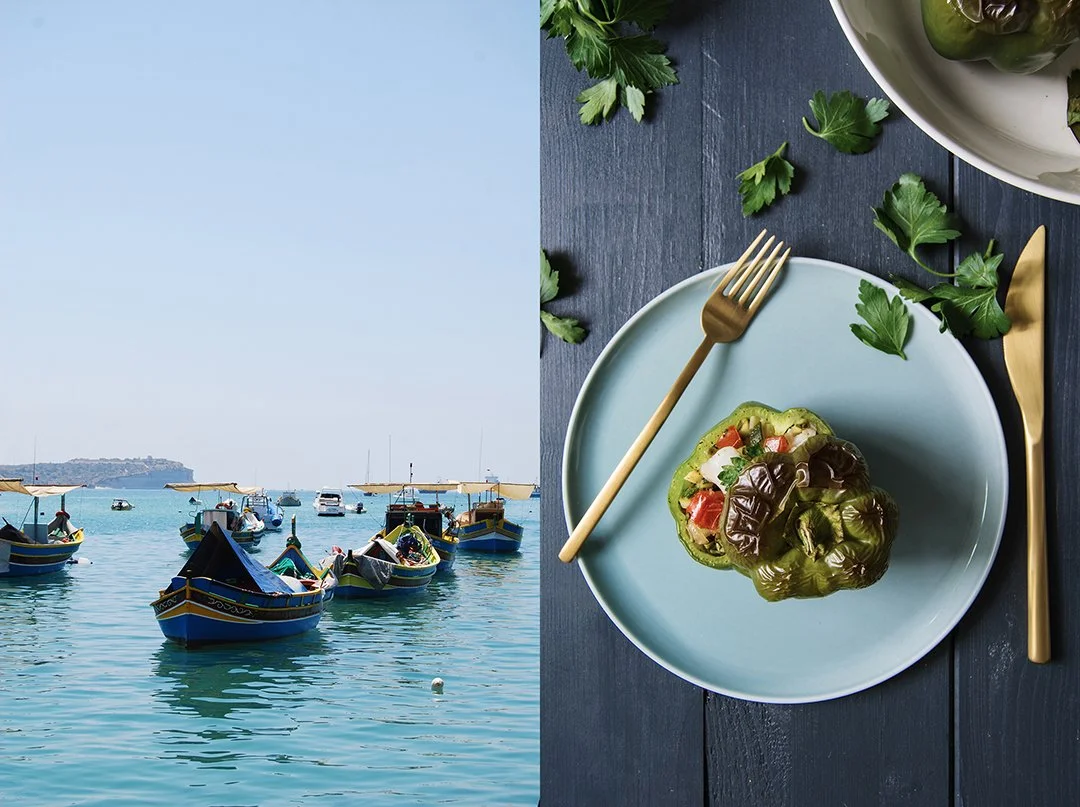
Maltese Stuffed Bell Peppers from my cookbook & a short trip to Malta
Old cities and beaches, seafood and wine! When Condé Nast Traveler asked me to take over their Instagram Stories last weekend and share some of my favourite spots in Malta, I immediately booked the flights. There's no way I would miss a chance to visit my second home!
I'm in the Mediterranean for just a few days at the moment, but it's enough time to visit my personal hot spots. An early morning boat ride starting in Sliema took me to Valletta to enjoy my first espresso of the day at the beautifully old fashioned Prego Caffe on the capital's narrow South Street. It's a beloved morning ritual of many locals, nibbling on buttery breakfast pastizzi filled with ricotta surrounded by the café's original 60's decor. A quick visit to the Baroque Saint Francis of Assisi Church (1607) and then I strolled through the streets - one of the most relaxing things I can imagine. If it had been a Sunday, I would have gone to St. John's Co-Cathedral's early morning mass, which is held in Latin accompanied by the most heavenly sounding choir.
On the way to my next destination, Casa Rocca Piccola, I stopped by at the peaceful Lower Barakka Gardens. This place always manages to overwhelm me with its stunning views over The Grand Harbour and The Three Cities - and its almost meditative atmosphere. Frances de Piro was so kind to show me around the 400 year old private Valletta palace Casa Rocca Piccola, where she lives together with her husband, the 9th Marquis de Piro who's a Knight of Malta, and their family. Many of the private rooms can be visited during guided tours and are a must see for everybody who loves art, history, and architecture.
My man joined me for lunch, which turned into a little feast at Scoglitti right at the sea at the Marsamxett Harbour facing Sliema. Pasta with Maltese prawns, swordfish from the grill, and a bottle of Meridiana Wine Estate's fruity white. Maltese Mqaret filled with dates for dessert and we were ready for a nap. Only the thought of an afternoon swim in Malta's deep blue waters could stop us from having a siesta. We chose the secluded Delimara bay, limestone rocks and crystal-clear turquoise sea are the best conditions for a good snorkeling trip.
My perfect day in Malta wouldn't be complete without having dinner at Legligin, my favourite restaurant in Valletta offering the most delicious Maltese tapas cooked by our friend Chris. And if it's a Friday night, you can stroll over to Bridge Bar for their weekly open air Jazz concerts. Sitting on red cushions on the capital's ancient stairs in front of the bar, sipping on a glass of pastis, and listening to good music make me ask myself why I should ever leave the Mediterranean (sorry Berlin).
As part of the Instagram takeover, I also shared a recipe from my Eat In My Kitchen cookbook on Condé Nast Traveler's website. It's a Maltese classic: stuffed bell peppers. Stuffed vegetables are a staple in every Maltese home. Tomato, zucchini, eggplant, pepper are filled with meat, seafood, or other vegetables and turned into the coziest treat to please a large Mediterranean family's appetite. In my version, which you can find below, I go for green peppers cooked al dente - I don't like them too soft and soggy - stuffed with white fish like cod, tiny zucchini cubes, tomatoes, and parsley refined with a shot of vermouth.
If you can't travel at the moment, just cook a dish that reminds you of your favourite holiday spot, close your eyes, and you'll almost be there.


Maltese Stuffed Bell Peppers with Cod, Tomatoes, and Zucchini
from Eat In My Kitchen, To cook, to bake, to eat, and to treat
Serves 4
4 to 5 medium green bell peppers
Olive oil
1 ½ tablespoons butter
510g / 18 ounces cod fillet (or any firm, white fish, such as monkfish or grouper), preferably 1 thick center piece
Fine sea salt
Ground pepper
1 medium onion, finely chopped
1 large clove garlic, crushed
340g / 12 ounces zucchini, cut into very small cubes
60ml / ¼ cup dry white vermouth, like Noilly Prat, or dry white wine
1 medium tomato, cut into small cubes
3 tablespoons chopped flat-leaf parsley leaves, plus 1 to 2 tablespoons for garnish
Preheat the oven to 220°C / 425°F.
Cut the tops off the peppers. Scrape out and discard the seeds and fibers, then rinse the peppers and set aside.
In a heavy pan, large enough to fit the fish, heat a generous splash of olive oil and the butter over medium-high heat. Sear the fish, turning once, for 1 to 3 minutes per side or until golden and flaky—mind that you don’t overcook it. Remove from the heat, break the fish into chunks, and season to taste with salt and pepper.
In a large, heavy pan, heat a splash of olive oil over medium-high heat. Add the onion and sauté for 2 to 3 minutes or until soft and golden. Add the garlic and sauté for 1 minute. Pour in a little more olive oil, add the zucchini, and season to taste with salt and pepper. Sauté for about 4 minutes or until soft. Add the vermouth and cook, stirring and letting the alcohol burn off, for about 10 seconds. Take the pan off the heat, stir in the tomato and parsley, and season to taste with salt and pepper.
To combine the filling, spread half the zucchini-tomato mixture on a large plate, lay the fish on top, and finish with the remaining vegetables. Adjust the seasoning if necessary.
Season the inside of the bell peppers with salt and pepper. Using a large spoon, generously stuff the peppers with the zucchini-cod mixture without pushing on the filling too much. If you have leftover filling, stuff the fifth bell pepper. Place the tops on the peppers and place them in a baking dish. Add a splash of water to cover the bottom of the dish and bake for about 25 minutes or until the bell peppers are al dente and the tops turn dark. Take the peppers out of the oven, sprinkle with more parsley, and serve warm.


A Summery Berry and Bacon Panzanella with Rosemary
A Tuscan Panzanella salad had been on my mind for weeks, I could clearly picture the colourful composition: Dark red cherries, crunchy bacon, crisp arugula (rucola), and chunks of spongy ciabatta dripping with olive oil and thick Balsamico vinegar and then sprinkled with woody rosemary. I was just waiting for the fruits to arrive at my Turkish vegetable shop around the corner.
Unfortunately, the day I planned to throw the salad together, my trusted vegetable man didn't have cherries and - what worried me even more - the weather was dull and grey. The first problem was easily solved, I replaced sweet cherries with even juicier strawberries, blueberries, and figs, which made the whole thing even more mushy and luscious. It tasted great, but the soggy look made it rather difficult to catch a pretty picture. Even more so as they just put scaffolding in front of my kitchen window, which means the light situation in this room is far from ideal.
In these moments I always know why I love food so much and why photography, sometimes, drives me crazy. Food either tastes good or it doesn't, of course it should look appetizing, but I believe what tastes good also looks good. But photography has its own rules and mysteries, to be able to capture a dish's yumminess in a picture, the conditions need to be right, especially the light. So please, when you look at the pictures in today's post, think of summery-sweet fruit juices, porky saltiness crisped in the pan, the freshness of green leaves, and the confidence of Mediterranean rosemary. Buon appetito!

Berry and Bacon Panzanella with Rosemary
Serves 2-4
For the dressing
olive oil 3 tablespoons
balsamic vinegar 1 tablespoon
white balsamic vinegar 1 tablespoon
fresh rosemary, very finely chopped, about 2 teaspoons
fine sea salt
ground pepper
For the Panzanella
olive oil
bacon 4 slices
arugula (rucola) or mixed lettuce leaves, torn, a large handful
ciabatta or rustic white loaf, cut into chunks, 2 large handfuls
strawberries, cut in half, a handful
blueberries, a handful
figs, quartered, 2
For the dressing, whisk all the ingredients together and season to taste with salt and pepper.
For the Panzanella, heat a small splash of olive oil in a heavy pan over medium-high heat. Add the bacon and cook for a few minutes on both sides until crispy and golden brown. Take the bacon out of the pan, let it cool for a few minutes, and break into large pieces.
In a large bowl, spread the greens and lay the chunks of bread on top. Arrange the fruits and bacon on top of the bread and pour the dressing all over the Panzanella. Serve immediately, preferably for lunch, accompanied by a glass of white or rosé wine, and think of your next holiday.


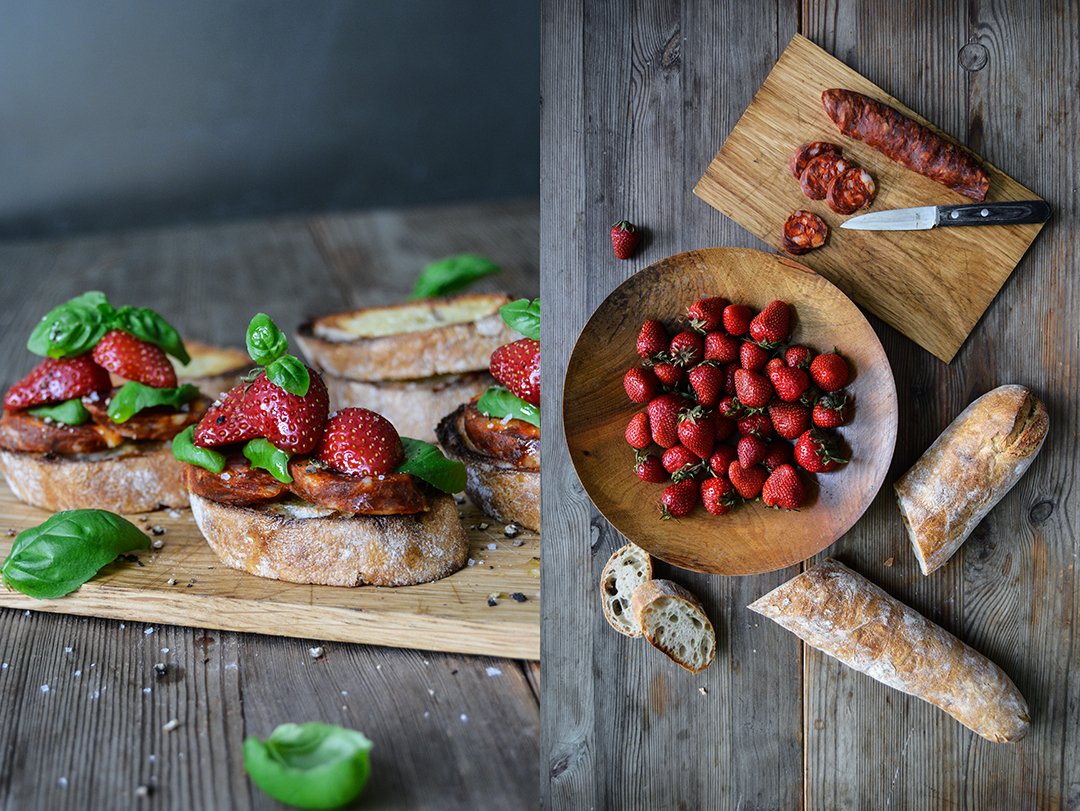
Chorizo and Strawberry Bruschetta with Basil
I found a new duo that comes close to perfection: chorizo and strawberry. It's an unexpected match, the fruity sweetness and slightly hot, porky sausage merge beautifully, as if they had just been waiting to meet.
It started as a quick snack while we were cooking, we filled our glasses with our favourite summer wine and looked in the fridge to see what we could nibble on while chopping and stirring the ingredients for our dinner. The red sausage and berries caught my man's attention and - in these moments he's a little more brave than me - he sandwiched them and stuffed a rather large portion of it in my mouth. We immediately discussed what we could do with this new find. A salad? I'm not a big fan of meat in my salad. Pasta? I don't like the combination of pasta and strawberries. I tried it, but it just tastes wrong. An open sandwich seemed like the right answer, a golden Italian bruschetta drizzled with good olive oil, crowned with thick slices of the peppery salami and juicy berries. Some fresh basil, salt, and pepper, and you have the perfect snack for summer on your plate.

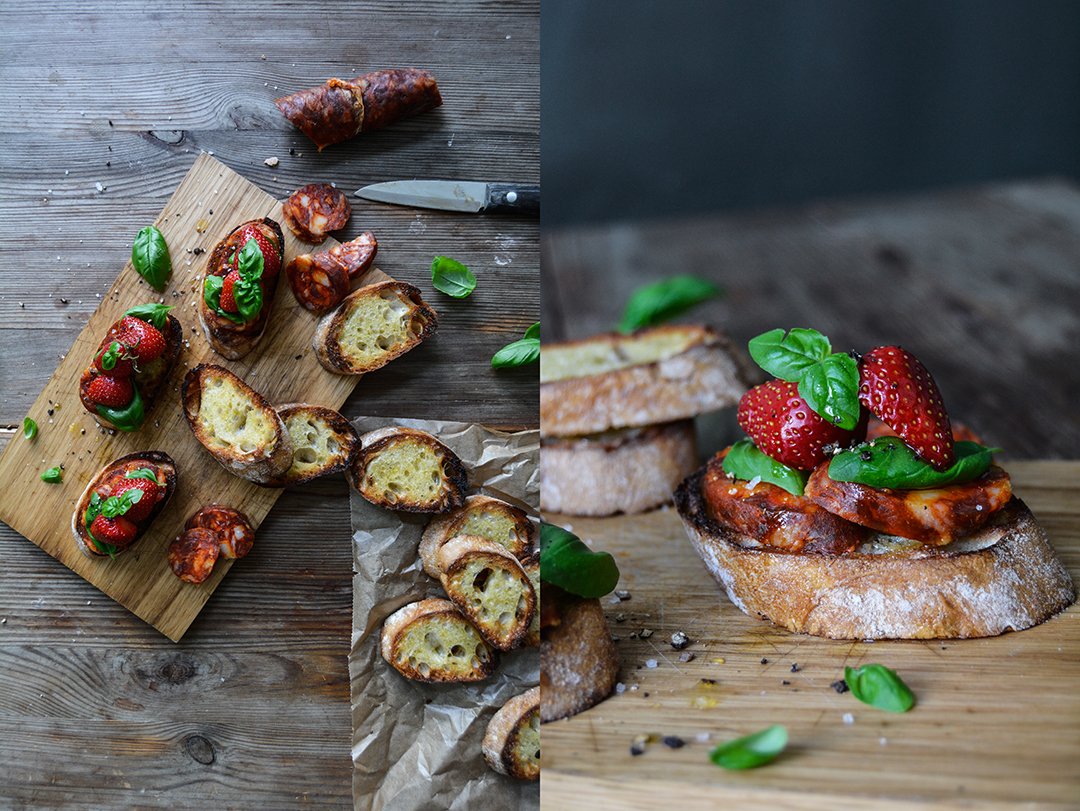
Chorizo and Strawberry Bruschetta with Basil
Serves 2-4
medium baguette, sliced, 1
olive oil
chorizo (salami, not fresh chorizo sausage) 1/2 ring, about 150g / 5 ounces
ripe strawberries, cut in half, about 18
fresh basil leaves, a small handful
peppercorns, crushed in a mortar
flaky sea salt
To roast the bread, set the oven to broil (grill). If your oven doesn't have a broil setting, toast the baguette in a hot cast iron pan.Brush the baguette on both sides with olive oil and, if using your oven, spread them on a baking sheet and roast for 1-2 minutes on each side or until golden brown, but not burnt. If you use a pan, in batches, spread the bread in the pan and toast on both sides until golden.
Depending on the size of your bread, pile up 2 slices of chorizo and 2-3 strawberry halves on each bruschetta. Drizzle with a little olive oil and sprinkle with basil, crushed pepper, and salt. Enjoy!


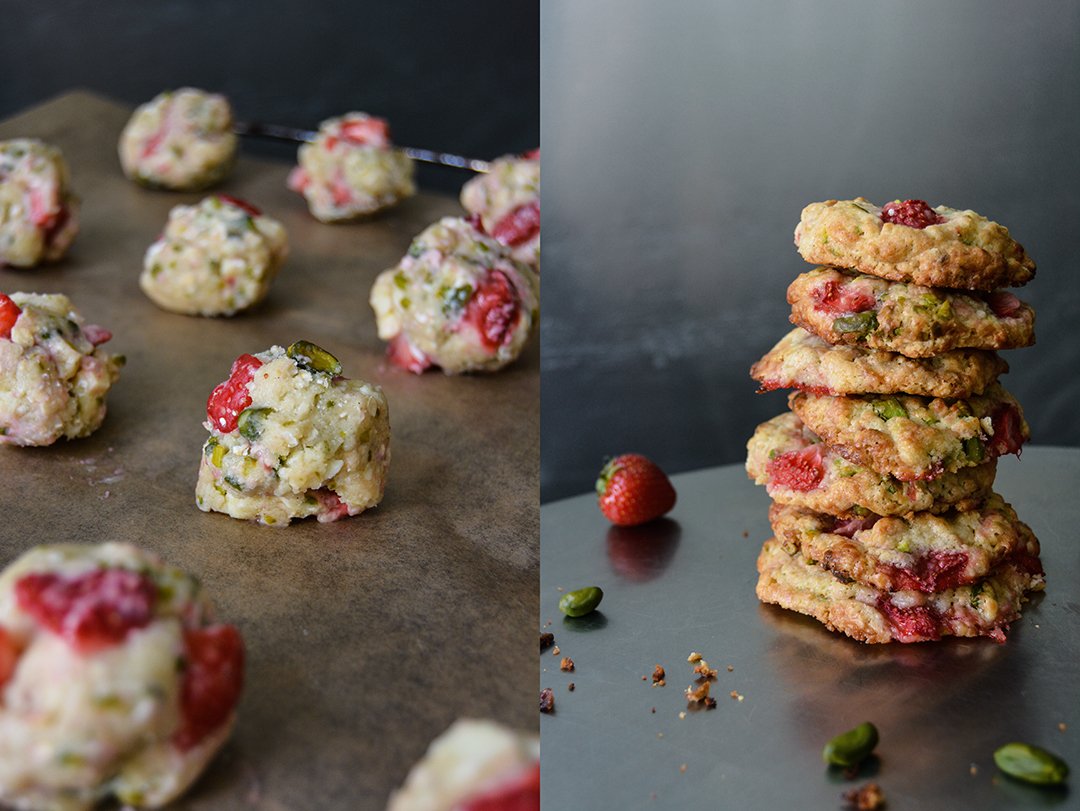
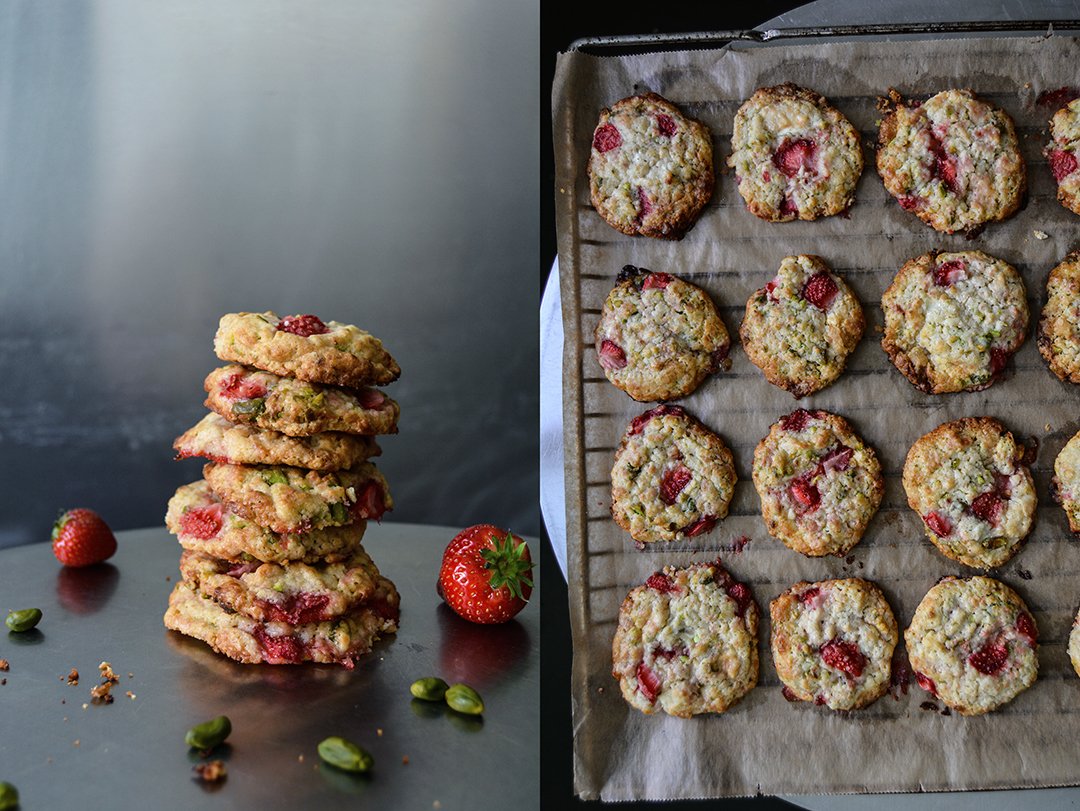
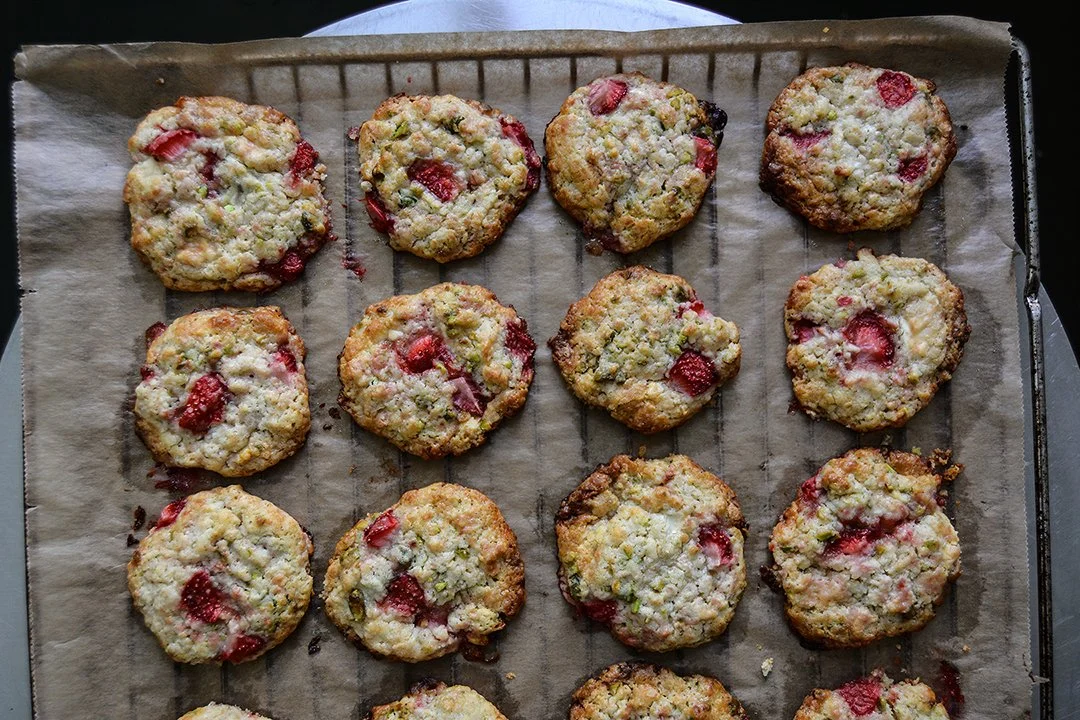
Strawberry Pistachio Cookies with Oats and White Chocolate
This spring feels strange, it doesn't seem to start. Most of the time it's either too cold, too grey, or too wet, I'm more in the mood for cozy stews and hearty pies munched away on the sofa than the springy treats that I usually crave in May.
I'm impatient (not just in the kitchen), I tend to rush to the next season with hungry excitement. I find it hard to wait for the right ingredients to appear at the farmers' market for all the dishes that I already picture in my head. So, I guess I should be thankful for the unpleasant weather, it helps me to stick to the actual season - spring with a wintery touch. Unfortunately, the unusual frosty temperatures at night are a tough burden for the farmers. Their produce suffers, which narrows their harvest dramatically. The white German asparagus that I tasted wasn't as thick and tasty as in the past years, strawberries - by far - aren't as sweet. It reminds me that we're in nature's hands. It's an important reminder, showing us that we live in a fragile system that we easily tend to forget about.
Although I'm not too impressed by the strawberries' taste, they are totally fine in a cookie. Accompanied by nutty pistachios, smooth white chocolate, and a handful of oats, I turned them into the best cookies that my kitchen has seen in a while. They are sweet, soft, and so addictive. Have a bite, close your eyes and you can feel summer.


Strawberry Pistachio Cookies with Oats and White Chocolate
Makes about 20 cookies
plain flour 200g / 1 1/2 cups
rolled oats 50g / 1/2 cup
fine sea salt 1/2 teaspoon
baking powder 1 teaspoon
butter (soft) 130g / 1/2 cup
granulated sugar 150g / 3/4 cup
vanilla pod, scraped, 1/4
organic egg 1
white chocolate, roughly chopped, 100g / 3 1/2 ounces
unsalted shelled pistachios, roughly chopped, a small handful
fresh strawberries, ripe but not soft, cut into small pieces, 100g / 3 1/2 ounces
Set the oven to 175°C / 350°F (preferably convection oven) and line 2 baking sheets with parchment paper.
Take 1 heaped tablespoon off the flour and set aside.
In a medium bowl, combine the remaining flour, oats, salt, and baking powder.
In the bowl of a stand mixer, fitted with the whisk attachment, beat the butter, sugar, vanilla, and egg for a few minutes or until fluffy. Add the egg and continue mixing for about 1 minute until well combined. Using a wooden spoon, stir in the flour mixture until just combined. Fold in the white chocolate and pistachios.
This will make it easier to mix in the strawberries: Sprinkle and mix the strawberries with the heaped tablespoon of flour. Crumble and spread the dough on a baking sheet. Spread the floured strawberries on top of the dough and, using your fingers, gently (!) fold in the berries. Don't worry if it looks loose and messy, mind not to squeeze the berries too much. Scoop out a heaped tablespoon of dough for each cookie and gentle form a ball slightly smaller than a golf ball. Spread the dough balls on a dish that's safe to keep in the freezer, then put the cookies in the freezer for 10-15 minutes or until hard but not frozen. Spread the cookies on the 2 lined baking sheets, mind to leave enough space between the cookies, they will expand in the oven.
Bake, one baking sheet at a time, for about 13-15 minutes or until golden but still slightly soft. After 5 minutes, using a fork, flatten the cookies softly. Let them cool on the baking sheet for a few minutes before you transfer them onto a wire rack.


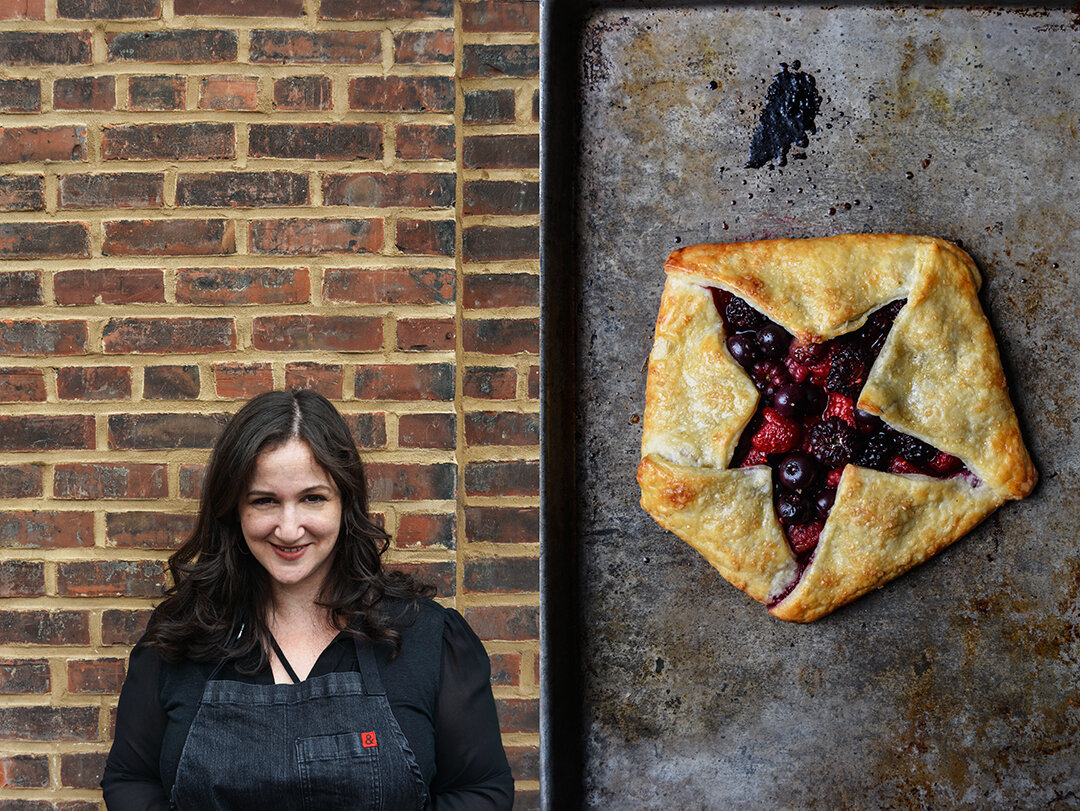
Meet In Your Kitchen | Deb Perelman - Smitten Kitchen's Berry Ricotta Galette

Last week I went to New York and I had three wishes on my mind:
1. I wanted to win the James Beard Award (I had strong doubts that that would happen).
2. I wanted to eat oysters at The John Dory.
3. I was hoping that Deb Perelman would open the doors to her famous Smitten Kitchen for a Meet In Your Kitchen feature.
And what can I say, I was a lucky girl. I won the award, I had a fantastic pre-award oyster treat just for myself (if you like oysters, book a table at April's restaurant next time you visit NYC!) - and I met and baked together with Deb!
Smitten Kitchen was the only blog I knew about when I started Eat In My Kitchen in November 2013. I discovered many more in the past three years, but not many managed to keep my attention with such persistence as Deb's. She knows how to entertain, impress, and inspire me with calm ease. Her love for food jumps out of all of her recipes, out of every picture she takes and every line she writes. She's a perfectionist, but she knows how to hide it. She's a charmer.

Deb's blog is a staple in the blog world. She started in 2003 writing about her life in general and focussing on recipes since 2006. When you ask yourself how a single person can build up such a successful food platform on her own and keep it running like a smooth motor, you just have to meet her and you'll know why. Deb is full of life and energy, at the same time down to earth and humble. She's not interested in the blunt surface, in superficial attention, she wants to explore a recipe in depth and present it in all its glory. And here lies her secret: all her recipes make sense, from a cook (or baker) and an eater's point of you. She calls herself a fussy eater, picky like her children, she doesn't mind baking the same cake 14 times until it's just right. This leads to a habit of excessive note taking whenever she's at the cooker. To learn, to improve, and to develop the right formula that she and her readers can totally trust. This trust is what a food blog is built on. Mrs. Perelman takes this task quite easily as she loves what she does, she only cooks the food that she craves herself and that she's curious about. She's like a passionate scientist, working late at night, while everyone else is already in bed, and she's still there, solving culinary problems.
Her journey into and in the kitchen was influenced by her work at a bakery as a teenage girl, by her family with roots in Germany and Russia, Jewish baking, and American cooking. Her mother's cookbook by Julia Child added some French extravagance to the palate and sparked her interest. When you read Deb's blog, you can see that she has a weak spot for comfort food. She might be a fussy eater but she's not into fussy cooking.
After hundreds of recipes developed by herself and shared online, it was time, in 2012, to turn this treasure into a physical publication. When Deb's first cookbook - The Smitten Kitchen Cookbook: Recipes and Wisdom from an Obsessive Home Cook - entered the book shops, it happened anything but quietly. It was a success that screamed for a follow up book. A second child (the cutest baby girl!) and obsessive recipe tasting caused a few delays in the schedule, however, Deb's confident that it's going to happen this year. Her new book will come out soon, including more global influences than in the predecessor's recipes. It's a collection that represents how we cook and eat today. Different cultures from all over the world inspired Deb to experiment with ingredients that are relatively new to our kitchens. The frame, however, is Deb, her style, and her love for American comfort cooking.
We baked the most wonderful berry ricotta galette together, it tasted divine, and the fact that Deb baked it for me made it taste even better.

Berry Ricotta Galette
Recipe by Deb Perelman / Smitten Kitchen
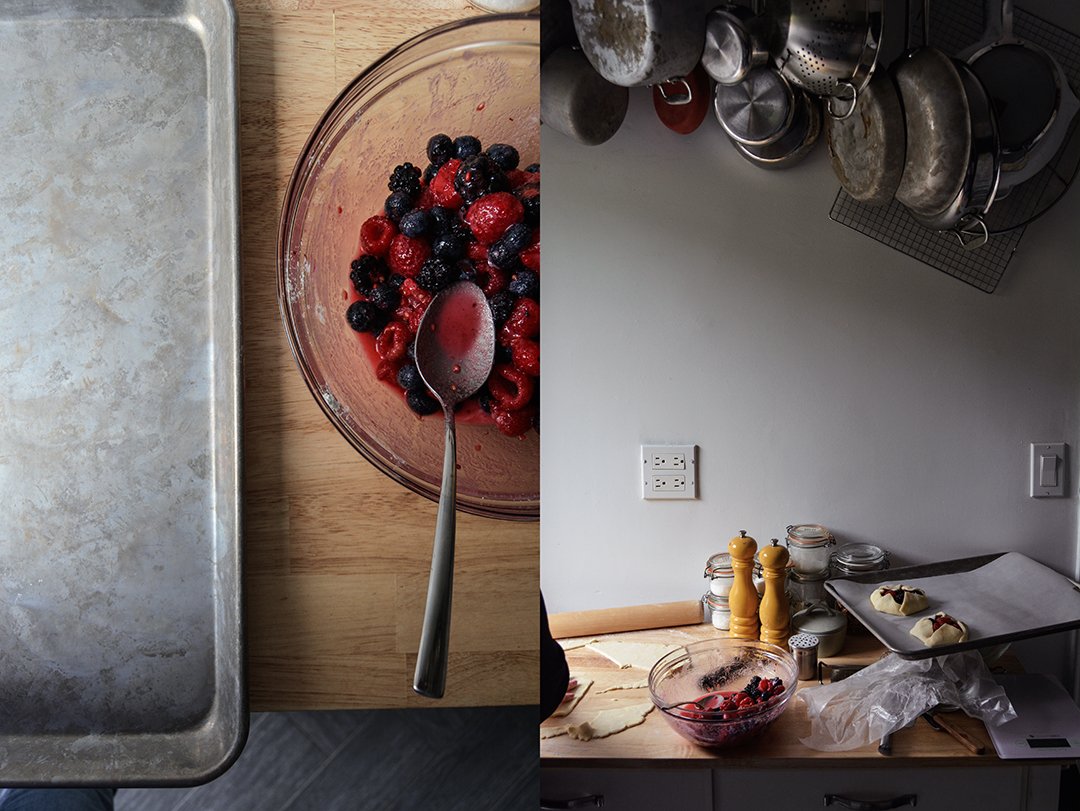
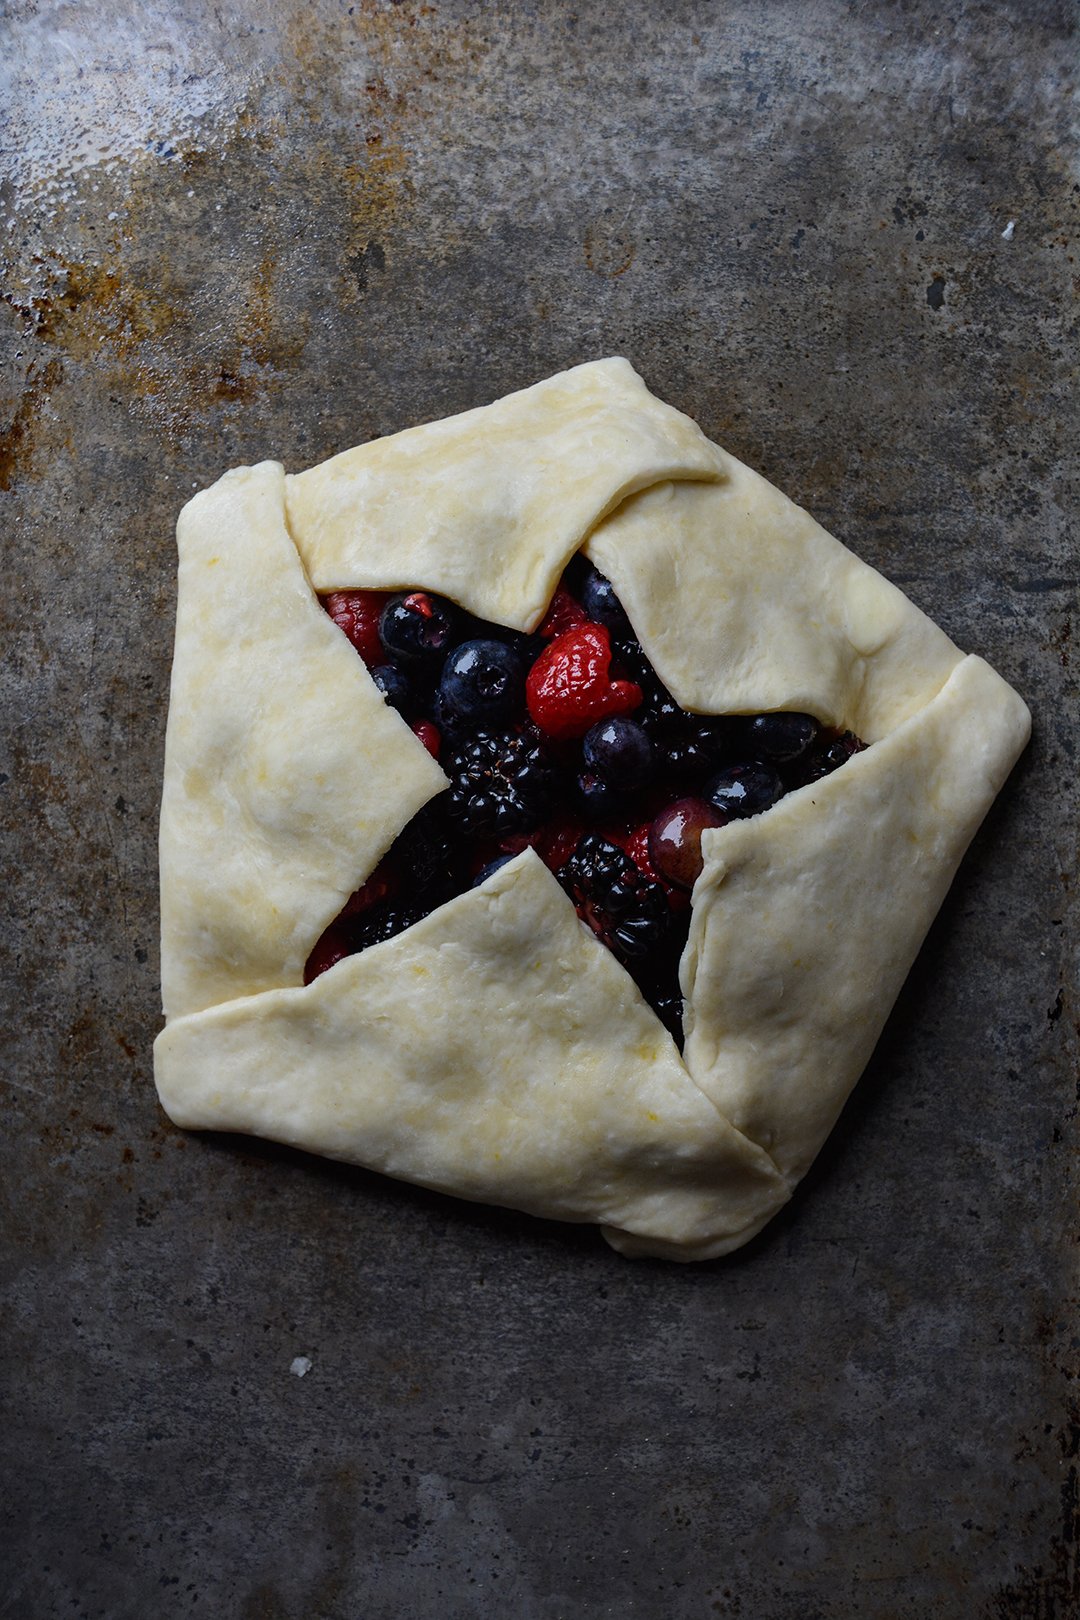
Deb also made a couple small galettes (as you can see in the picture above), but if you aim for the star-shape it's easier to make one large galette. The smaller ones opened in the oven.
Leakage is almost inevitable when making galettes but you shouldn’t sweat it because I’m convinced that it’s more distressing for the baker (who knows exactly how much jammy deliciousness has been lost) than anyone eating a wedge (it will taste like nothing is missing at all).
Here’s the PDF template I made to help you form a star shape, if desired. As should be abundantly evident, I’m no graphic designer, but it will hopefully give you a start.
Makes one 7.5 to 8-inch (19-20cm) galette
For the pastry
1 1/4 cups (160 grams) all-purpose flour
1/2 teaspoon table salt
1 1/2 teaspoons granulated sugar
Zest of half a lemon
8 tablespoons (4 ounces or 113 grams) cold unsalted butter, cut into pieces
1/4 cup (60g) ricotta, yogurt or sour cream
3 to 4 tablespoons cold water
For the filling
2 cups raspberries, blackberries, and blueberries
3 to 4 tablespoons granulated sugar (use the lower amount if your fruit is especially sweet)
2 tablespoons cornstarch
Juice of half a lemon
Pinch of salt
For the glaze
1 egg yolk beaten with 1 teaspoon water
1 heaped teaspoon turbinado or coarse sugar for sprinkling
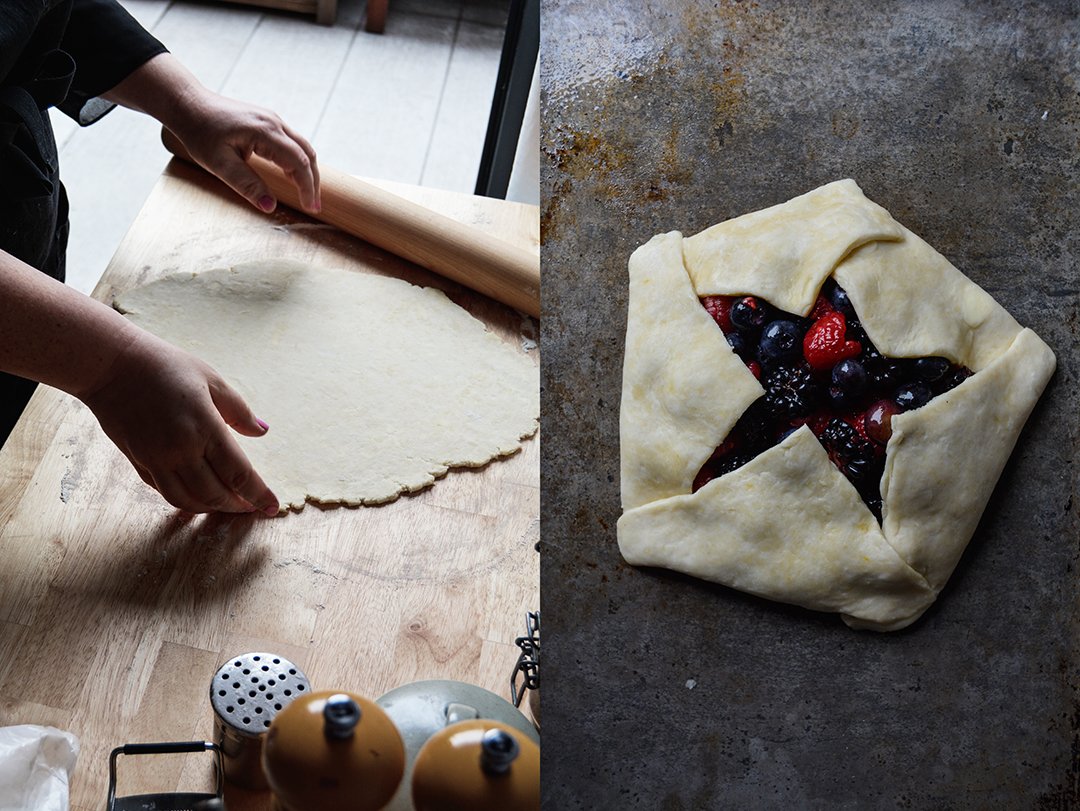
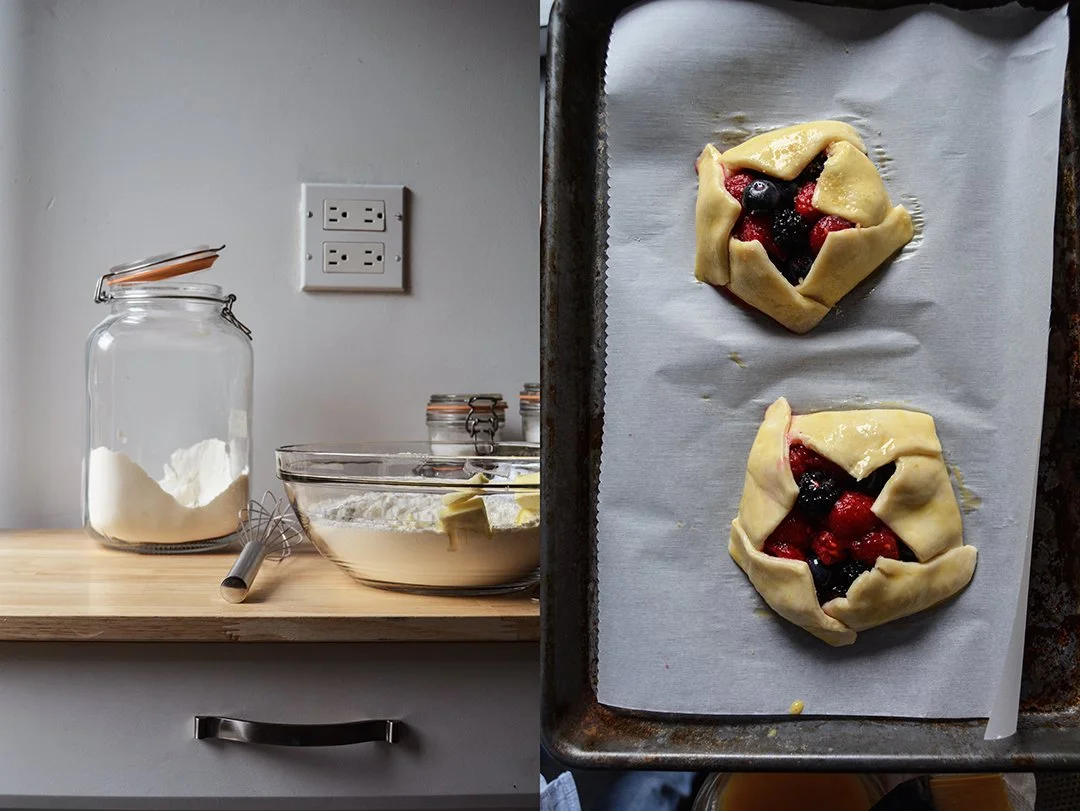
For the dough, whisk the flour, salt, sugar and zest together in the bottom of a large bowl. Work the butter into the flour with your fingertips or a pastry blender until mixture resembles a coarse meal and the largest bits of butter are the size of tiny peas. Stir ricotta and 3 tablespoons water together in a small dish and pour into butter-flour mixture. Stir together with a flexible spatula as best as you can, then use your hands to knead the mixture into a rough, craggy ball. Wrap in plastic and flatten into a disc. Chill in the fridge for 1 hour or up to 48 hours, or you can quick-firm this in the freezer for 15 minutes.
Preheat the oven to 400°F (200°C).
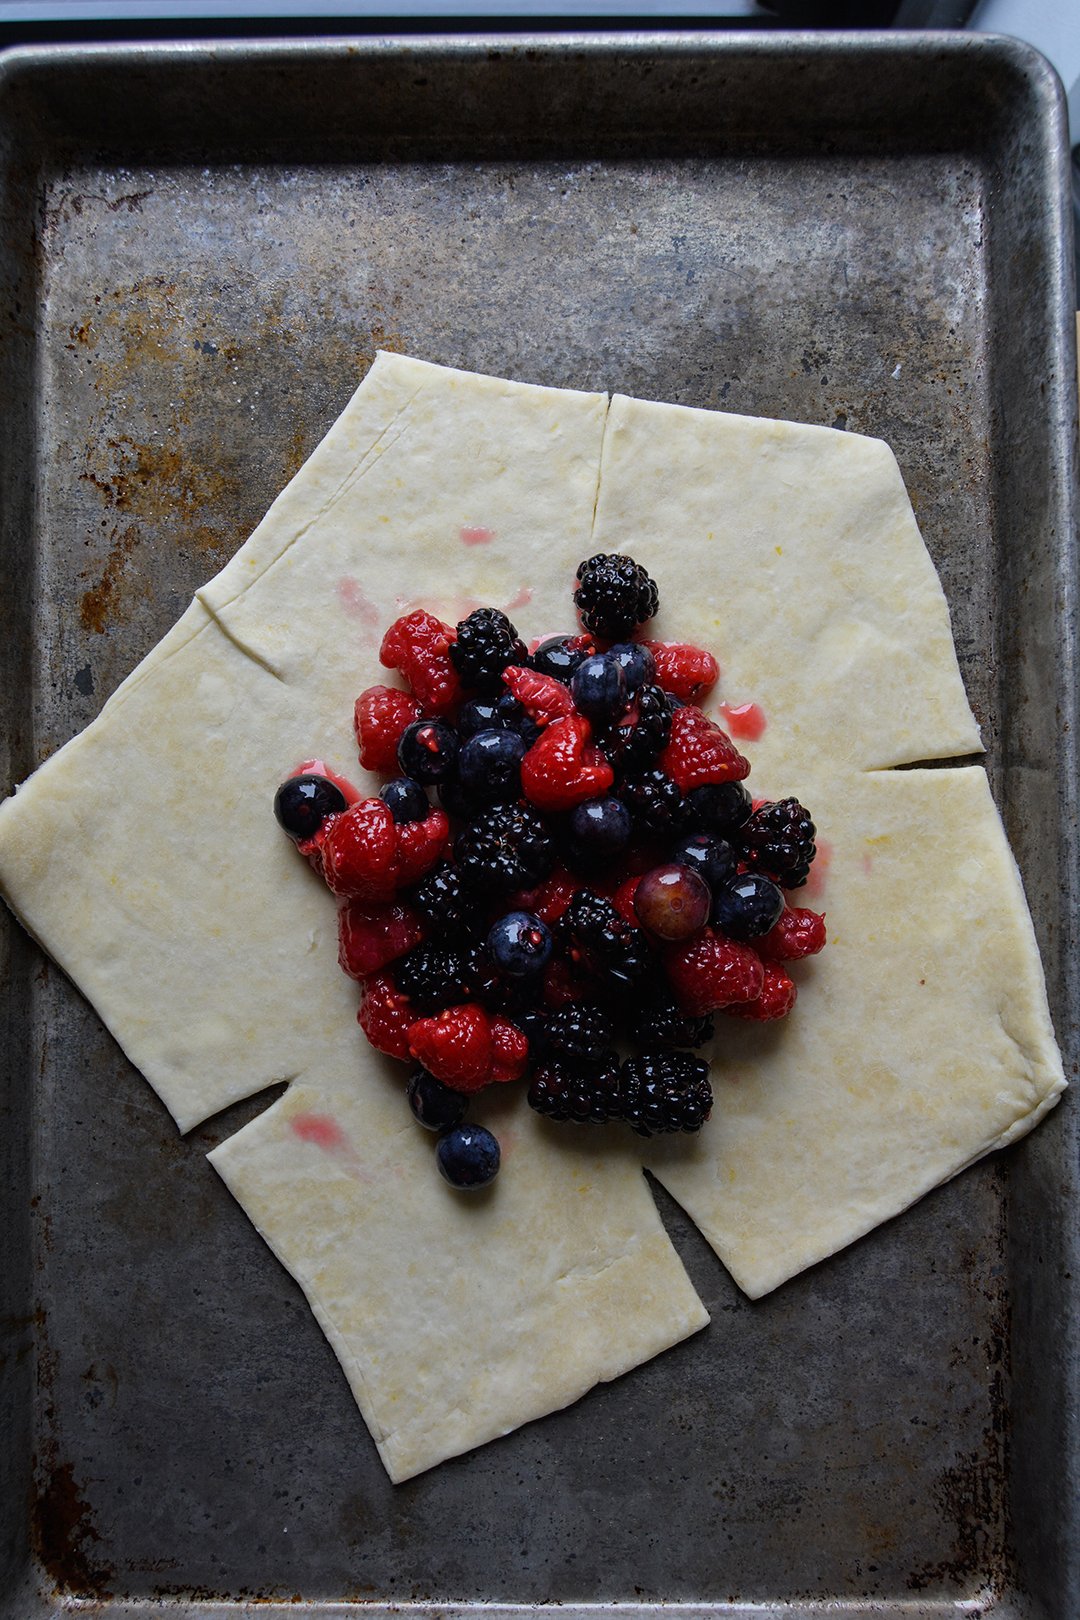
On a floured counter, roll the dough out into a large round-ish shape, about 14 to 15 inches (36-38cm) across. If you’d like to form your galette into a star, as shown, use the red dashed outline of the PDF template mentioned above. It will print smaller on an 8.5×11-inch (DIN A4) piece of paper than you need, but you can use it as a rough guide to cut as large of a pentagon shape as your dough will allow.
Transfer round or pentagon-shaped dough to a parchment-lined baking sheet; I like to fold my dough gently, without creasing, in quarters then unfold it onto the baking pan. If you’re making a star, cut a 1-inch (2.5cm) notch in the center of each side, angling it toward the center, as shown in the blue dashed lines of the template.
Stir together all of the filling ingredients and spread them in the center of the dough, leaving a 2-inch (5cm) border. If you’re making a round galette, fold the border over the filling, pleating the edge to make it fit. If you’re making a star shape, fold each of the 5 corners into the center, along the green dotted lines of the template. Pinch the outer corners closed, to seal in the filling and the shape (see 6th and 10th picture).
Whisk egg yolk and water together and brush over exposed crust. Sprinkle with coarse sugar.
Bake for 30 minutes, or golden all over. Remove from the oven and let stand for 5 minutes, then slide the galette onto a serving plate. Cut into wedges and serve hot, warm or at room temperature, preferably with vanilla ice cream.

The ever-growing number of Smitten Kitchen's followers has now trusted you for over a decade. What's your secret?
I have no idea how I got so lucky with this. When I got started food blogging in 2006, there was no such thing as turning it into a career so it wasn't even in the remotest corner of my mind. All I wanted to do was create a collection of recipes I considered perfect so once I got a dish the way I liked it, I didn't have to reinvent the wheel every time I was hungry for it. I still feel exactly this way. Having an audience makes it way more fun, but I often wonder if I'd still be doing this in a vacuum because I will always want to cook new things and get them right.
You call yourself a perfectionist, do you feel the drive to perfection just in the kitchen or also in other fields of life? Does the perfect recipe really exist, when do you know you have to stop?
I think near-perfect recipes exist. I don't think every recipe is going to work with every set of ingredients, in every kitchen, at every altitude, at all times but I think when the recipe is very strong, it withstands these variations well. If I think a small thing will throw a recipe immeasurably off though, I won't publish it because I've found in 10+ years of comments that if something can go wrong with a recipe, it sooner than later will for someone.As you've seen my fridge and freezer (since cleaned, but only under duress), I think you know my perfectionism does not extend everywhere in my life. But I do want things the way I want them and I hear from my parents I have been this way from the beginning (sorry guys).
Which of your recipes do you love the most? Which one does your husband and two kids love the most?
We all love the Leite's Consummate Chocolate Chip Cookie, especially now that I've updated them in a way that I can make them more often (I like to stash them in the freezer, bake whenever we remember). And not to be too much of a tease but because this is something I've been working endlessly on for the last couple years, there's a grandma-style chicken noodle soup and a crumb cake in my next cookbook that everyone is nuts for. They never go to waste.
Where do you find inspiration for new recipes?
Oddly, never inside the kitchen. The kitchen is where I test out ideas and pay close attention to what happens, but it's not where new ideas come to me. They come to me when I'm on a train or in a car going somewhere far enough that my mind wanders off, or at a restaurant when I like the flavor intersection of ingredients and want to apply it to something else at home.
How do your family's roots in Germany and Russia influence your cooking and your personal culinary journey?
From my husband's Russian family (he was born there but doesn't remember it), an appreciate of garlic, pickles, sour cream, dill, wafer-y cakes, syrniki (cottage cheese pancakes), as well as the value of a freezer full of pelmeni, vareniki (filled dumplings), and at least one bottle of vodka. From my mom's German side, spaetzle, schnitzel, bretzel, Bienenstich (popular German cake), and every type of almond paste/marzipan confection you can dream up.
What do you enjoy about writing a cookbook and what do you hate about this project? Do you prefer working on your blog or on a book?
I love both for different reasons; the blog is my favorite place to be, to try out ideas, chat with people in the comments, field questions and more. The speed of output and feedback is faster, it lends itself well to cooking whims and streaks; it makes me very happy. Books are less balanced. You spend years (5 years, even!) working through recipes and ideas behind the scenes with an additional layer of design -- I don't know how your book experience was, but I seem to always go 20 rounds with the cover, 45 rounds with the title, 10 rounds with page layouts, and am making recipe swaps until the day I'm cut off, like being at a bar at 2am -- all to yield one (hopefully) wonderful thing that you hope people will want to take home and read and cook from but you have no idea and so, perhaps, the stress is also much greater. But so are the rewards (or is it relief?) should people be as excited about it as you were. I loved getting to book tour last time, and hope to do more this fall.
You have a large cookbook selection in your apartment, what makes a good cookbook in your eyes?
So many things. While I love, like anyone with eyes, looking at beautiful pictures, it's never made a just-okay cookbook a great one. What I love even more is feeling like I'm stepping into a story, a world, with recipes. I love a funny anecdote about how a recipe came to be or a small tidbit I wouldn't have known about a dish. I want the recipes to be airtight, even though I know how hard this is, but to me this is the baseline of a cookbook. And I'm always hoping to see something I hadn't seen before; to feel the creativity bursting from the page.
Do you enjoy being cooked for? On a special night, do you prefer to eat at home or dive into New York's vibrant food scene?
I love being cooked for! I love going out; we used to do it so freely before kids and I do miss it, it's just more complicated with noisy people with early bedtimes. I get so inspired going somewhere teeming with fresh ideas, and it makes me want to come home and cook immediately, so eating out fuels eating in.
Who is your biggest inspiration in the kitchen?
I've always enjoyed Julia Child's tenacity, Marion Cunningham's defense of home cooking against drudgery, and Gabrielle Hamilton's unapologetic embrace of her food vision.
When it comes to school events or a friend's party, do you get requests to bring a dish or are people shy to ask Deb from Smitten Kitchen to bring a birthday cake or sandwiches?
Absolutely not.
What was the first dish you cooked on your own, what is your first cooking memory?
Brownies, I think. Not very different from My Favorite Brownies on my site, but I'd forgotten to add the flour. They were a little burnt at the edges and very mushy in the middle and yes, we still ate them. They weren't even bad, but I never heard the end of it.
What are your favourite places to buy and enjoy food in New York?
Union Square Greenmarket for vegetables and fruit and everything; Murray's or Saxelby for cheese, Kalustyan's for spices and around-the-world ingredients, Buon Italia in Chelsea Market, mostly to load up on the Setaro pasta, Faicco's for spiral sausages for grilling weather, which are always a huge hit, can I go on and on? I could go on and on.
If you could choose one person to cook a meal for you, who and what would it be?
I think my kids should wake up early to make me pancakes this weekend for a change. (I am joking, of course. They are 1 and 7 and our apartment would be in ashes.)
You're going to have ten friends over for a spontaneous dinner, what will be on the table?
Spaghetti with clams or mussels and fries or assemble-your-own steak salads with a side of roasted potatoes.
Do you prefer to cook on your own or together with others?
Solo if I'm working on a new recipe or one I haven't ironed out yet, because I want to be able to pay attention and take notes and make tweaks. If I'm throwing together the above meal for 10 friends, they better be hanging out in the kitchen and drinking wine with me.
Which meals do you prefer, improvised or planned?
Improvised; I like the challenge.
Which meal would you never cook again?
Anything where I've ended up cooking things individually over a stove for many people; I have bad memories of making Fake Shack Burgers for 10 people (so much hamburger grease from head to toe when I was done) as well as an early brunch party where I made French toast for everyone as they trickled in.
Thank you Deb!


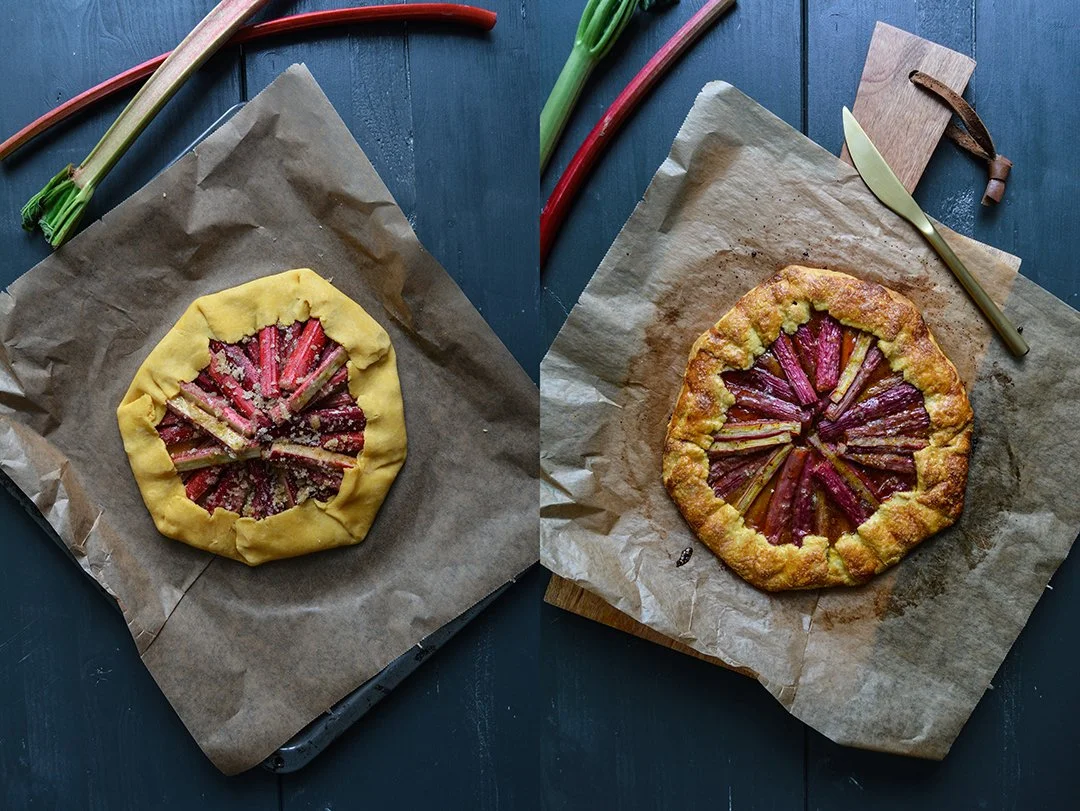
Rhubarb Corn Galette with Saffron & we won the James Beard Award!

Last Tuesday we won the James Beard Award. I flew to New York thinking that I had no chance of winning - Ina Garten was nominated in the same category as me: General Cooking. I was sure that this was not going to happen.
And now I’m sitting here at JFK airport, writing these words while waiting for my flight back to Berlin. Trying to think clearly, but I can’t. I wish there were words to describe how I feel, or at least give you a vague idea of what this means to me - but I can’t. It’s almost impossible to talk about a feeling that still shakes me up every time the memories come back and makes my heart fall as if I’m jumping of a cliff. It’s not just in my mind. I feel physically overwhelmed. Just like I did when I went on stage to fall around our host Andrew Zimmern’s neck, to kiss and squeeze him, and to receive the James Beard Foundation medal from his hands (watch my speech here).
When I say we won and not I won, you need to understand that this book, Eat In My Kitchen, would not exist without a bunch of people who gave me all the help, love, support, and inspiration I needed whenever I thought I wouldn’t manage. These people believed in me before I believed in myself, they were the ones who convinced me to trust and follow my instincts:
My editor Holly La Due who guided me through the past two years since we first spoke about a cookbook - and she held my hand in these endless painful seconds before my name was announced at the awards ceremony by legendary Andrew Zimmern; my mother who passed her love for food and wine on to me, the seed out of which Eat In My Kitchen grows every day; everybody at Prestel Publishing and our external experts Lauren Salkeld, Jan Derevjanik, and Ron Longe, who gave everything to make this book look as it looks and stand where it stands. And my family and friends all over the world, your belief in me makes me grow every day. Thank you for trusting me, and for waiting for me patiently.
When your work is recognized and awarded by one of the most critical juries in the food world, a jury who’s not interested in numbers or celebrity status, but in the quality of recipes, it can easily feel intimidating. But that rainy night at New York's Chelsea Piers was not intimidating at all, it was magical. I was in a room together with so many talented people who all love what I love so much - food - and I experienced the warmest welcome to this family (a word that winner Dori Greenspan used). There's a lot of respect, a humble appreciation of the work of the others. Ronni Lundy, Dori Greenspan, Andrew Zimern, Pierre Koffmann, Naomi Duguid, Judith Jones, Keith Pandolfi, Francis Lam and many more (here's the full list of winners), we were awarded for our work, and everybody who came to this event came to celebrate us, but also a passion that we share and that connects us, no matter what part of the world we come from. I want to thank the James Beard Foundation and all the inspiring people who I met that night, a night that I'll never forget in my whole life.
Knowing that I wouldn’t be able to cook or bake anything to share with you when I came back, I made a galette (twice actually because it’s so good) just a few days before I left. It’s a spring treat and it's quite a spectacular one. A crunchy short crust base made of corn flour and spelt flour (you can also use wheat), topped with sour rhubarb and the most fragrant saffron sugar. Cookbook author Yossy Arefi introduced me to this golden spice sugar and inspired me to use it for various sweet pies. Last summer I wrote about her berry galette and I will never forget how the addition of saffron to fruit and buttery crust hit me. It's a true celebration cake.
And now I want to thank you for always pushing me to try out new things in my kitchen, to keep cooking, baking, and writing about what we all love so much: Food!
Photos of the James Beard Award Ceremony by Kent Miller Studios, c/o the James Beard Foundation.


Rhubarb Corn Galette with Saffron Sugar
Update: This recipe is also in my 2nd book, 365: A Year of Everyday Cooking & Baking, Prestel Publishing, 2019
Mind that it's best to prepare the dough for the galette the day before you bake it to give it enough time to chill in the fridge.
Makes one 23cm / 9" galette.
For the pastry
very fine corn flour / corn meal (not corn starch) 90g / 1/2 cup
plain flour (or white spelt flour) 90g / 2/3 cup
granulated sugar 1 tablespoon
fine sea salt 1/4 teaspoon
unsalted butter, cold, 125g / 1/2 cup plus 1 tablespoon
water, cold, 2 tablespoons
cider vinegar 1 teaspoon
For the galette
granulated sugar 75g / 1/3 cup and 1 tablespoon, plus 1 teaspoon for the topping
vanilla bean, scraped, 1/2
saffron threads about 1/8 - 1/4 teaspoon
plain flour (or white spelt flour) 1 tablespoon
fine sea salt 1/8 teaspoon
trimmed rhubarb 280g / 10 ounces
freshly squeezed lemon juice 1 tablespoon
organic egg, beaten, 1
For the pastry, in the large bowl of a stand mixer fitted with the hook attachment, combine the corn flour, flour, sugar, and salt. Add the butter and use a knife to cut it into the flour until there are just small pieces left. Quickly rub the butter into the flour with your fingers until combined. Add the water and vinegar and, using the hooks of the stand mixer, mix until combined. Form the dough into a thick disc, wrap it in plastic wrap, and chill in the fridge overnight (or for a few hours) until hard, or freeze for about 20-30 minutes.
On a table or countertop, place the dough between 2 sheets of plastic wrap and use a rolling pin to roll it out into a 30cm / 12" circle. Pull off the top layer of plastic wrap and replace with a piece of parchment paper. Flip the pastry circle over, transfer to a wooden board, and pull off the remaining layer of plastic wrap. Store the pastry (on top of the wooden board) in the fridge while preparing the topping.
Using a mortar and pestle, grind the sugar, vanilla seeds, and saffron until the saffron is fine and the mixture is well combined. Stir in the flour and salt and set aside.
Cut the rhubarb into 10cm / 4" long pieces and quarter each piece lengthwise. In a large baking dish, using your hands, toss the rhubarb, saffron-sugar, and lemon juice.
Take the pastry out of the fridge and arrange the rhubarb, overlapping, in a circle on top of the dough, leave a 5cm / 2" rim all the way around the fruit (see 10th picture). Sprinkle with any remaining saffron-sugar. Fold the edges of the pastry over the ends of the rhubarb, press to seal the folds. Chill the galette in the fridge for about 10-15 minutes or until the pastry is firm.
Preheat the oven to 200°C / 400°F (conventional setting). Place a baking sheet in the middle of the oven while preheating.
Brush the pastry with the egg wash and sprinkle with 1 teaspoon of sugar. Take the hot baking sheet out of the oven and pull the galette with the parchment paper onto the baking sheet. Bake for about 30 minutes or until golden brown. Let the galette cool for about 10 minutes before cutting. Serve warm or cold.


Nominee - Winner:


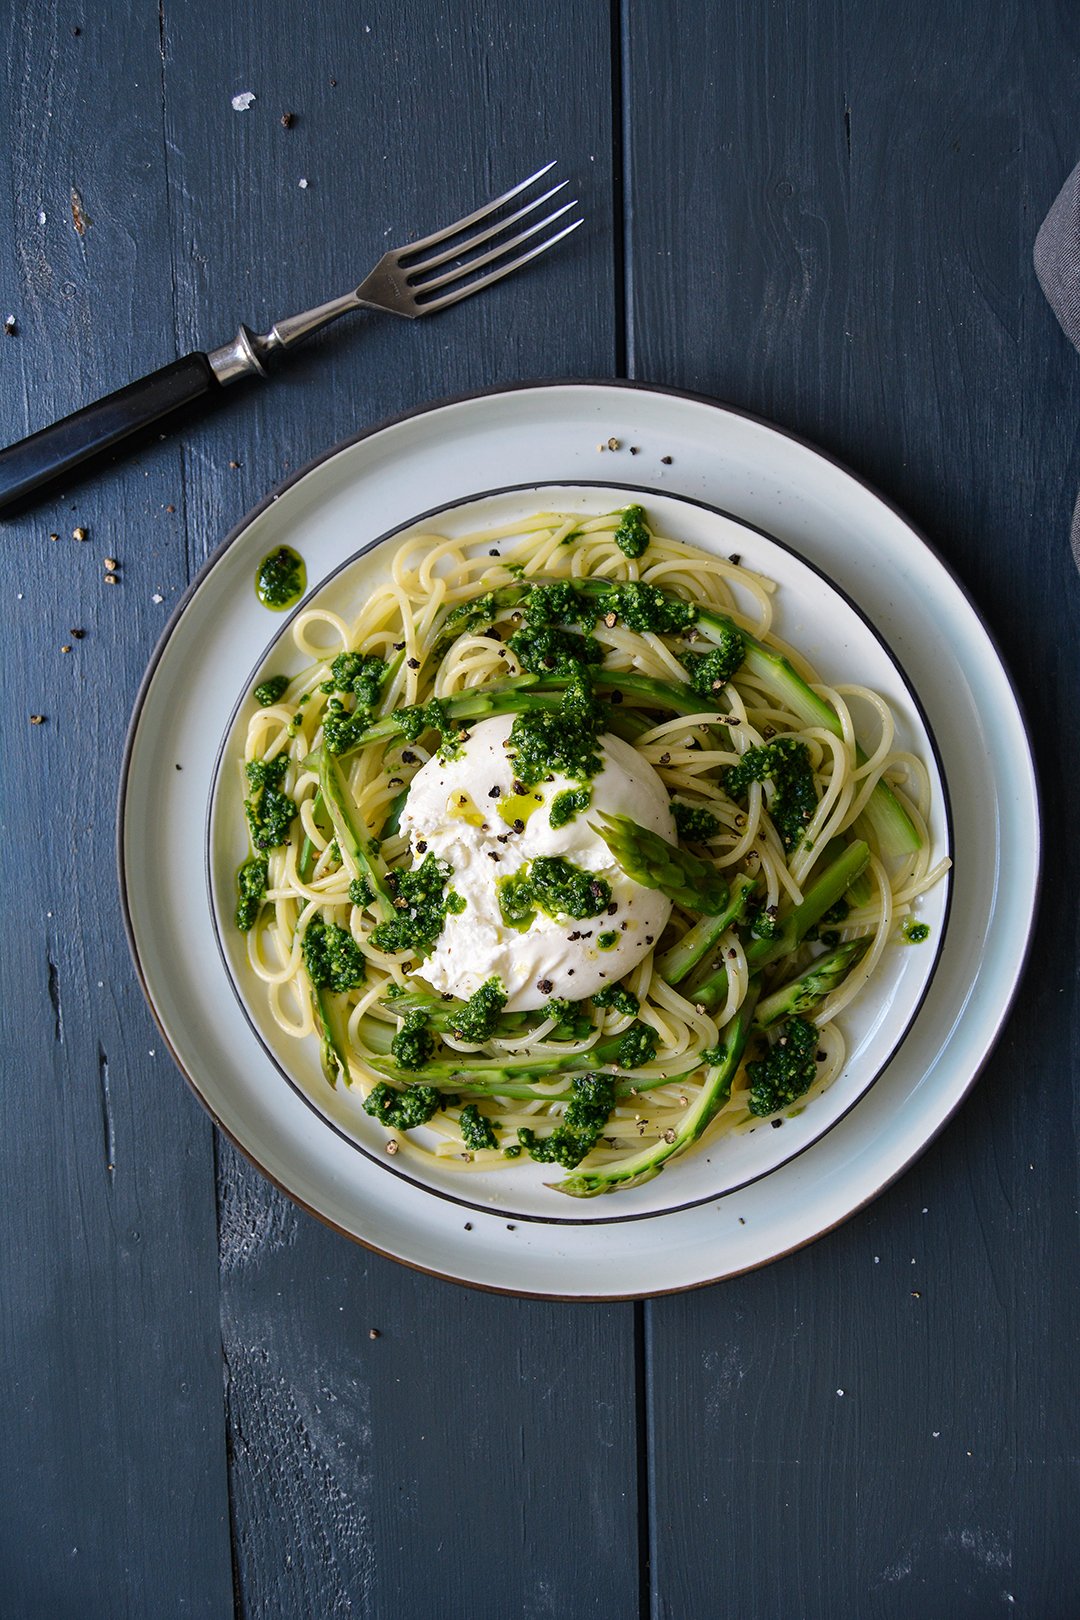
Spaghetti with Asparagus, Burrata and Ramp Pesto
I think spring is my favourite season - until I feel the same in summer, autumn, or winter, depending on my mood. Spring offers a lot of drama and surprises. The changeover from the cold season is so drastic, so abrupt. There's so much energy around and inside me all of a sudden without even knowing where it's coming from. The temperature rises, nature's sprouting and flourishing at every corner, adding colour to a scene that was brown and grey only a few weeks ago. I welcome these changes with gushing excitement and open the doors to my kitchen for all those greens that are soon to come to my cooking space.
In the past couple weeks, the fragile leaves of fragrant ramps brought Mediterranean pesto back to our table. And crisp asparagus is next. The official harvest start of the white asparagus from Beelitz happened last week, so let the feasting begin! When I eat the white stalks, I'm quite a traditionalist. Young potatoes, ham, and Hollandaise sauce is all I need. But when it comes to green asparagus, I become more experimental.
This little lunch was as simple as it was stunning: I added the green stalks, boiled and very thinly sliced, to a plate of warm spaghetti, burrata (mozzarella di Bufala would also work), and ramp pesto. You could also go for a basil or arugula (rucola) pesto, but I enjoyed the subtle oniony flavour in my green creation. In case you disagree, you'll find the links to all three pesto recipes below. Buon Appetito!

Spaghetti with Asparagus, Burrata and Ramp Pesto
Serves 2
For the ramp pesto
(here you can find alternative recipes for basil or arugula pesto)
ramps or ramson, leaves only, 1 medium bunch (around 60g / 2 ounces)
parmesan 30g / 1 ounce
olive oil 60ml / 1/4 cup
salt 1/4 teaspoon
For the pasta
green asparagus, the bottoms cut off, 1 pound
spaghetti 150-200g / 5-7 ounces
olive oil
burrata (or mozzarella di Bufala) 200g / 7 ounces
ramp pesto about 4 tablespoons
flaky sea salt
black peppercorns, crushed with a mortar
For the pesto, purée the ingredients in a blender or food processor until smooth and season with salt to taste.
Cook the asparagus in plenty of salted water for about 3 minutes or until al dente. Using a slotted ladle, transfer the asparagus to a colander (leave the water in the pot), rinse the stalks briefly with cold water, and drain. Using a sharp knife, lengthwise, quarter each stalk into 4 long pieces (including the heads).
To cook the pasta, put the pot you used for the asparagus back on the heat, bring the water to the boil (add more water if necessary), and cook the spaghetti until al dente. Drain, transfer back to the pot, and stir in a tiny splash of olive oil.
Divide the pasta and asparagus between 2 plates, folding the vegetable into the spaghetti. Break the burrata in half and place in the middle of each pasta plate. Drizzle with pesto and a few drops of olive oil (optional) and season with salt and crushed pepper to taste. Serve immediately.


Ramp and Prosciutto wrapped Monkfish with Spring Peas
I didn't have many cookbooks when I was younger, I learned all about cooking from my mother. She's my mama bird in the kitchen, I just watch and follow her. Then, in my late teens, she gave me my first cookbook, a detailed introduction to the most important basic techniques covering everything from eggs to soups, meat, seafood, and vegetables. It felt like she wanted to be sure that I wouldn't starve when I moved out. The book was published in the 80's and beautifully photographed. Quite minimal. I think, in regards to food photography, this book influenced my style of capturing food in pictures more than any other publications.
It was my only cookbook for a long time, but I collected and wrote down recipes myself whenever I got the chance to sneak a kitchen classic from a friend or my family. Even in restaurants, I was never shy to ask, if they'd share a recipe with me (the ones that really hit me). This strategy led to a bursting folder packed with notes, snippets, and sheets torn out of magazines. I still haven't cooked and baked all of the treasures collected in more than 30 years. It's a steadily growing project.
As I got into collecting cookbooks, Jamie Oliver's books were one of the first added to the shelves. First as a present from friends, but later on I bought a few myself. I liked his style of playing with food. I was in my early twenties, I had seen and tasted many German, French, and Italian traditional classics cooked to perfection, by my mother and in friend's kitchens, or at restaurants. But I felt like a younger voice. And Jamie's voice felt just right at that time. In the end, I might have only cooked about 15 of his creations in all those years, but he inspired me a lot. And at least 5 of his recipes became staples that I still embrace today.
There's one recipe that I've been wanting to try for more than 15 years. And again, I didn't use it to follow, but to play with: Jamie wraps monkfish filets in prosciutto spread with pesto. It's so simple, it looks stunning. As spring is in the air, or at least the smell of ramps as you enter the woods, I decided to wrap my firm white fish fillet in ramp leaves and prosciutto di Parma. Thanks to Jamie, the cooking time and temperature were perfect. The fillet was tender yet firm. And the wrapping was spot on: green, fresh, and slightly salty.
If you're still looking for an Easter menu, what about skipping the traditional lamb roast and go for seafood? This dish is so easy, serve it with a bowl of lemony ramp peas and baguette (for the lazy ones like me) or Mediterranean mashed potatoes (either from my book, or try this recipe). And what about an eggnog sponge cake for dessert?
Have a wonderful Easter time with your loved ones!
xx


Ramp and Prosciutto wrapped Monkfish
Serves 2
olive oil
monkfish fillet, a thick center piece, 250-300g / 9-11 ounces
fine sea salt
ground pepper
prosciutto di Parma (or San Daniele or Serrano) 10 very thin slices
fresh ramps leaves, a small bunch
peas, fresh in shells (about 400g / 15 ounces) and peeled, or frozen (170g / 6 ounces)
freshly squeezed lemon juice, 1-2 teaspoons
Preheat the oven to 200°C / 400°F (conventional setting) and brush the bottom of a baking dish with olive oil.
Cut the monkfish in half (lengthwise) and, using your hands, coat it in olive oil and season with salt and pepper.
On a large chopping board, spread out half the prosciutto (overlapping slices). Arrange a layer of ramp leaves on top (laying across the prosciutto), then lay one half of the monkfish on top (see 5th picture). Roll and wrap the fish tightly and transfer to the oiled baking dish. Prepare the second fillet the same way and lay next to the first fish wrap. Brush the prosciutto with olive oil and bake in the oven for about 15 minutes or until the fish is tender.
While the fish is baking, prepare the peas: Cut 12 ramps leaves into thin strips, set aside. Cook the peas in plenty of salted boiling water for 1 minute or until al dente. Drain and briefly rinse with cold water. In a small saucepan, heat a splash of olive over high heat, add half the chopped ramps, and take the pan off the heat. Stir in the peas and lemon juice and season with salt and pepper to taste.
When the fish is done, using a sharp kitchen knife, cut the fillets into thick slices and divide between 2 plates. Serve with the peas sprinkled with the remaining chopped ramps, crunchy baguette, and chilled white wine.


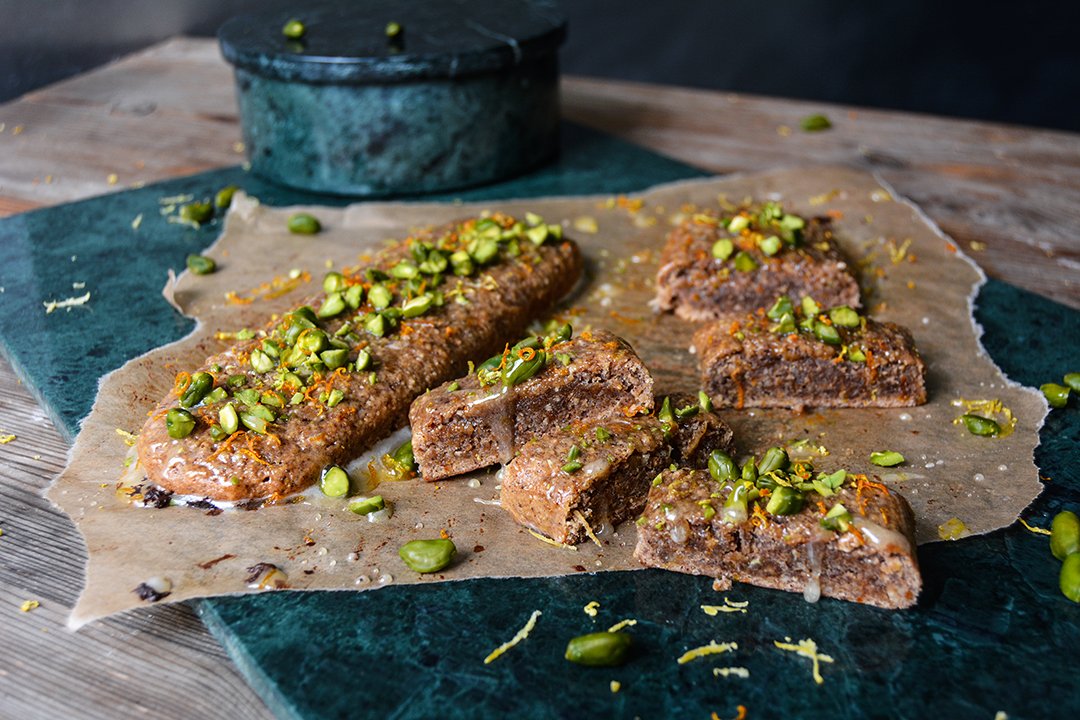
Kwareżimal - Maltese Easter Sweets without Eggs and Butter
No eggs and no butter, but lots of spice and flavour and a soft and chewy texture. Maltese Kwareżimal are an almost guilt-free pleasure that tastes so good, that I ask myself why I didn't bake them earlier.
This ancient treat dates back to the medieval times, when the Knights in the Mediterranean traditionally baked Kwareżimal during Lent. The little dark brown loaves are made without dairy products, just ground almonds (or hazelnuts in my recipe), spices, and honey create a beautifully fragrant cakey sweet. Sugar was allowed, as it was seen as a spice in those days. It's not a healthy bar after all.
The name derives from the Latin word quaresima, the 40 days of the Lenten season. Although you can find Kwareżimal in some confectionaries on the Maltese islands throughout the whole year, my favourite bakery for sweet treats, Busy Bee, only pulls them out of the oven as Easter is nearing. The problem was that I have never been to Malta around this time, so I had no idea how good Kwareżimal tastes. I knew that I wanted to try them at Busy Bee first and thanks to Jessica and Luke this day has finally come. Our friends visited us a couple weeks ago and gave me - besides many other goods - this plain looking miniature cake as a present. It only took me 12 years to have my first bite of Kwareżimal and it was pure enjoyment. I didn't share a piece with anyone.
So I finally knew what I was aiming for, I felt ready to give it a go. My Kwareżimal are made with ground hazelnuts, as my Maltese man doesn't like almonds, but feel free to use whatever nut you prefer. I mixed in some white spelt flour (plain flour woks just as well) to lighten up the texture. But don't worry, it's still as soft and chewy as it should be thanks to the juice of half an orange.
The texture is divine, almost moist, it reminds a bit of rough marzipan. And it tastes so rich, nutty, and citrusy, with strong tones of rather Christmassy spices, such as cinnamon, cloves, citrus zest, and flowery orange blossom water. I went for a crunchy pistachio topping, bedded on sticky honey running down the sites of my little Kwareżimal. You can also chop almonds or hazelnuts. When you buy this sweet from a shop, you get a single bar, not more than 12cm / 5" long, that was my measure. To serve, I cut it in thick slices - it's a bit like a cookie with a chewy feel.

Kwareżimal
Makes 2 small bars (serves 2-4)
finely ground hazelnuts (or almonds) 120g / 1 cup plus 2 tablespoons
plain flour (I used white spelt flour / type 630) 100g / 3/4 cup
granulated sugar 100g / 1/2 cup
cocoa powder 1 teaspoon
baking powder 1/8 teaspoon
fine sea salt 1/8 teaspoon
ground cinnamon 1 teaspoon
freshly grated nutmeg 1/4 teaspoon
cloves, finely ground in a mortar, 1/2 teaspoon
vanilla bean, scraped, 1/4
freshly grated orange zest 2 generous teaspoons
freshly grated lemon zest 2 generous teaspoonsf
reshly squeezed orange juice 60ml / 1/4 cup
honey 1 tablespoon
high quality orange blossom water (preferably organic) 2 tablespoons
candied orange peel, finely chopped, 1 tablespoon
For the topping
honey 2 tablespoons
freshly squeezed orange juice 1 teaspoon
shelled unsalted pistachios, roughly chopped, a small handful
freshly grated orange zest 1/2 - 1 teaspoon
Preheat the oven to 180°C / 350°F (preferably convection setting) and line a baking sheet with parchment paper.
In a large bowl, whisk together the ground hazelnuts, flour, sugar, cocoa powder, baking powder, salt, cinnamon, nutmeg, cloves, vanilla seeds, orange zest, and lemon zest.
In a small saucepan, heat the orange juice and honey over low heat and whisk until the honey has melted. Take off the heat and whisk in the orange blossom water. Let it cool for a couple minutes, then stir into the dry mixture. Add the candied orange peel and stir until well combined. The dough will be soft, but you should be able to form a bar; if it's too soft, add a little more ground hazelnuts.
Wet your hands lightly, divide the dough in half, and form 2 bars, about 5cm / 2" wide and 2cm / 3/4" tall. Mind that they aren't too flat or they will dry out in the oven. Bake for about 15 minutes, the top of the loaves should still be soft and just slightly baked.
While the Kwareżimal are baking, prepare the topping: in a small saucepan, heat the honey and orange juice over medium heat and whisk until combined. Take the pan off the heat.
Brush the warm Kwareżimal with the warm honey and sprinkle with the pistachios and a little orange zest. To serve, cut into thick slices. Wrapped in cling film, it stays fresh for days.


16 Recipes for your Easter Brunch Table

Hunting Easter eggs in the woods was one of my childhood's spring highlights. The sweet smell of blossoms and sunlight in the air, the trees' leaves presenting their most fragile green, and - in a lucky year - I could even replace boots and jacket for shirt and jeans while searching for golden wrapped chocolate eggs and bunnies. I always loved the sprouting energy that comes with the change of season, when winter's shades of grey and brown give way to vibrant colours. Easter is a changing point in the year, there's the promise of summer in the air.
Is there a better way to celebrate this day than gathering your loved ones around the table and treating them to a luscious brunch? Here's some inspiration (click the titles for the recipes) - and there will be two new Easter recipes coming up this Sunday and next Wednesday!
Happy Easter!
Tsoureki – Greek Easter Bread with Aniseed and Orange Blossom Water


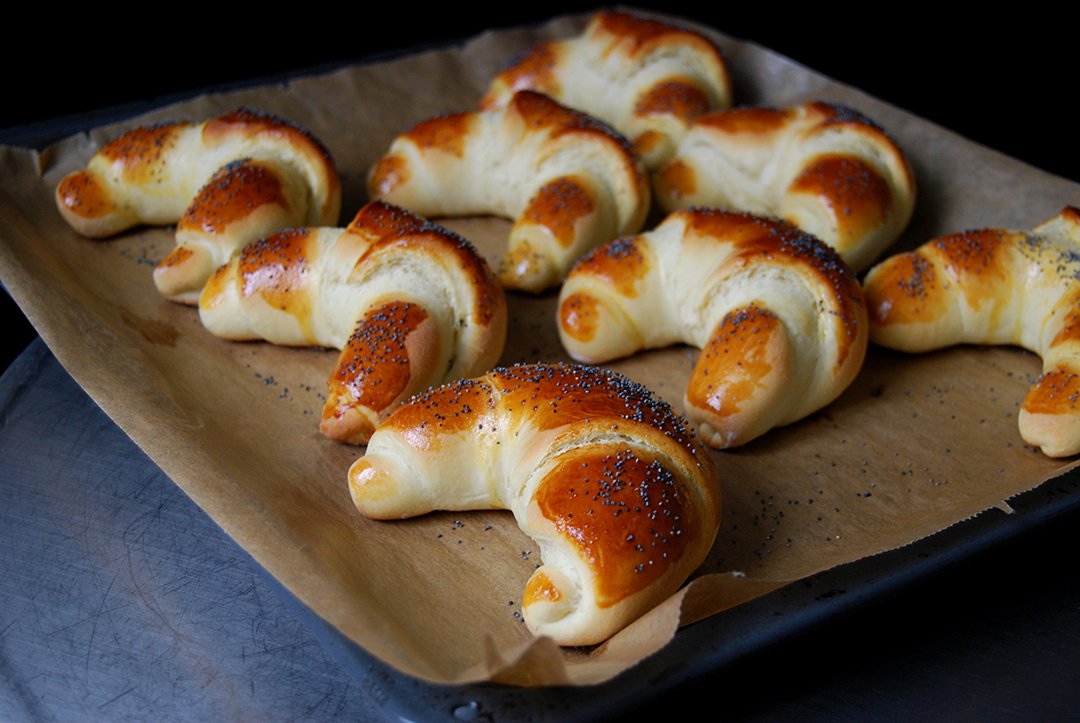


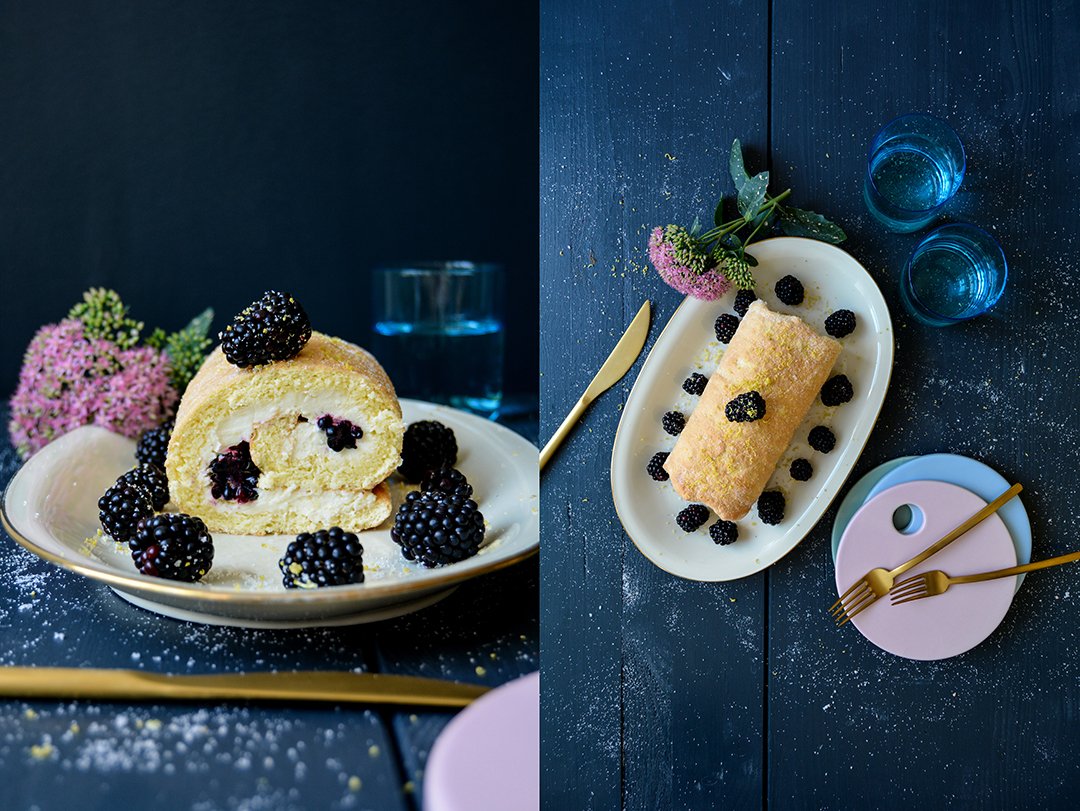


Green Asparagus with Beet and Chickpea Hummus
Pink and spring green! Today's dish celebrates this vibrant colour combination and I can't really say that I expected the result to taste that good. My green asparagus stalks found a perfect companion in a screaming pink hummus. I adjusted its colour and taste by adding a generous amount of boiled beetroots. At first I was worried that the roots' earthy tones would dominate, so I started with one root for a small can of chickpeas. But there was no need to worry. The beetroot easily found its place in the nutty dip, in fact, it's a fine sweetness that comes through the most.
Before the roots kicked in, I used my basic hummus recipe to start with. It perfectly balances out the flavours of chickpeas, rich tahini, sour lemon, and the punch of fresh garlic and ground cumin. It was a recently published cookbook that inspired my to turn my hummus pink. Joel MacCharles and Dana Harrison's book called Batch, a comprehensive collection of pantry recipes, caught my attention and made me wish I had a whole room and not just a shelf to store my jars of preserved goods. Their book covers various methods for canning, dehydrating, fermenting, cellaring, salting, smoking, and infusing. As I thumbed through the pages, I noticed that there are still a lot of preserving techniques I have to learn more about. I cook my own jams and chutneys, preserve my gherkins, lemons and other fruits and vegetables, I learned to make gravad lax from my mother (a recipe that comes to use at least once a year), but I've never made my own sauerkraut or smoked mussels.
Batch is a book that needs time and attention, a book that gives you lots of basic recipes to follow and not to experiment with. It's about learning the right techniques to be able to fill the shelves in your pantry with pride and satisfaction. However, the duo also included quite a few creations that allow you to play with your preserving results and be creative. In the beet chapter, Joel and Dana write about a pink beet hummus, which is different to mine: they don't add chickpeas, it's the pure red root that shines. Below you can find both recipes, my chickpea and beet hummus and Joel and Dana's pure beet hummus. Try both and enjoy. I just love my chickpeas. But don't forget to add green asparagus cooked al dente, it's too good. And use the leftover dip to spread on dark spelt bread.
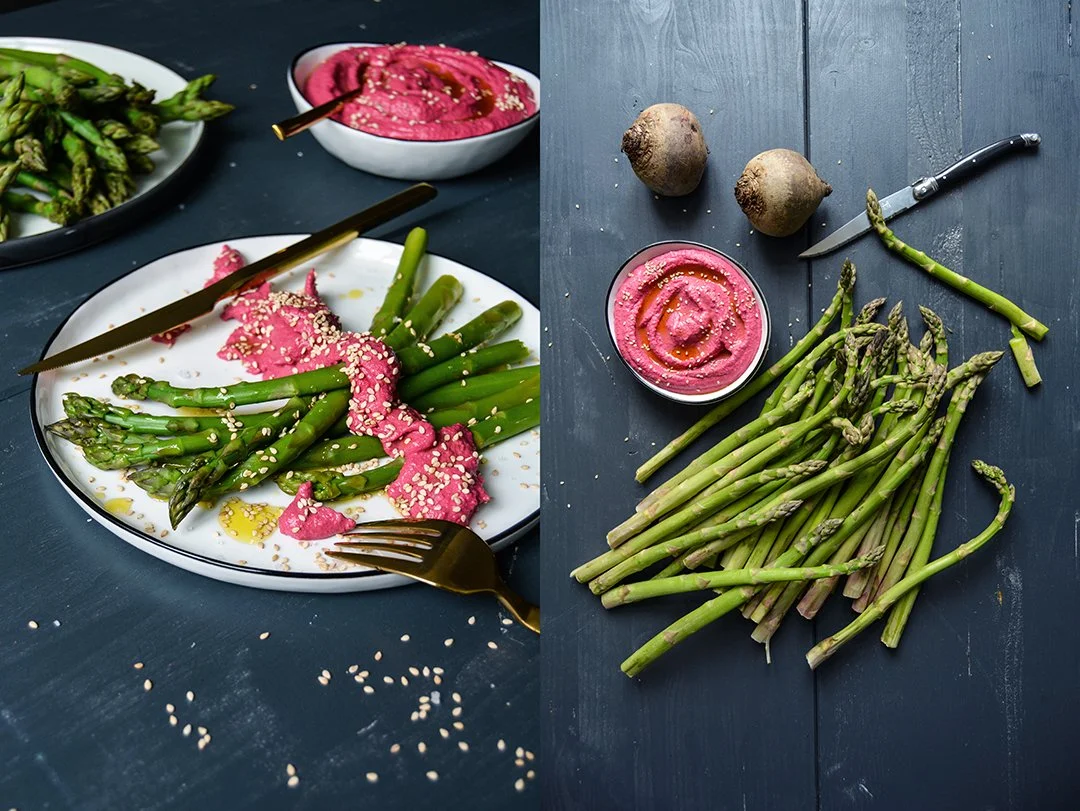

Green Asparagus with Beet and Chickpea Hummus
Serves 3-4
For the beet and chickpea hummus
medium to large beetroots, unpeeled, 2
bay leaves 2
olive oil 2 teaspoons
drained and rinsed canned chickpeas, 240g / 1 1/3 cups
tahini 150g / 5 ounces
water 120ml / 1/2 cup
freshly squeezed lemon juice 6 tablespoons
garlic, crushed, 2 large cloves
ground cumin 1/4 - 1/2 teaspoon
fine sea salt about 1 1/4 teaspoons
For the asparagus
green asparagus, rimmed, 1kg / 2 1/4 pounds
olive oil
flaky sea salt
white sesame seeds
Bring a medium pot of salted water to the boil. Add the beetroots (with their skin) and bay leaves, cover with a lid, and cook the roots over medium heat (simmering) for about 45-55 minutes or until tender. Rinse with cold water and let cool for a few minutes. Peel the roots and weigh 200g / 7 ounces, use any remaining beetroot for another recipe. Using a food processor or blender, purée the beetroots and 2 teaspoons of olive oil until smooth. Transfer to a bowl and set aside.
For the hummus, using the same food processor or blender, purée the chickpeas, tahini, water, lemon juice, garlic, cumin, and salt until smooth. Add half the puréed beetroot to the hummus and purée until well combined. Add more puréed beet until the hummus has the desired taste. I added the whole 200g / 7 ounces of beet. Add more lemon juice, salt, and cumin to taste.
Cook the asparagus in plenty of salted water for about 3 minutes or until al dente, rinse briefly with cold water, drain, and transfer to a large plate or divide between the plates. Serve warm or cold, drizzle the asparagus with a little olive oil, and sprinkle with sesame and salt. Dollop a few teaspoons of the hummus over the green stalks and enjoy!
Alternative beet hummus recipe:
Joel MacCharles and Dana Harrison's Beet Hummus
from Batch, published by appetite by Random House
Serves 2-3
garlic, peeled, 3 cloves
tahini 120ml / 1/2 cup
ground cumin 2 teaspoons
sesame oil 2 teaspoons
fresh lemon juice 2 tablespoons (add more if you wish)
canned beetroots 1l / 1 quart-jar (you can find a recipe for pressure canned beets in the book, but you can also use my recipe above to boil the beets)
beet stock (preserving / boiling liquid) 60ml / 1/4 cup
olive oil (optional)
Place the garlic in a blender and chop until fine.
Add the tahini, cumin, sesame oil, and lemon juice to the blender. Scrape the sides to make sure the garlic is incorporated and blend for 10 seconds.
Add the beets and blend until smooth. Add the beet stock, 1 tablespoon at a time, until the hummus achieves the texture you like (you may not use the whole 60ml / 1/4 cup or you may have to add more). Chill in the fridge for a few minutes before eating (optional). Serve in a bowl and a drizzle of olive oil.
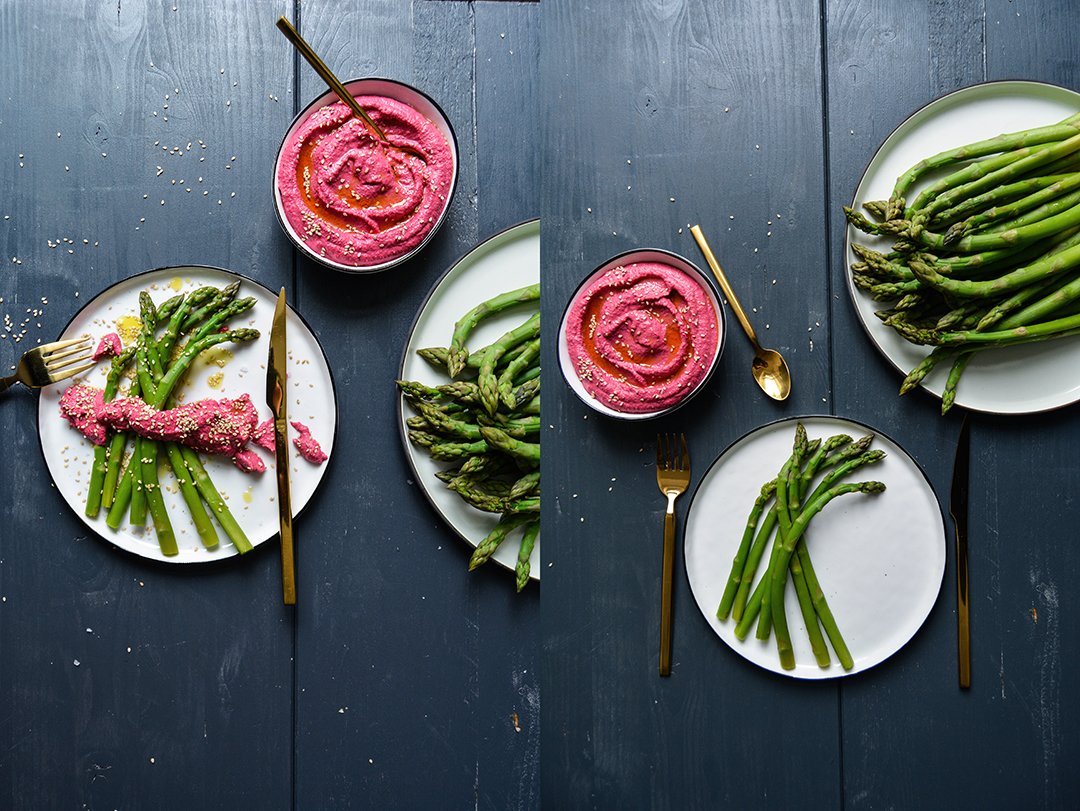


Chocolate Baby Cakes with Peanut Butter and Banana
Bittersweet chocolate and peanut butter is a divine duo that I often come back to. When juicy stone fruits and berries aren't in season yet and it's time for my beloved citrus to say goodbye, I gladly experiment with the little nuts and a bar of dark chocolate. It's one of those treats that, despite its rather filling qualities, still manages to make me grab for another piece. It's heavy, you know it, but it's too good to stop.
My little baby cakes are no exception in that respect, they make a perfect dessert after a light dinner that still leaves some space in your tummy (I wouldn't serve them after a cheese spaetzle feast). But you can also see them as a chocolaty addition to your Sunday teatime table. Keep in mind, these cakes are rich. I'm not a big fan of cocoa powder in baking, I want real chocolate in my cake batter. If you're a chocolate lover, you know what I'm talking about. There's a certain depth that you can't achieve with cocoa powder. I always use the same chocolate for my baking, it has 55% cocoa, it's well balanced - semisweet, but still smooth, and it literally melts in your mouth. I like to call it a grown up treat, bittersweet and rich.
To give the chocolate-peanut combo a new touch, I mixed the nutty butter with half a pureed ripe banana, and this lifts the whole experience onto another level. I see a great future for this trio in my kitchen! This time I went for a sweet, nutty, and rich filling wrapped in a chocolate cake that is still partly molten. Depending on your preference, you can bake the cakes even shorter to leave them a bit more liquid. I found a thin layer of hot chocolate batter laying on top of the soft peanut-banana center just right.
If you'd like to dive more into chocolate and peanut, you can also try these recipes:


Chocolate Baby Cakes with Peanut Butter and Banana
Serves 6
butter, soft, 60g / 1/4 cup
granulated sugar 65g / 1/3 cup
vanilla pod, scraped, 1/2
fine sea salt 1/8 teaspoon
organic eggs 4
plain flour 45g / 1/3 cup
bittersweet chocolate (I use 55%), melted and cooled, 280g / 10 ounces
peanut butter, creamy, 80g / 3 ounces
ripe banana 40g / 1 1/2 ounces (about 1/2 banana)
Preheat the oven to 200°C / 400°F (fan assisted oven). Butter 6 6-ounce ramekins. Cut out 6 circles of parchment paper, large enough to fit the bottom of the ramekins. Then cut out 6 strips of parchment paper, long and tall enough to fit the sides of the ramekins. Line the ramekins with the pieces of parchment paper.
In the large bowl of a stand mixer fitted with a whisk attachment, beat the butter, sugar, vanilla seeds, and salt for a few minutes until creamy. Add the eggs, one at a time, mixing well in between. Add the flour and mix for about 1 minute or until well combined; then add the melted chocolate, mixing well until smooth and well combined.
In a food processor or blender, mix the peanut butter and banana until smooth. Divide into 6 portions and roll into balls.
Divide about 2/3 of the chocolate batter between the 6 ramekins. Lay 1 peanut butter-banana ball on top of the chocolate batter in each ramekin, pushing it down a little (see 1st picture). Top with the remaining chocolate batter and even out the surface. Bake for 14-16 minutes or until the tops start to become spongy, they should still be a little soft and partly liquid. You can also bake them shorter, if you prefer the chocolate center to be more liquid. Enjoy warm or cold.


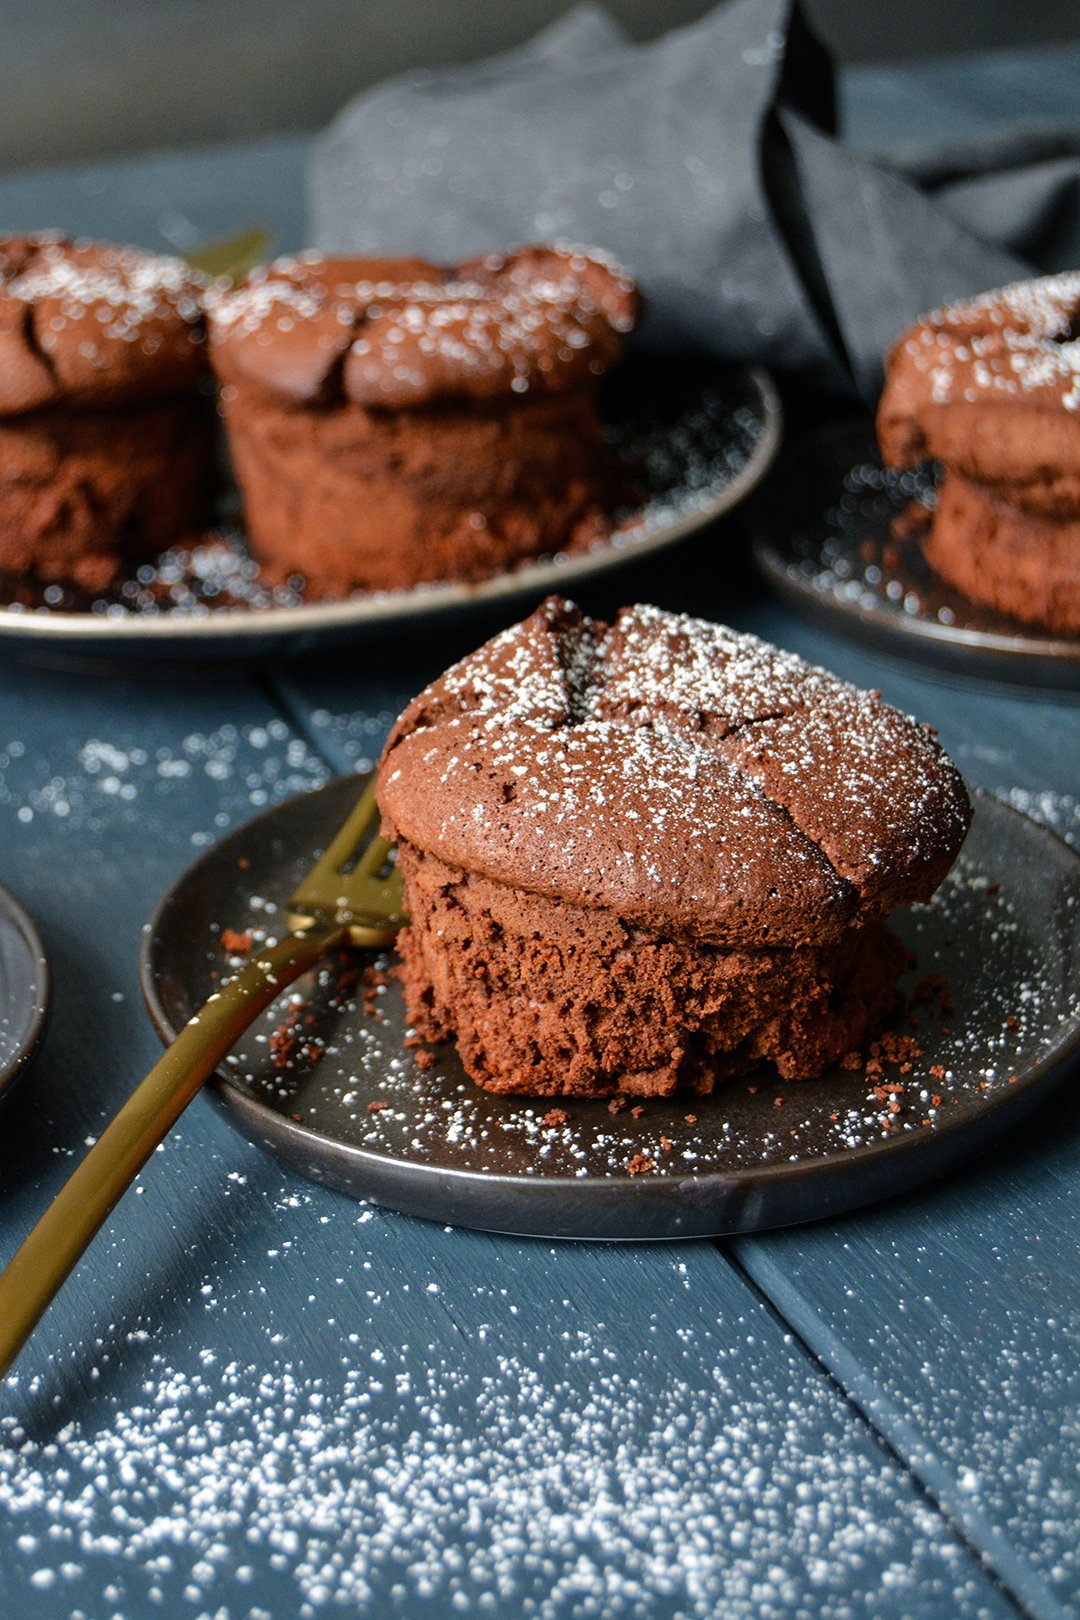

Crêpe love Part II: Green Shakshuka Crêpes and fantastic news
Sometimes life does funny things, these unexpected surprises that hit you with such impact that you can't even say a word anymore. Short circuit in the mind. A few days ago, I experienced one of these moments and I'm still recovering from this mental hangover. If I had written this post back then when it hit me, I would have shouted out the news hysterically, but I calmed down, so today, it's a civilised announcement:
The James Beard Foundation has nominated the Eat In My Kitchen book for the prestigious James Beard Award 2017 in the General Cooking category, alongside Ina Garten's Cooking for Jeffrey and Cook's Science's How to Unlock Flavor in 50 of Our Favorite Ingredients!
This is crazy, I thought I was going to faint! Thanks to my man I didn't loose it completely. So what can you do, when life does these funny things that make you speechless? You just sit there, quietly, silently, wait until it sinks in - and you book a flight to New York where the award ceremony is going to take place in April. I'll keep you posted.
Once my adventurous trip was booked and I felt my stomach again, I made crêpes. You remember that, last week, I shared my new favourite pancake passion with you: crêpe au citron. When I went to Normandy and I found that wonderful Crêperie in the village of Le Touquet, I new there would be lots of thin crêpes on my own kitchen table in the near future. After the citrusy dessert, we can move on to the main course: green shakshuka crêpes. I didn't find this particular recipe on the menu of my little French village restaurant, but another hearty treat that was also a pure pleasure. It was a galette (buckwheat crêpe) filled with ham, cheese, and a soft egg. It was the best comfort food you can think of, especially when you can smell a salty breeze in the air and you have an endless long beach right in front of you.
Personally, I prefer a normal crêpe over a galette, it works just as well in combination with a savoury filling (however, in my recipe below you find both options). First I just wanted to share the classic with you - ham and cheese - but then I saw a green shakshuka somewhere and I could already see it in my mind, wrapped in a crêpe. As the pancake filling shouldn't be too soggy, I only went for peas, spring onion, and parsley stirred in cumin-garlic oil. Arugula leaves and Gruyère cheese sprinkled over the cracked egg cooking slowly on top of the crêpe, and it was done. It's aromatic and fresh, slightly eggy with a soft hint of cumin, and the greens taste like spring. I seasoned it with another souvenir that I brought home from France: peppery Piment d'Espelette (Gorria chilli pepper powder).
We enjoyed this green beauty for lunch and dinner, but I can also see it on a Sunday breakfast table!

Green Shakshuka Crêpes
If you prefer to make galettes (buckwheat crêpes), replace half the plain flour with buckwheat flour.
Makes about 4 large crêpes
For the crêpes
plain flour, sifted, 130g / 1 cup
granulated sugar 1/2 tablespoon
fine sea salt 1/8 teaspoon
organic eggs 2milk 250ml / 1 cup and 1 tablespoon
butter, to cook the crêpes
For the filling
olive oil 2 tablespoons
large garlic clove, cut in half, 1
ground cumin 1/4 teaspoon
fresh or frozen green peas, blanched for 1/2 minute, rinsed, and drained, 200g / 7 ounces
spring onions, thinly sliced, 2
fresh flat-leaf parsley leaves, roughly chopped, a small handful
fine sea saltground pepper
organic eggs 4
aromatic hard cheese (like Gruyère), finely grated 80g / 3 ounces
arugula (rucola), a small handful
Piment d'Espelette (optional)
For the crêpes, in a large bowl of a stand mixer fitted with a whisk, mix the flour, sugar, salt, eggs, and milk until smooth; let the batter sit for about 10 minutes (at room temperature) to 1 hour (in the fridge).
For the filling, in a medium saucepan, heat the olive oil, garlic, and cumin over high heat and cook until it starts sizzling. Take the pan off the heat immediately and stir in the peas, 3/4 of the spring onions, and the parsley. Season with salt, pepper, and additional cumin to taste and set aside.
In a large, heavy or non-stick pan, melt half a teaspoon of butter on medium-high heat. Pour in a large ladle of the batter, holding the pan in your hand and turning it so that the batter spreads evenly and thinly. Cook the crêpe for 30-60 seconds or until golden, flip around, and take the pan off the heat. Turn the heat down to medium-low. Carefully crack an egg in the middle of the crêpe, gently swirl the egg white a little so that it spreads a bit, don't break the egg yolk. Spread 1/4 of the cheese and 1/4 of the shakshuka filling, and 1/4 of the arugula around the egg yolk (see 1st picture) and fold up 4 sides of the crêpe so that your end up with a square shape. Leave the egg yolk uncovered. Put the pan back on the heat and let the egg white set, the yolk should stay runny. If the bottom of the crêpe gets too dark, turn down the heat. Sprinkle with 1/4 of the remaining spring onions and season with Piment d'Espelette or ground pepper to taste; serve immediately.
Continue cooking and filling 3 more crêpes, you should always melt 1/2 -1 teaspoon of butter in the pan before you cook the next crêpe. You can use any remaining batter (made of plain flour) to make crêpe au citron.
Bon appétit!


Crêpes au Citron
Rough seas, endless beaches, and food that kept me happy from morning till midnight. I went to France and it was a feast.
I got spoiled with a spontaneous trip to Normandy together with my mother, to the picturesque seaside village of Le Touquet. Five nights, five days and luckily, I didn't have much time to make plans beforehand - or to build up expectations. This kept me relaxed and the activities very basic: I went from my bed to the opulent breakfast table, then straight to the beach for long walks, a quick snack on the 'high street' before teatime or an aperitif at our hotel's beautiful old-fashioned bar; at 7pm I was dressed pretty and ready for the French way of dining - luscious feasting that makes you forget about everything around you and lets you sleep like a baby. Those were my days in Normandy.
We couldn't have organized our arrival at the majestic Le Westminster any better. We were hungry and stepped out of the car just in time for lunch. The hotel's bistro offered a French classic, Steak Tartare, and a fantastic dish of potatoes, cut thinly and cooked like risotto, with smoked eel and truffles. A glass of Sancerre and our French immediately came out more fluently. It was the beginning of a culinary trip that couldn't have satisfied my taste buds any better: the freshest oysters, lobster, large rock crab, prawns, and sea snails, Breton Cotriade (fish soup with potatoes) topped with half a lobster (preferable enjoyed at Perard on Rue de Metz), Moules Frites, oeufs a la neige (floating island), and wonderful salads, all very simple combinations with only a few ingredients, but the results were superb.
During our first walk through the village I spotted a fantastic pâtisserie. My instinct is very reliable when it comes to sweets, I can 'smell' where I can find the best éclair au café, croissants, little tartes Tropéziennes, brioche and baguette. The bakery's staff saw me daily. The farmers' market on Saturday is a weekly celebration in the village, fruits and vegetables, salamis and patés, the most fragrant (and pungent) cheeses, the fishermen's catch from the night, honey and jam, all laid out in front of us. We were like kids in a candy store and bought bags full of delicacies, which we then stored in the car for a couple days to take back home with us. It was quite cold outside so it didn't harm the food. However, the cheese infused the car with such a distinct aroma that I'm sure we'll enjoy it for months.
As much as I love a glass of Champagne and a plate full of Atlantic oysters sprinkled with mignonette (chopped shallots in vinegar), the simple pleasures are sometimes the best in life. Le Touquet has an excellent Crêperie, Aux Mignardises Saint Jean, where you can watch the masters of crêpe cook such delicious creations as crêpe au caramel or au citron (both tested and approved). The simple yet so genius addition of a good squeeze of lemon juice really hit me. It was totally new to me, how could I have missed it? You just have to cook a thin crêpe, sprinkle it with a little sugar, and drizzle it with the sour juices of the citrus fruit. First I started with a few drops, but then I learned that you should be generous, the more lemon, the better! Back home, I already made it twice and here's the recipe for you. If you feel like a quick, but scrumptious breakfast or lunch, or if you'd like to impress your guests at your next dinner party, flip some crêpes in the pan and buy a bunch of lemons.
Another treat, a savoury buckwheat galette, was just as good and included ham, cheese, and an egg. It was actually so good that I might also share this recipe with you in the near future.
And if you're not into citrus, try one of these recipes:


Crêpes au Citron
Makes about 15-20 crêpes
plain flour, sifted, 260g / 2 cups
granulated sugar 50g / 1/4 cup, plus more to sprinkle the crêpes
fine sea salt 1/8 teaspoon
organic eggs 4
milk 1/2l / 2 cups and 2 tablespoons
butter, to cook the crêpes
fresh lemons, cut in half, about 2-3
fresh mint leaves, a small handful (optional)
In a large bowl of a stand mixer fitted with a whisk, mix the flour, sugar, salt, eggs, and milk until smooth; let the batter sit for about 10 minutes (at room temperature) to 1 hour (in the fridge).
In a large, heavy or non-stick pan, melt half a teaspoon of butter on medium-high heat. Pour in a ladle of the dough, holding the pan in your hand and turning it so that the dough spreads evenly and very thinly. The crêpes won’t need more than 30-60 seconds on each side once the heat is set right. When the crêpe is slightly golden on both sides, sprinkle with a little (!) sugar, fold twice so that it forms a triangle, and transfer to a large plate. Cover with a large plate or lid. Continue with the remaining batter until you have about 15-20 crêpes. You should always melt 1/2 -1 teaspoon of butter in the pan before you cook the next crêpe.
Serve the crêpes warm, sprinkled with additional sugar to taste, drizzled with freshly squeezed lemon juice (to taste), and decorate with a few mint leaves. Bon appétit!